CONTENT SUMMARY:
- Resurgence Rebirthed: Welcome back to Rebirth Island! What surprises are in store?
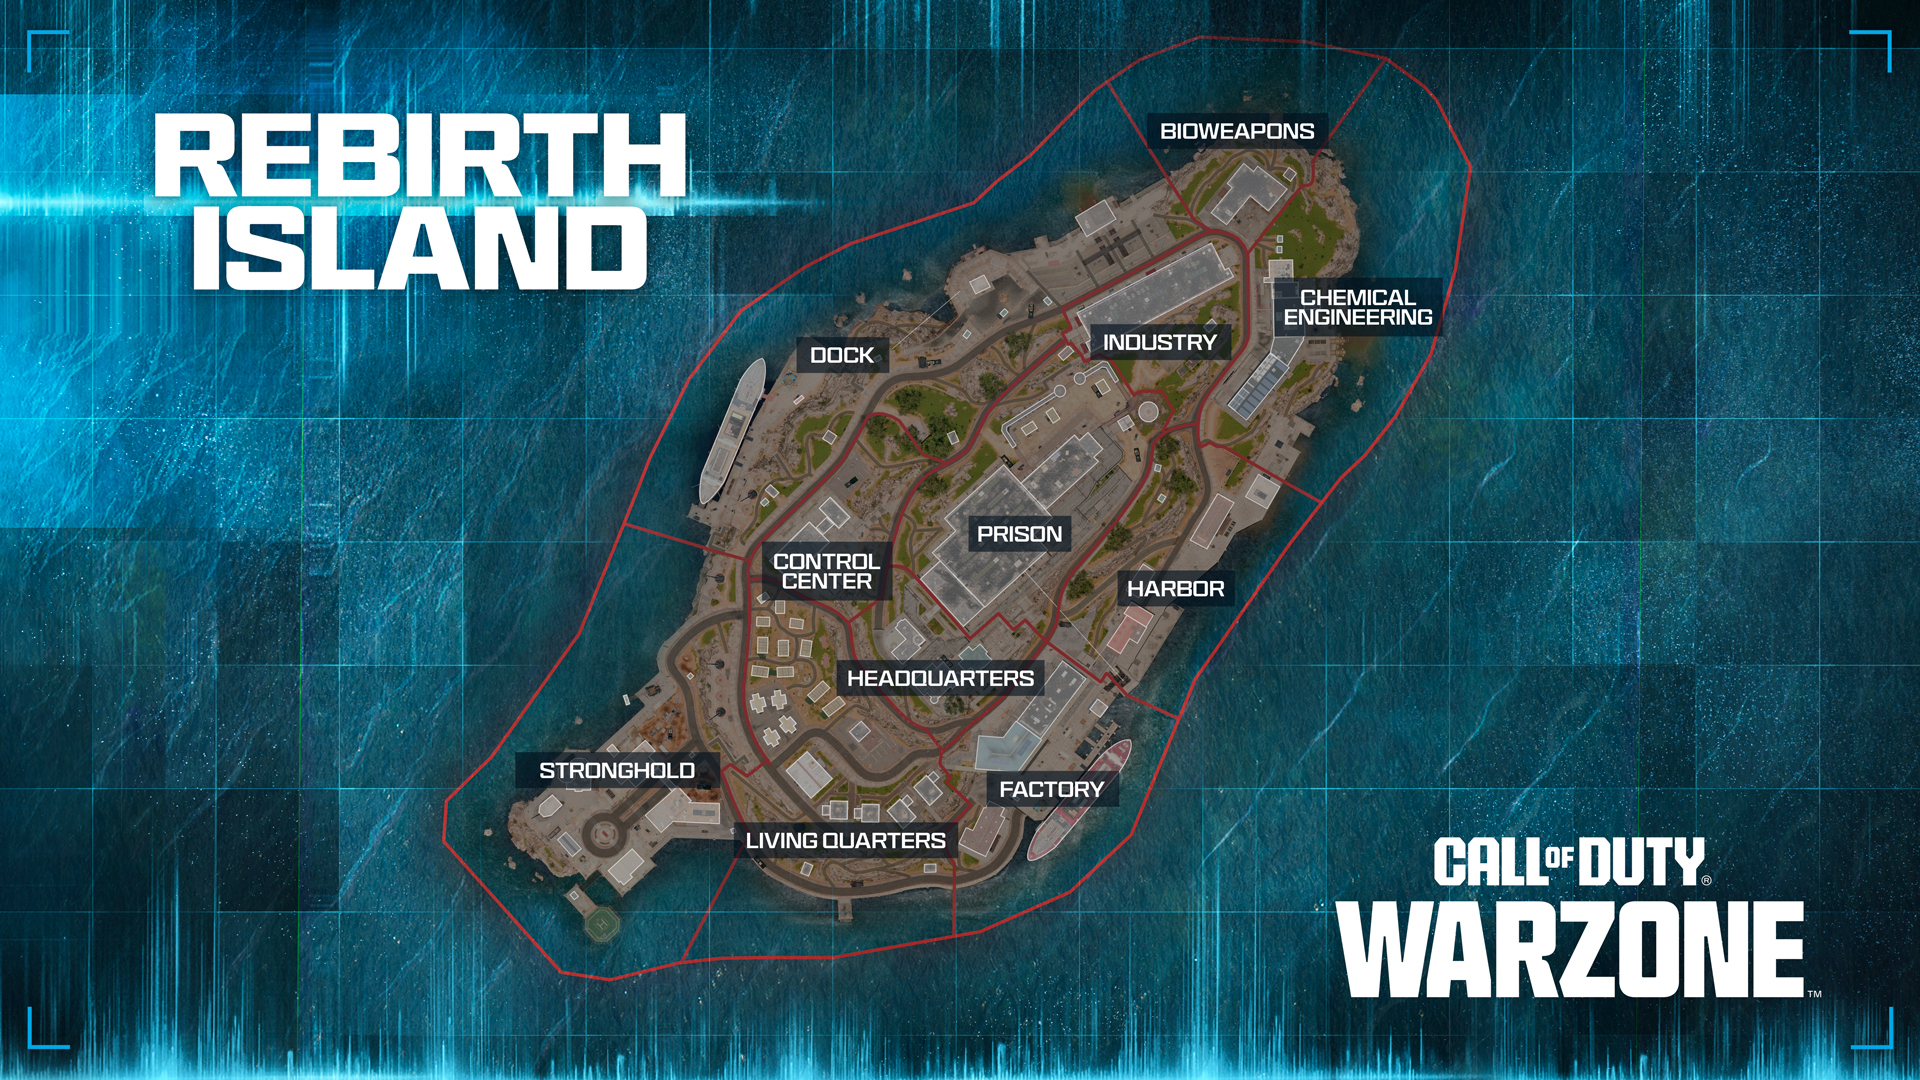
- Welcome Back to Rebirth Island: A thorough inspection of the 11 major Points of Interest throughout Rebirth Island is underway. Is the map just how you remember it? Read on to find out.
- New Modes and Gameplay Features: Resurgence modes and variants. Biometric Scanners. Smart Displays. Weapon Trade Stations. A new Resurgence Champion’s Quest in Rebirth Island. Variable time of day conditions that change the atmospheric mood but not the visibility of the action. Infil Strikes where the Water Tower, Lighthouse, and even the Prison roof is destroyed as your infil begins. And a host of secrets to discover. Optimized combat for Rebirth Island arrives in Season 3.
- Call of Duty: Warzone Ranked Play — Resurgence on Rebirth: Ranked Play continues with a new map to master. Use the same Resurgence rules and innovations, claim the stack of impressive rewards for your grind, and drop into Rebirth Island throughout the new season.
Happy Rebirth Day: Welcome Back to Rebirth Island (Launch)
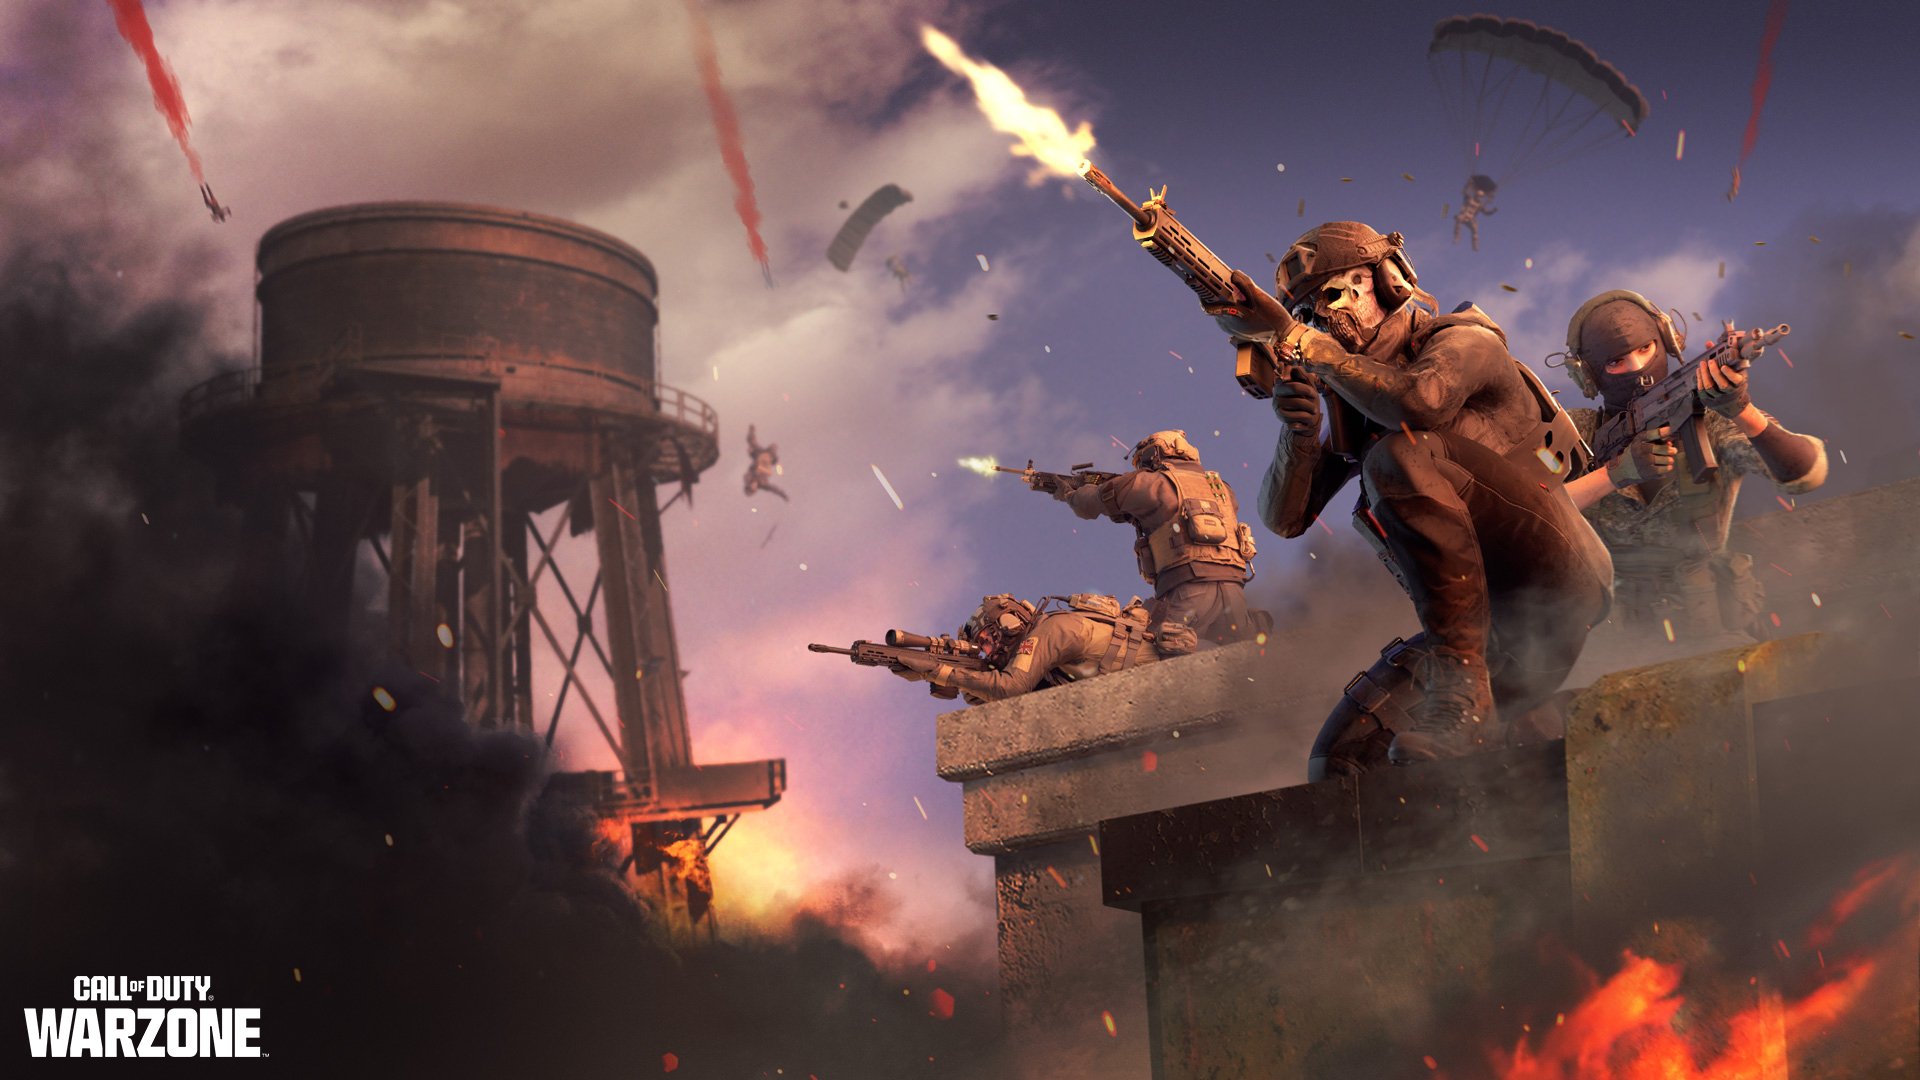
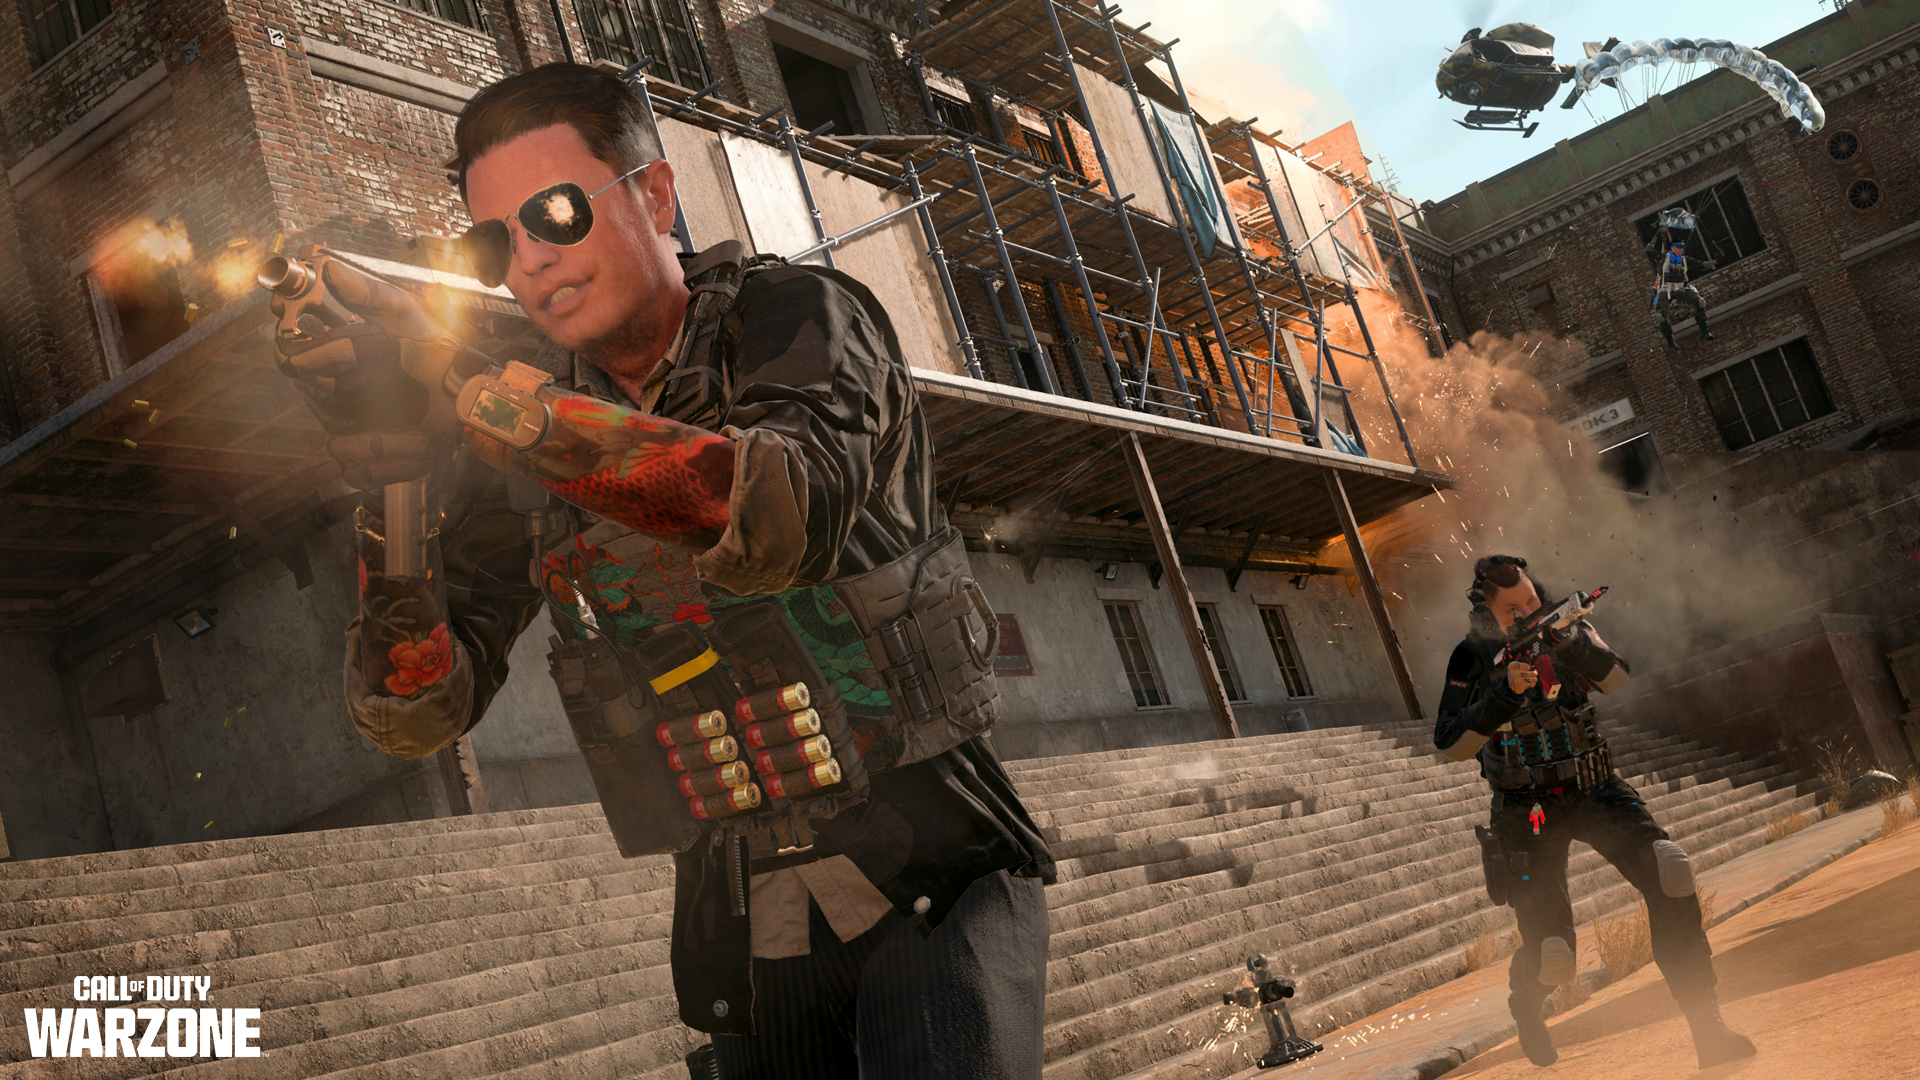
Rebirth Island returns at the launch of Season 3! The island feels familiar; veteran players will find all the Points of Interest recognizable. The structures of the island remain intact, and though some POIs have become more weathered, the island’s latest occupying force — Konni Group — hasn’t ignored the structures that are important to its machinations, retrofitting and modernizing them both outside and in. While a small power plant known as Building No 06 is the only new structure on the map, expect more than a few surprises as you return to Rebirth Island!
Developed by Beenox, the return of Rebirth Island represents your new destination for Resurgence Matches, as well as your home for Season 3 Call of Duty: Warzone Ranked Play: Resurgence developed by Treyarch and Raven Software.
Return to Rebirth: Points of Interest Intel
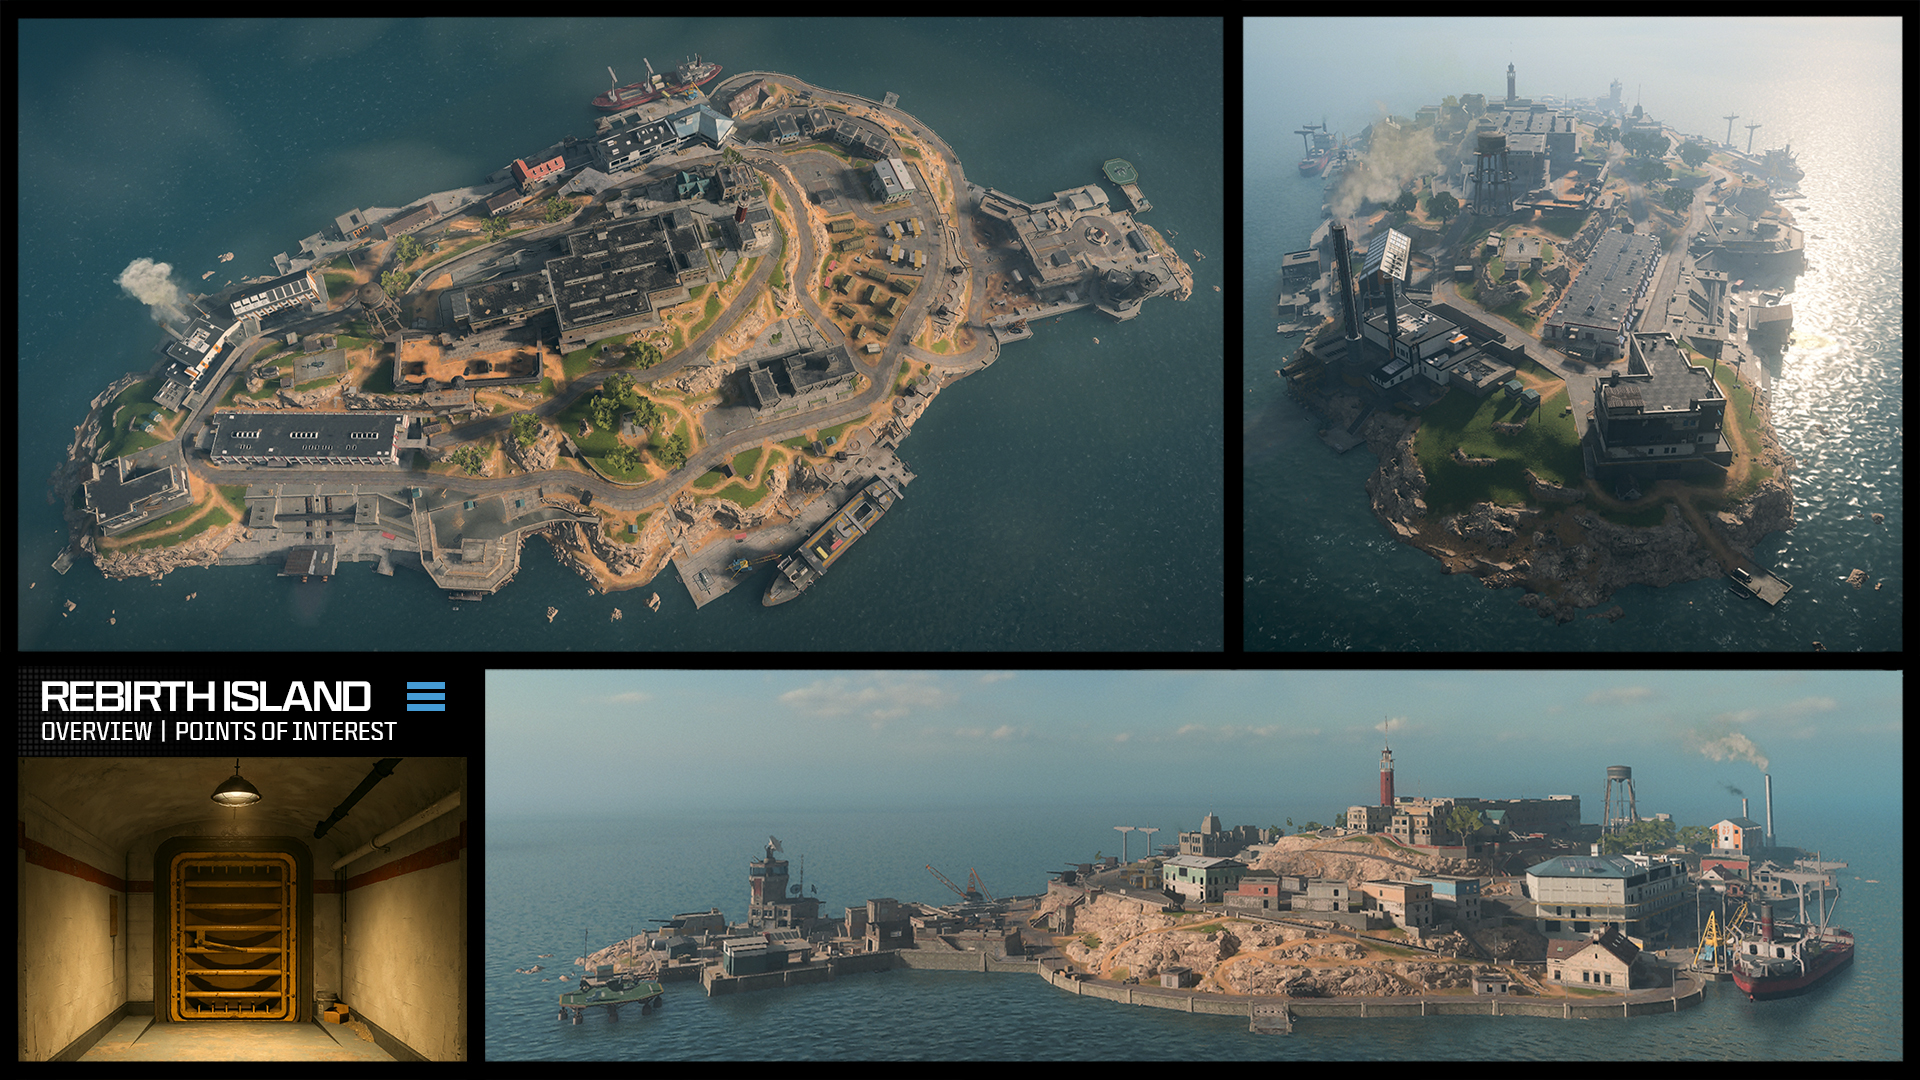
Swimming and water combat. Submerged and new shoreline access points. Biometric Scanners. Smart Displays. Weapon Trade Stations. A new Resurgence Champion’s Quest. Variable Time of Day that changes the atmospheric mood but not the visibility of the action. Infil Strikes where the Water Tower, Lighthouse, and even the Prison roof are destroyed as your infil begins. We’ll detail all of this later in the blog, but for the moment, let’s reacquaint ourselves with the 11 major POIs across Rebirth Island:
Bioweapons
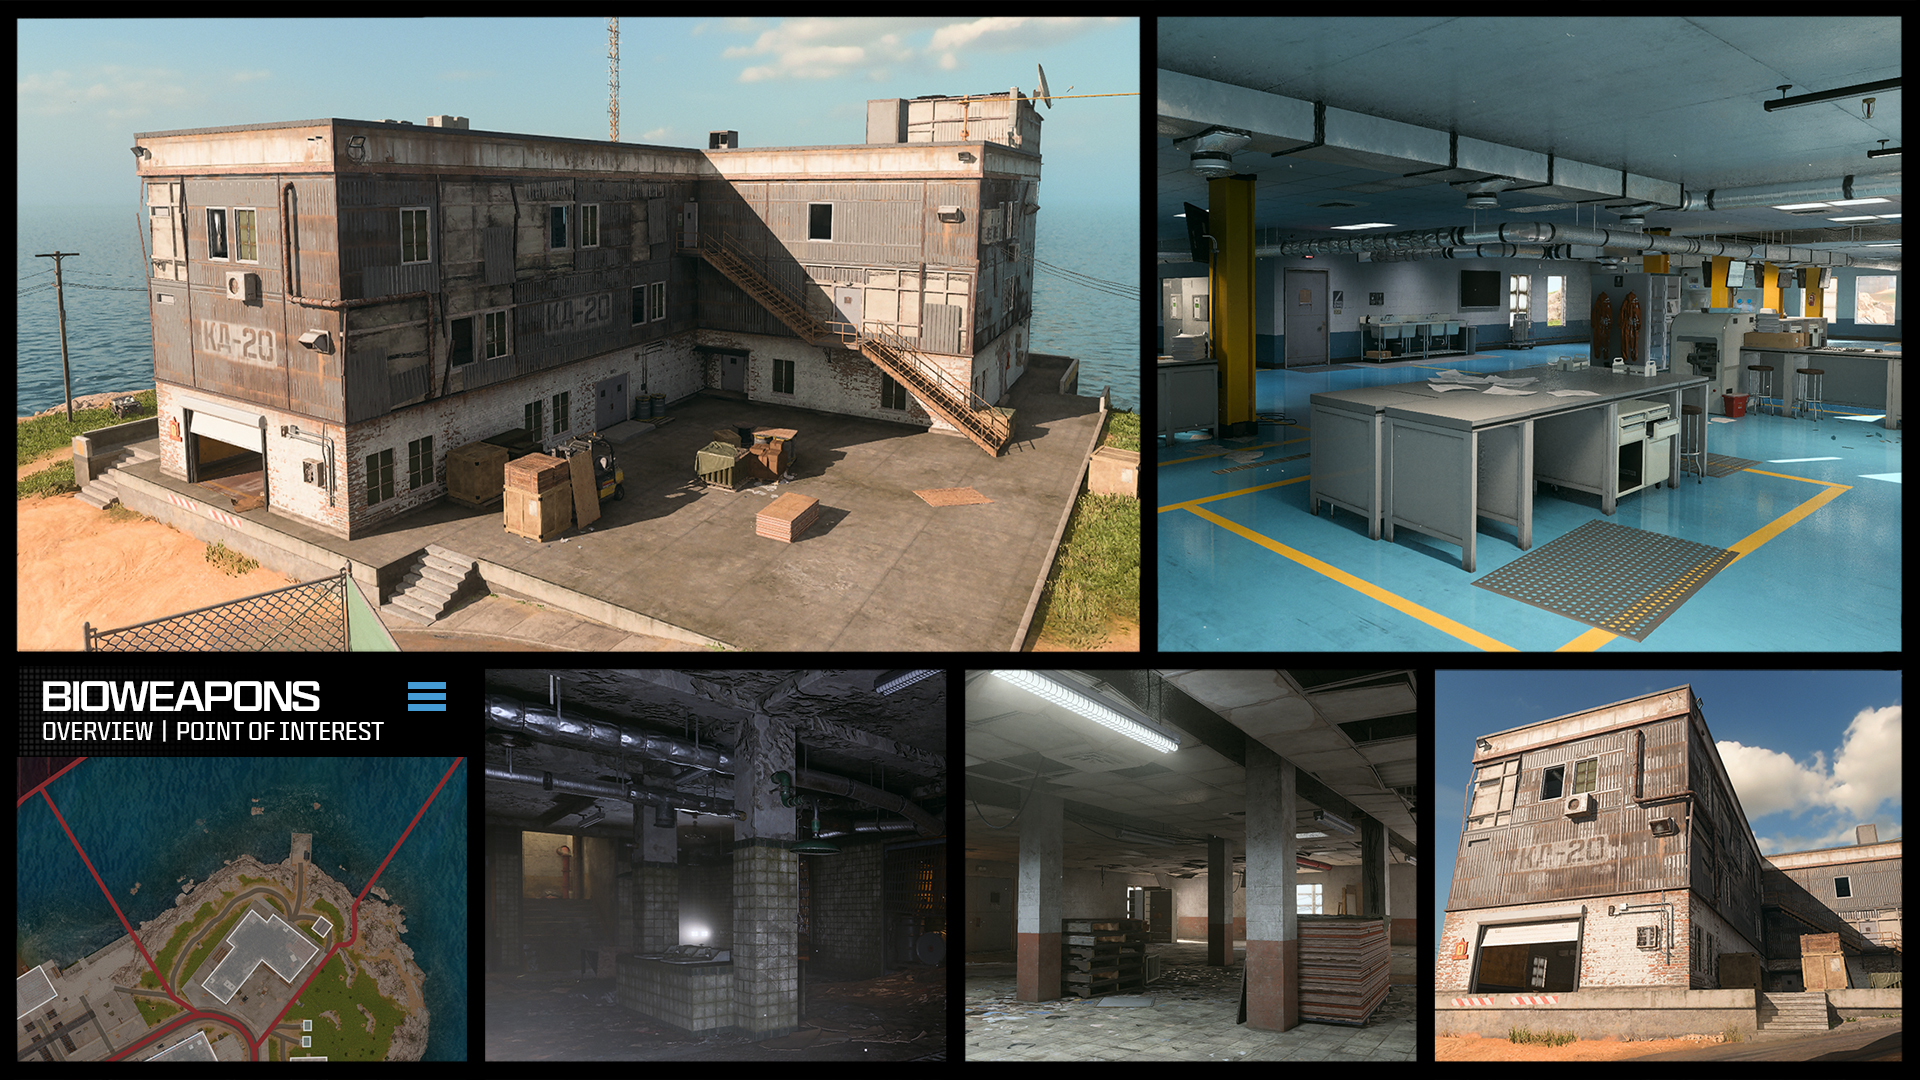
One of the bona fide hot drops, this three-floor brick and steel building is easily spotted on its coastal corner along the northern edge of the island. While much of the structure has been left to rust and decay over the decades, the Konni Group has modernized the third-floor laboratory. The same cannot be said for the basement showers and the remains of an office floor within the building. A great place to make a stand, the roof is accessible by parachute and by interior and exterior stairs. For a quick escape, take the zipline over to Chemical Engineering.
Industry
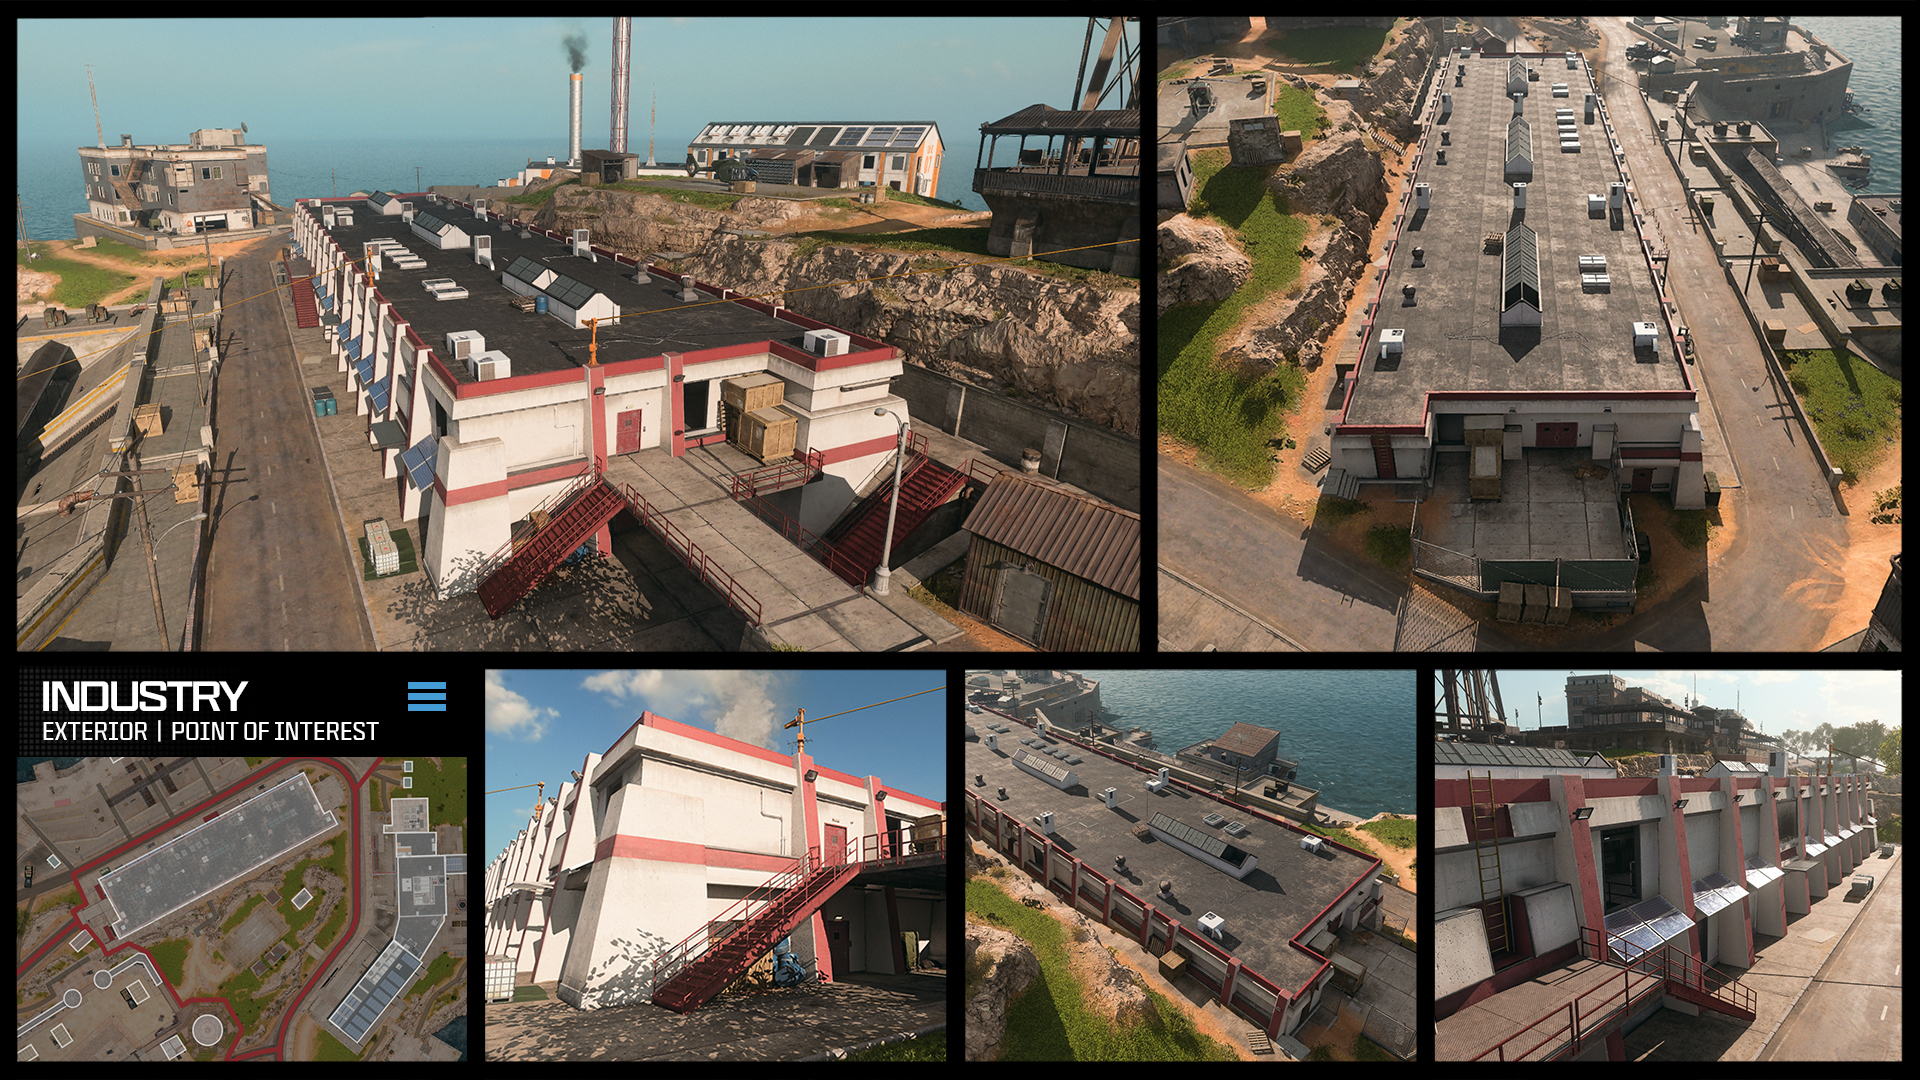
Overview and Exterior: This low-lying structure nestled below the helipad plateau has received more than a new coat of red and white paint. But the flanking alley between the two areas is still a good place to take cover, and there are plenty of doors and windows allowing you access into the main, two-floor interior. Head southeast to the bridge connecting to the road close to the Prison.
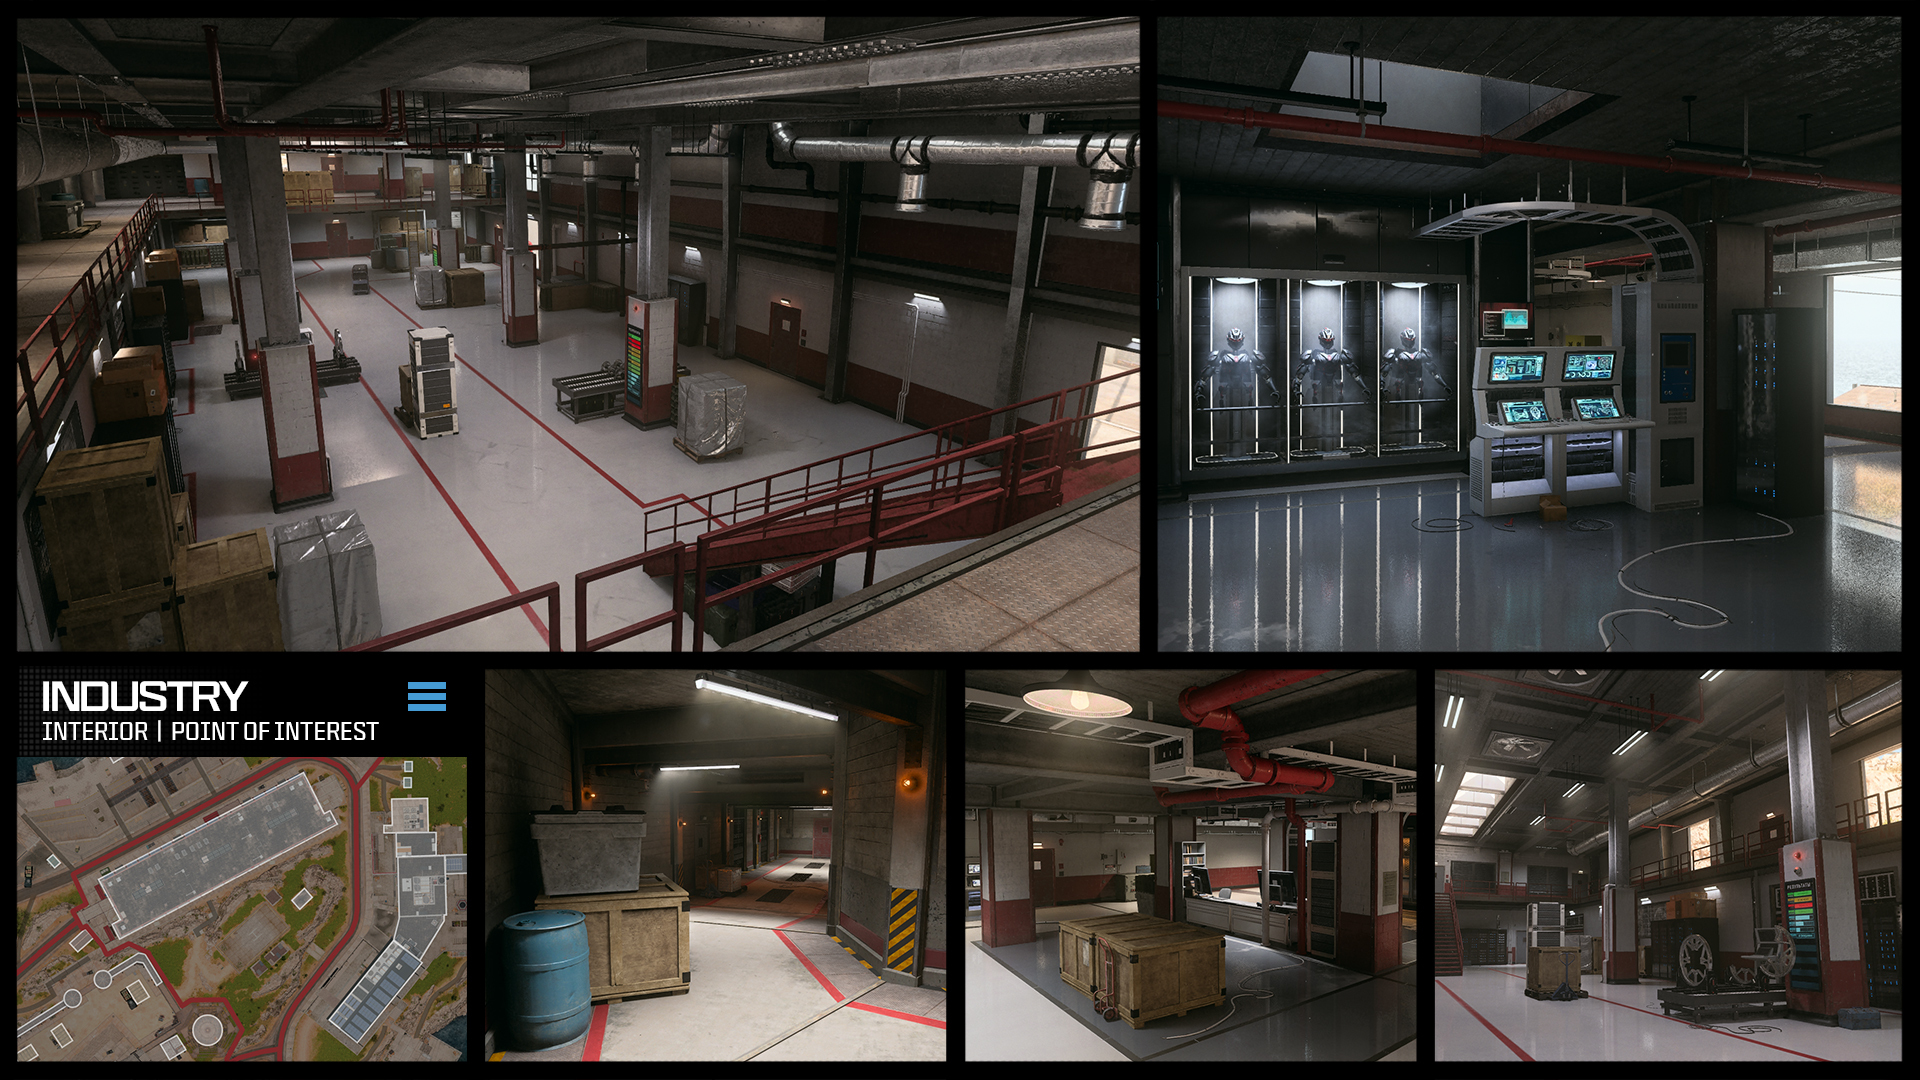
Interior: The interior of this giant storage structure has been cleaned up considerably and features enhanced visibility when checking the dark corners and crate stacks within. Don’t miss the side room, accessible from both floors, that leads to a tunnel cutting under the helipad to the front of Chemical Engineering.
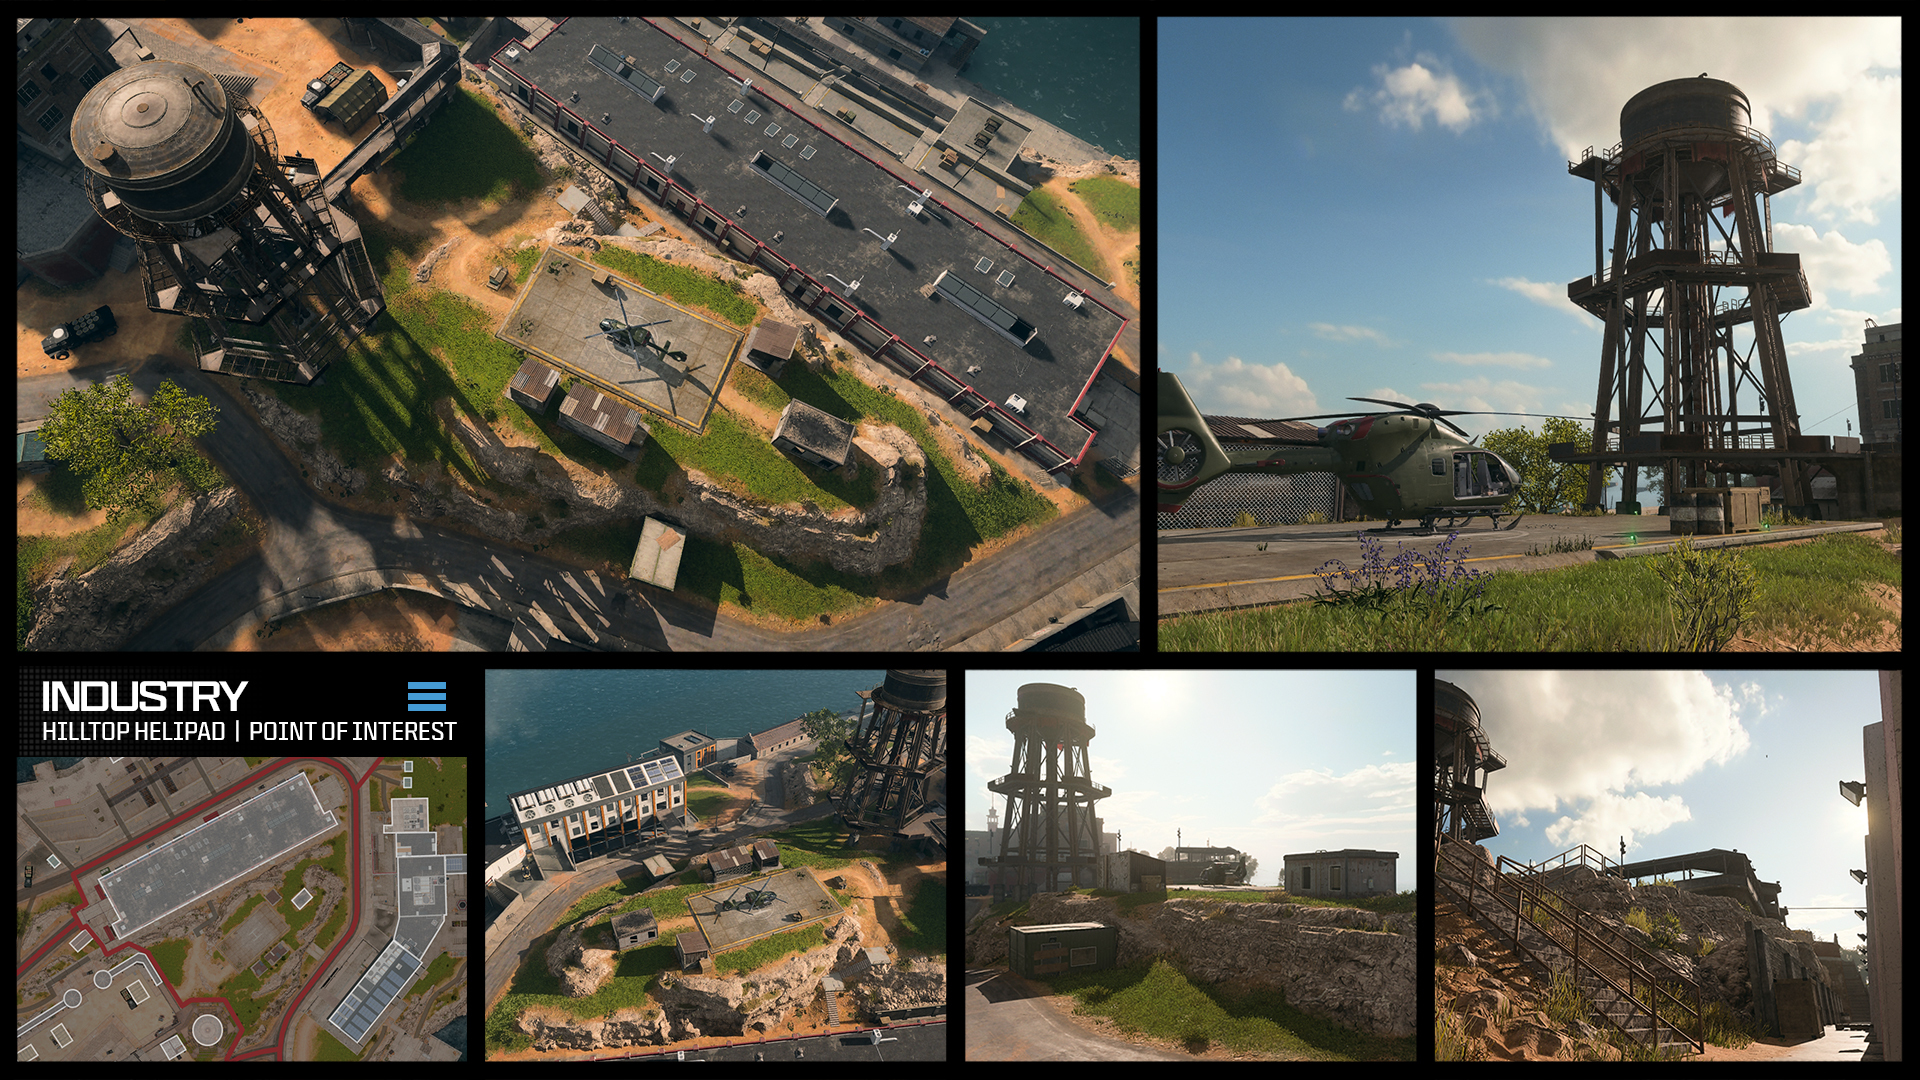
Hilltop and Helipad: Adjacent to the long Industry building is a raised plateau, featuring a helipad and several sheds, one of them accessible with several windows providing views over the Industry rooftop. If you’re not spotted on this exposed grassy knoll, this makes a good pivot point along the road. It is adjacent to the Water Tower, a major Prison landmark.
Chemical Engineering
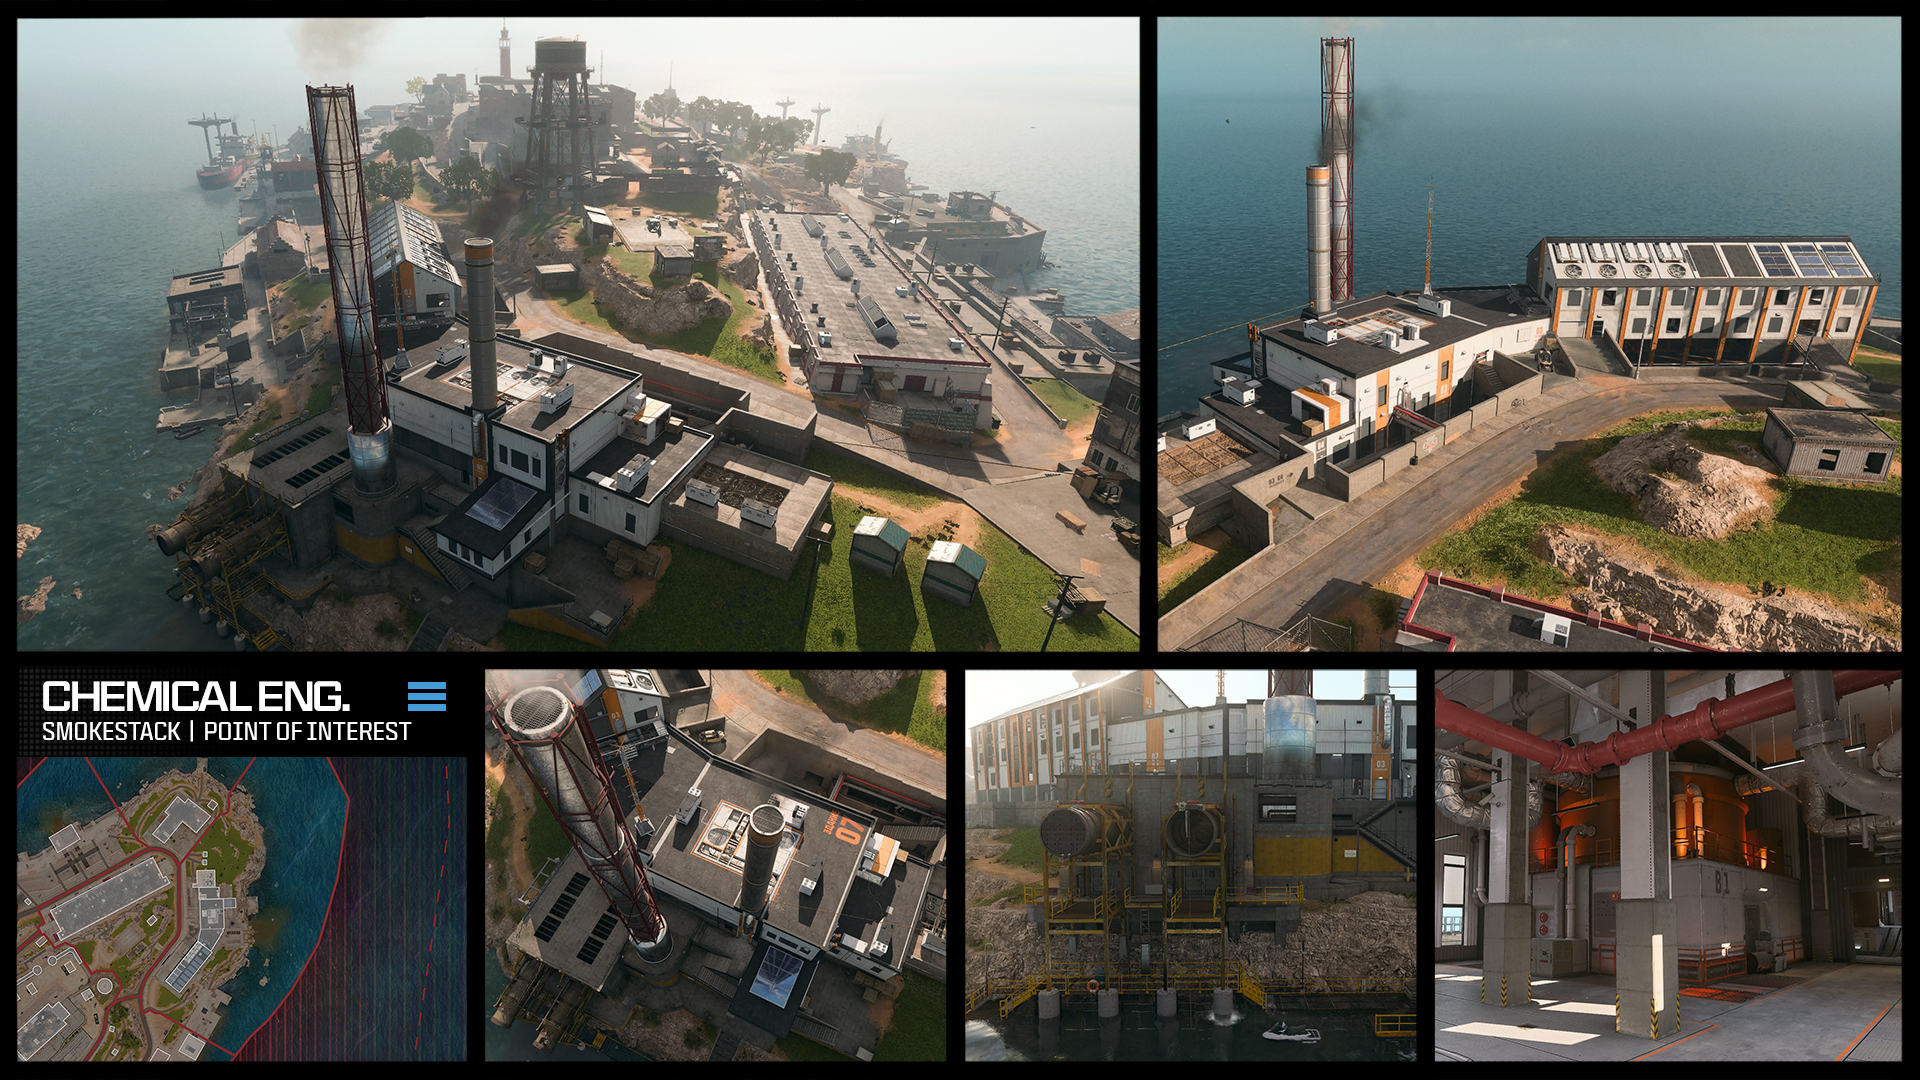
Smokestack and Factory: One of the few POIs to receive a complete retrofit, this area is painted in orange and white and is easily identified by the smokestacks rising from its roof. From the roadside or rocky shoreline, there are numerous entry points, and the low exterior ground level below the road offers a tunnel to Industry as well as protection. Investigate the zipline and ascenders before you enter the main, L-shaped factory floor featuring chemical tanks and control systems, as well as smaller rooms and links to the adjacent building.
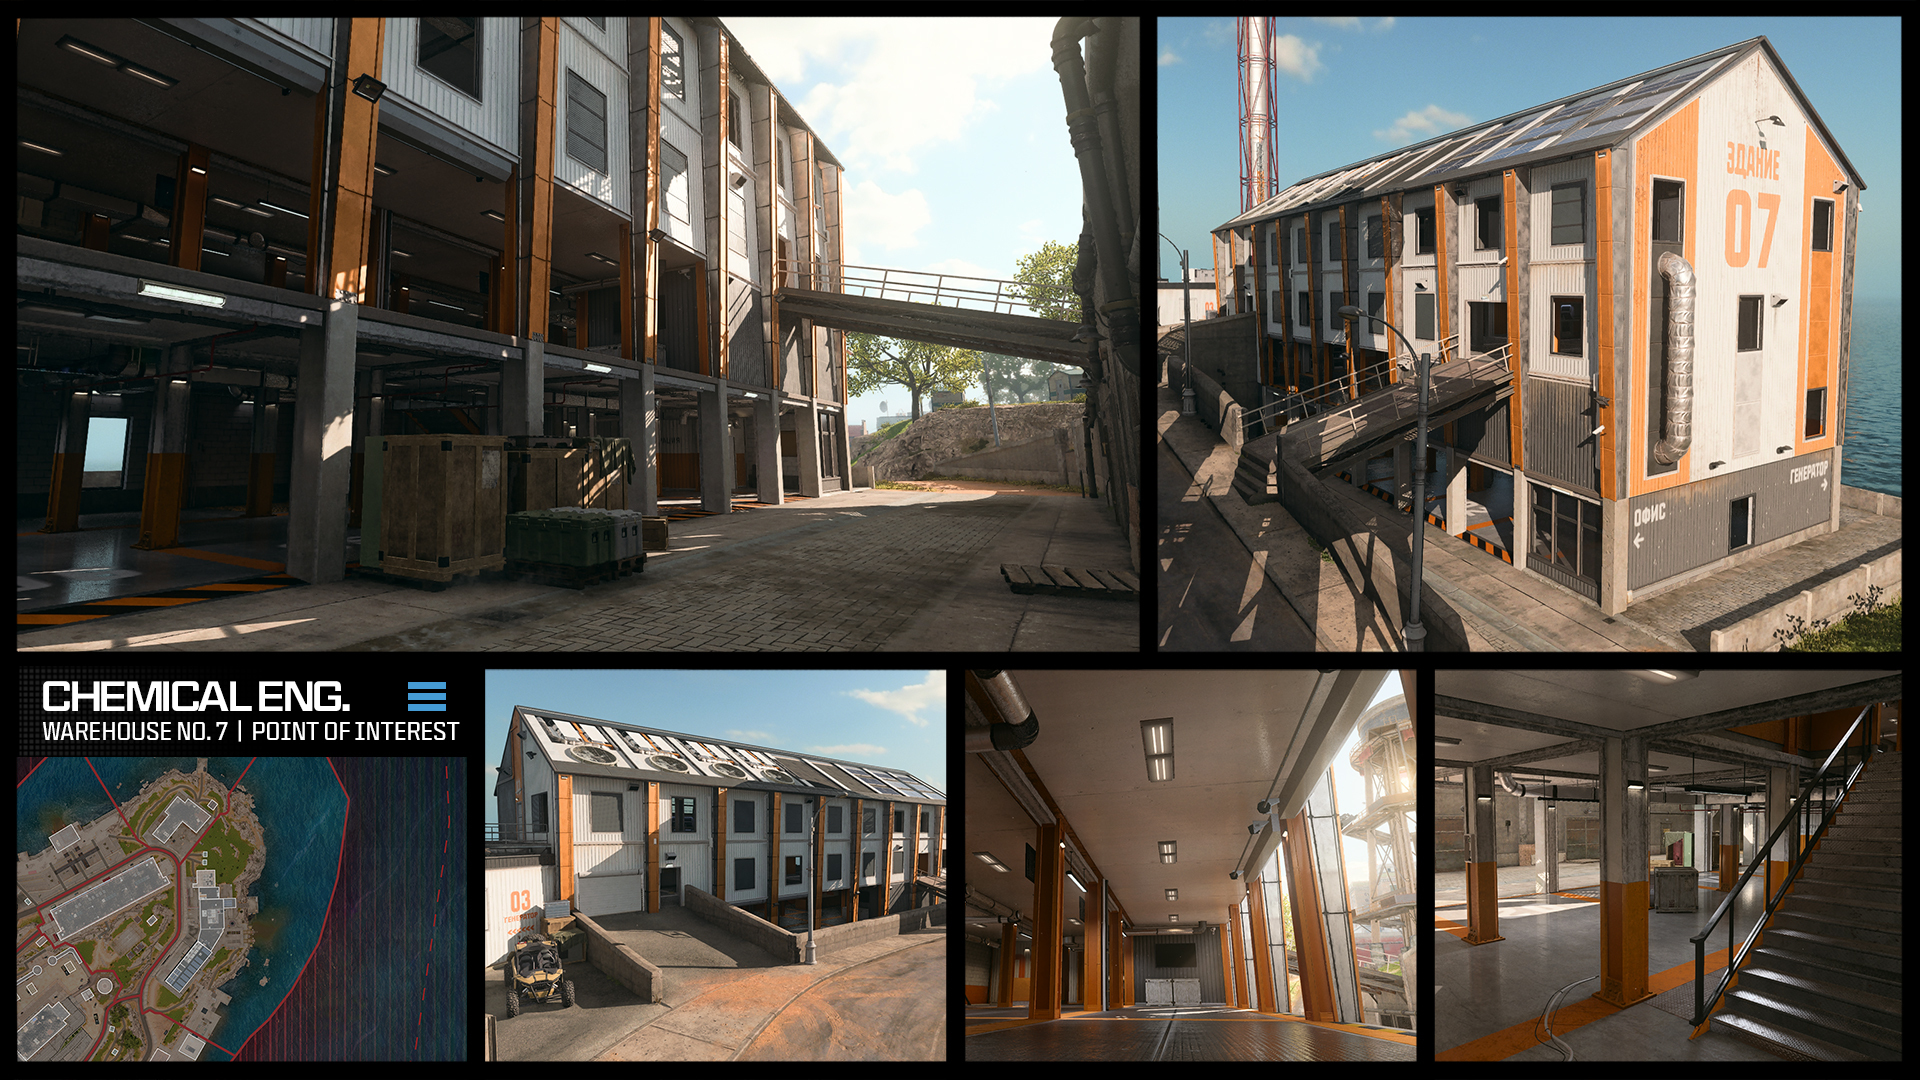
Building No. 7: Though both structures are numbered “07,” the pitched roof and visible sign of the storage and security building is a major draw for players looking to stock up on supplies and engage in combat across multiple floors. The upper levels are accessible by roadside ramps or a lower unloading area that is fully open to the elements, as well as a wraparound walkway along the shoreline. The upper floors, which include server rooms and security offices, also provide a ladder to the sloped roof, as well as views across Harbor, the hilltop, Industry, and Bioweapons.
Dock
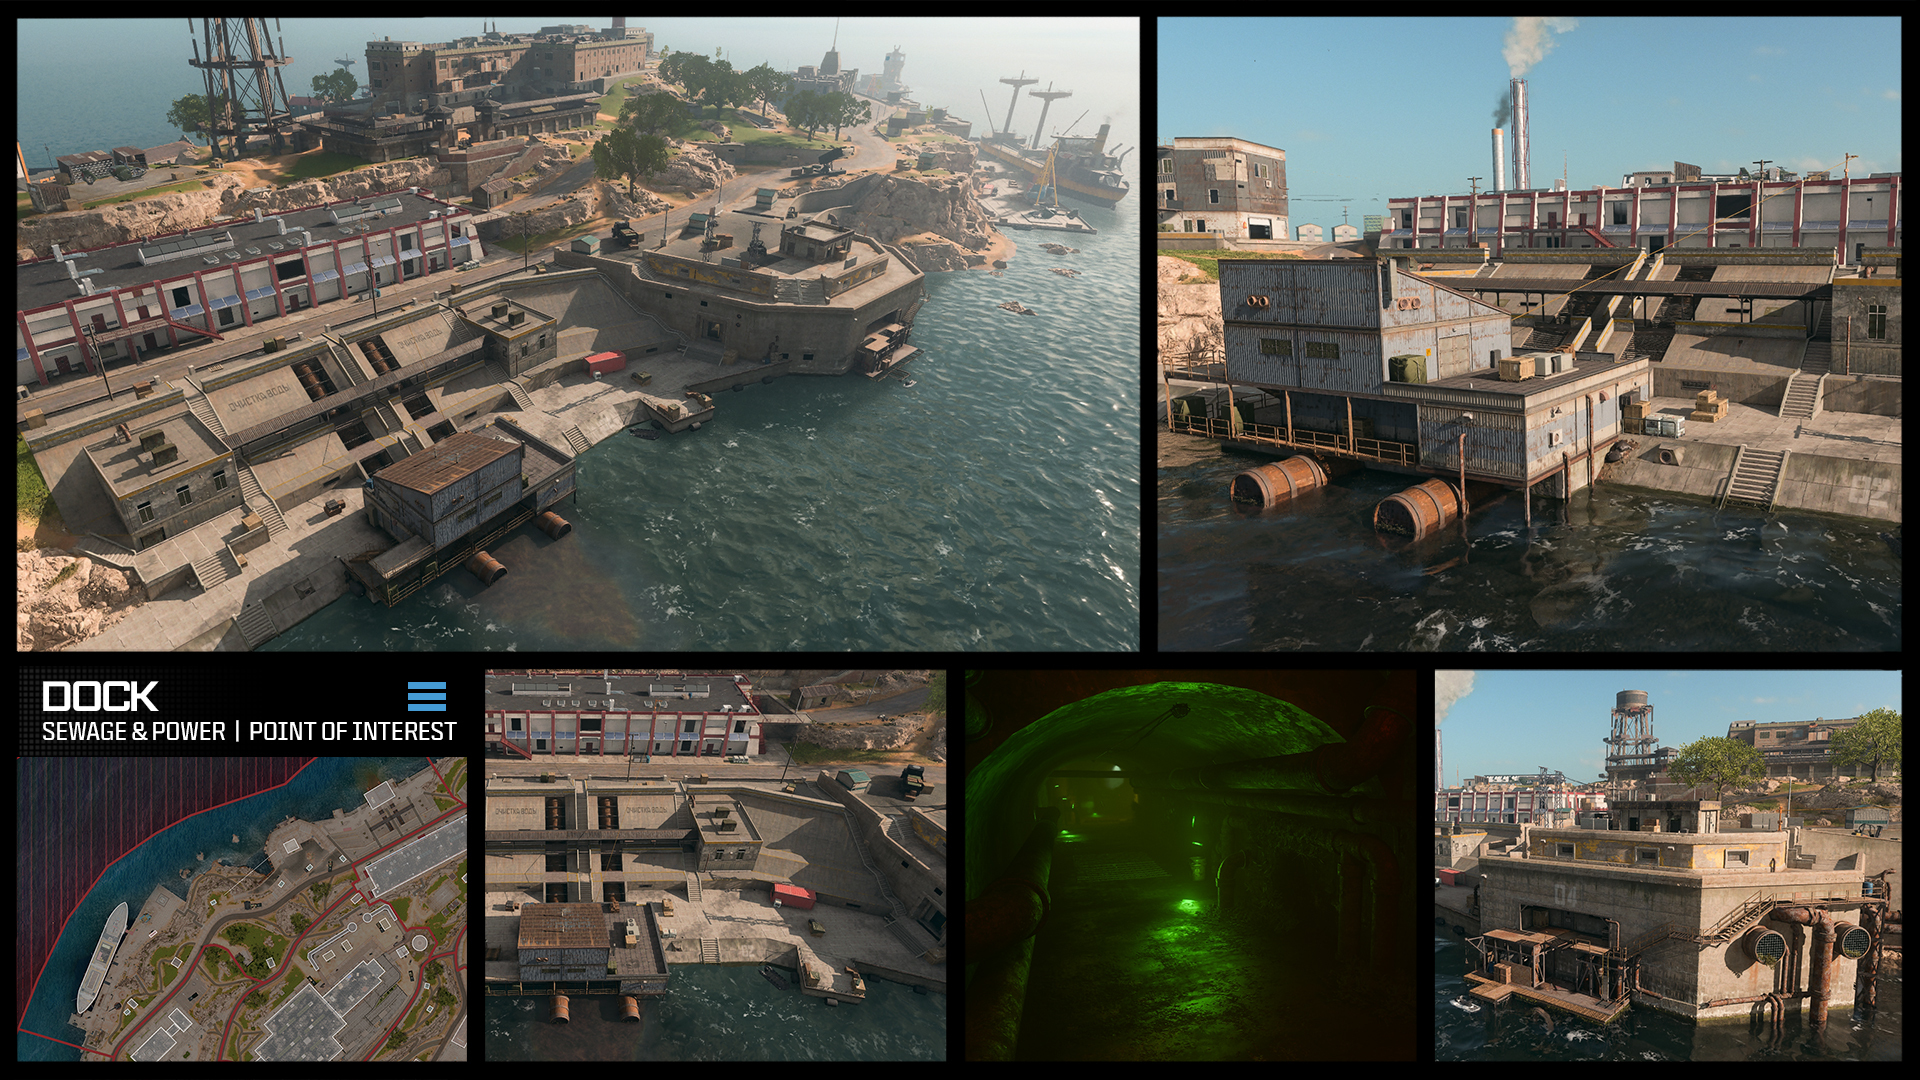
Sewage Treatment, Power Room, and Lookout: This POI stretches along the northern shoreline of the map, beginning with a sewage treatment plant connected to Industry. Adjacent to that is Power Room 04, jutting out on an elevated concrete structure. Rusting catwalks connect these areas. There’s both an open Bunker door and a submerged pipe leading into a waterlogged Bunker, and likely a few secrets lost to the waves.
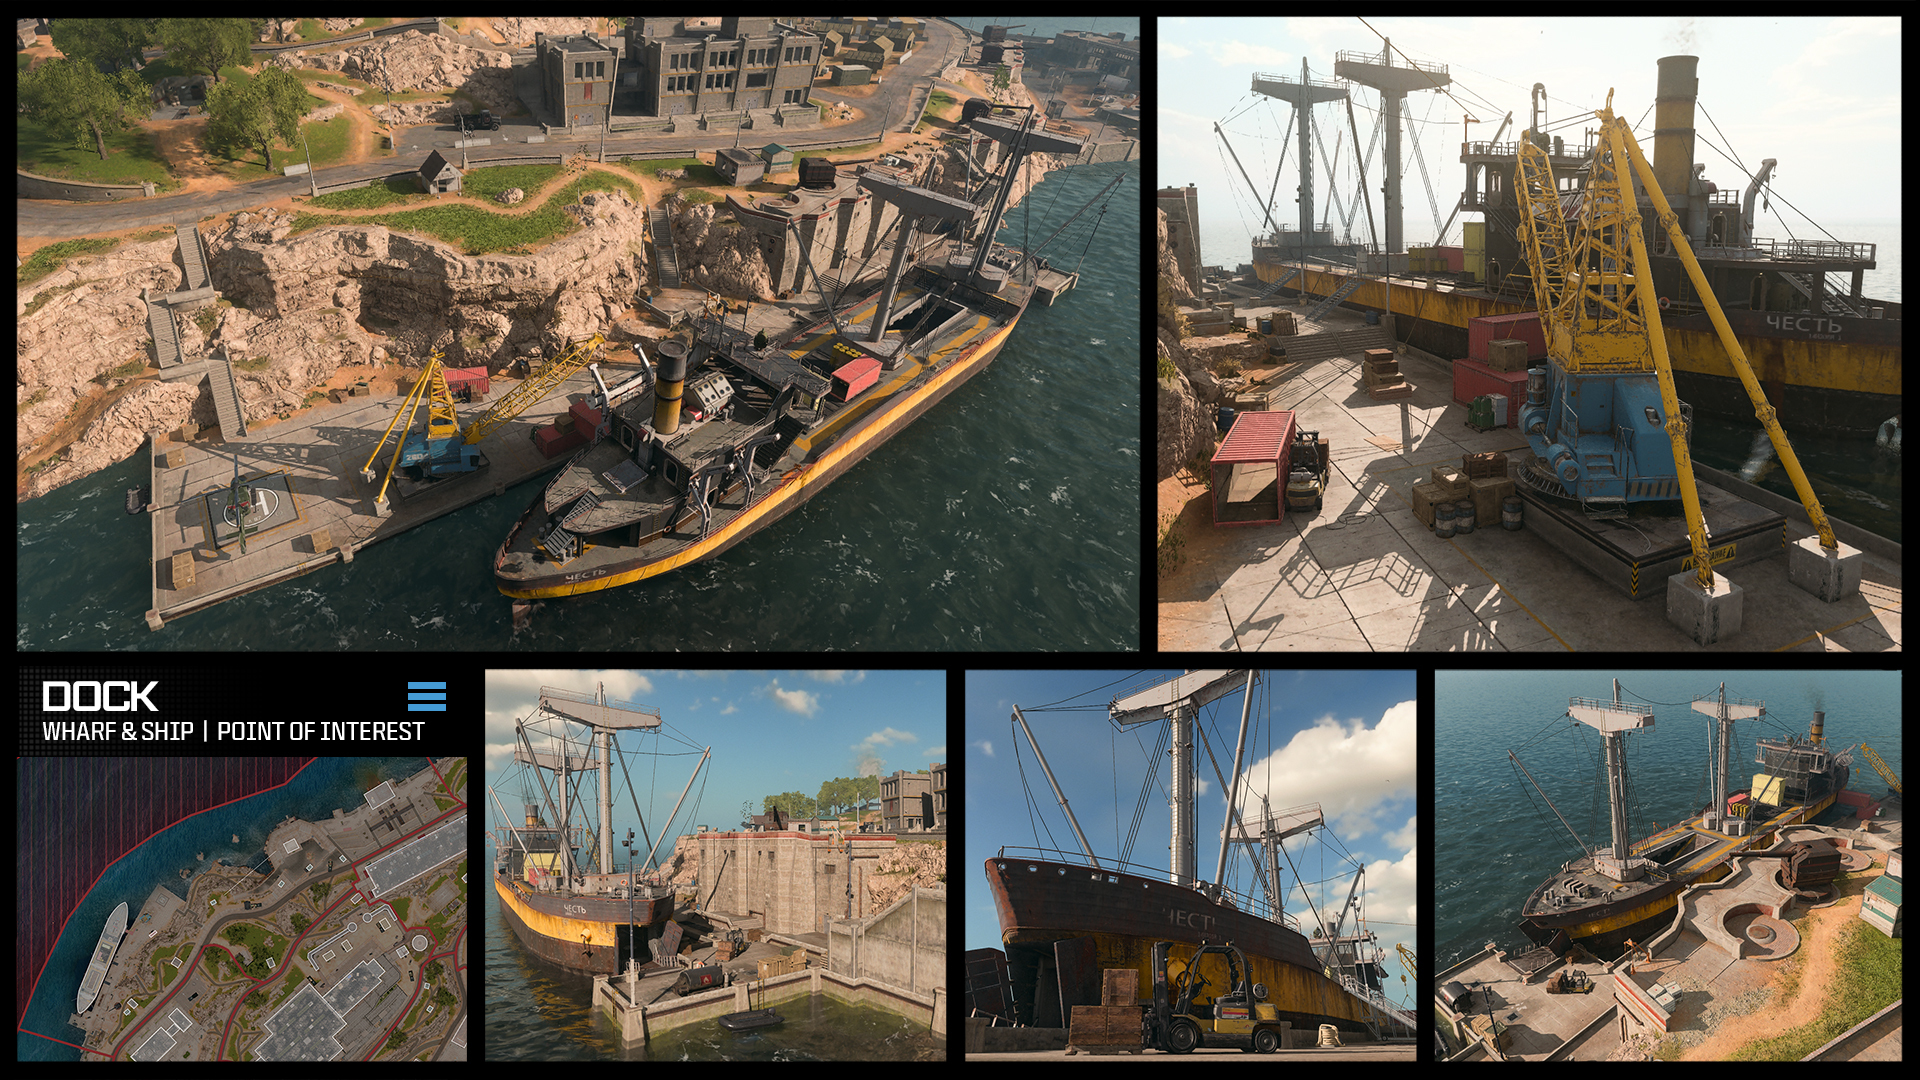
Wharf and Freighter: Farther along the elongated dockside, a large freighter is accessible for exploration. The deck of this ship sits in full view of the nearby gun emplacements, so watch for foes attacking from that direction. Move down the ramp and use the clusters of crates and supplies on the dockside as cover, or hide inside the ship. Climb the foremast if you’re after a sniping position.
Control Center
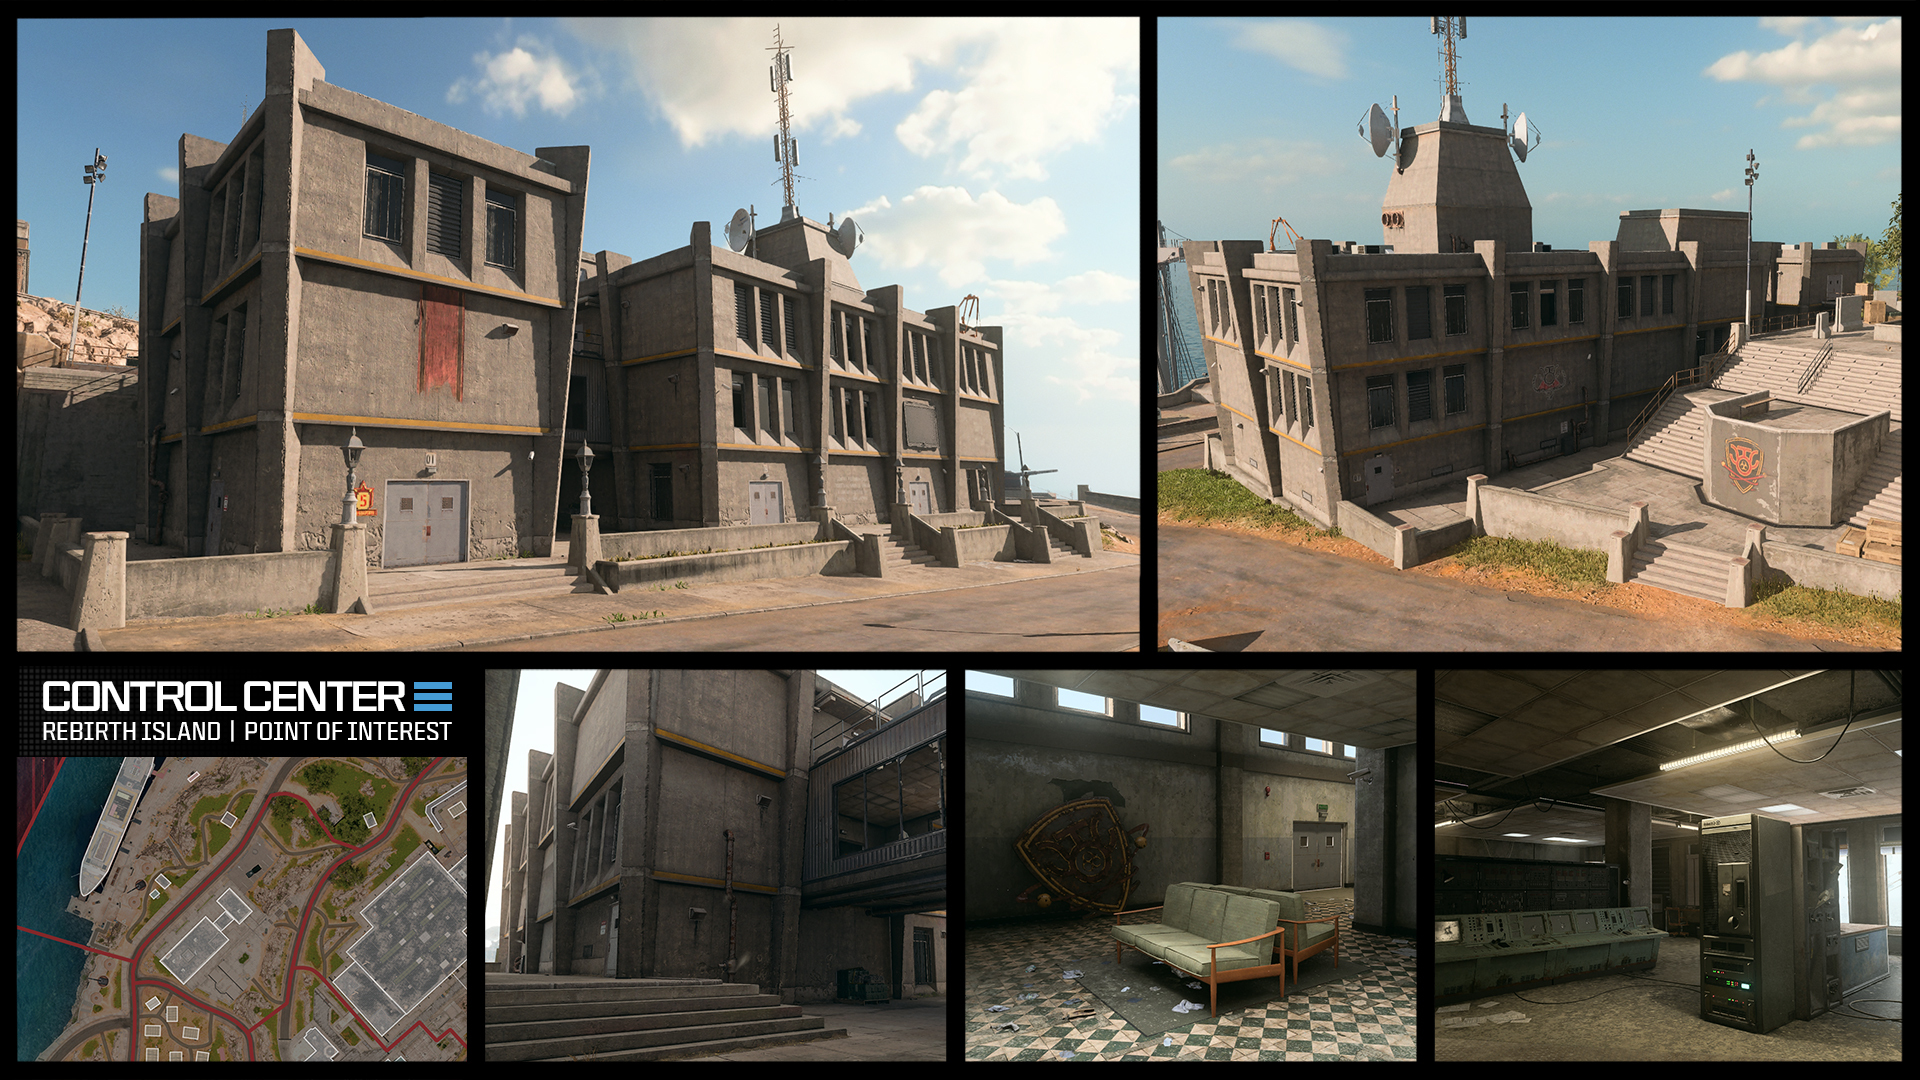
Once a construction site, this piece of brutalist architecture features a main building connected to a smaller section via a covered breezeway and a concrete exterior forecourt behind the structure. You’ve vantage points to Prison and out toward Living Quarters. Inside, even the larger of the two buildings has tight interior spacing, with offices on two floors to explore, ideally in Tac-Stance.
Prison
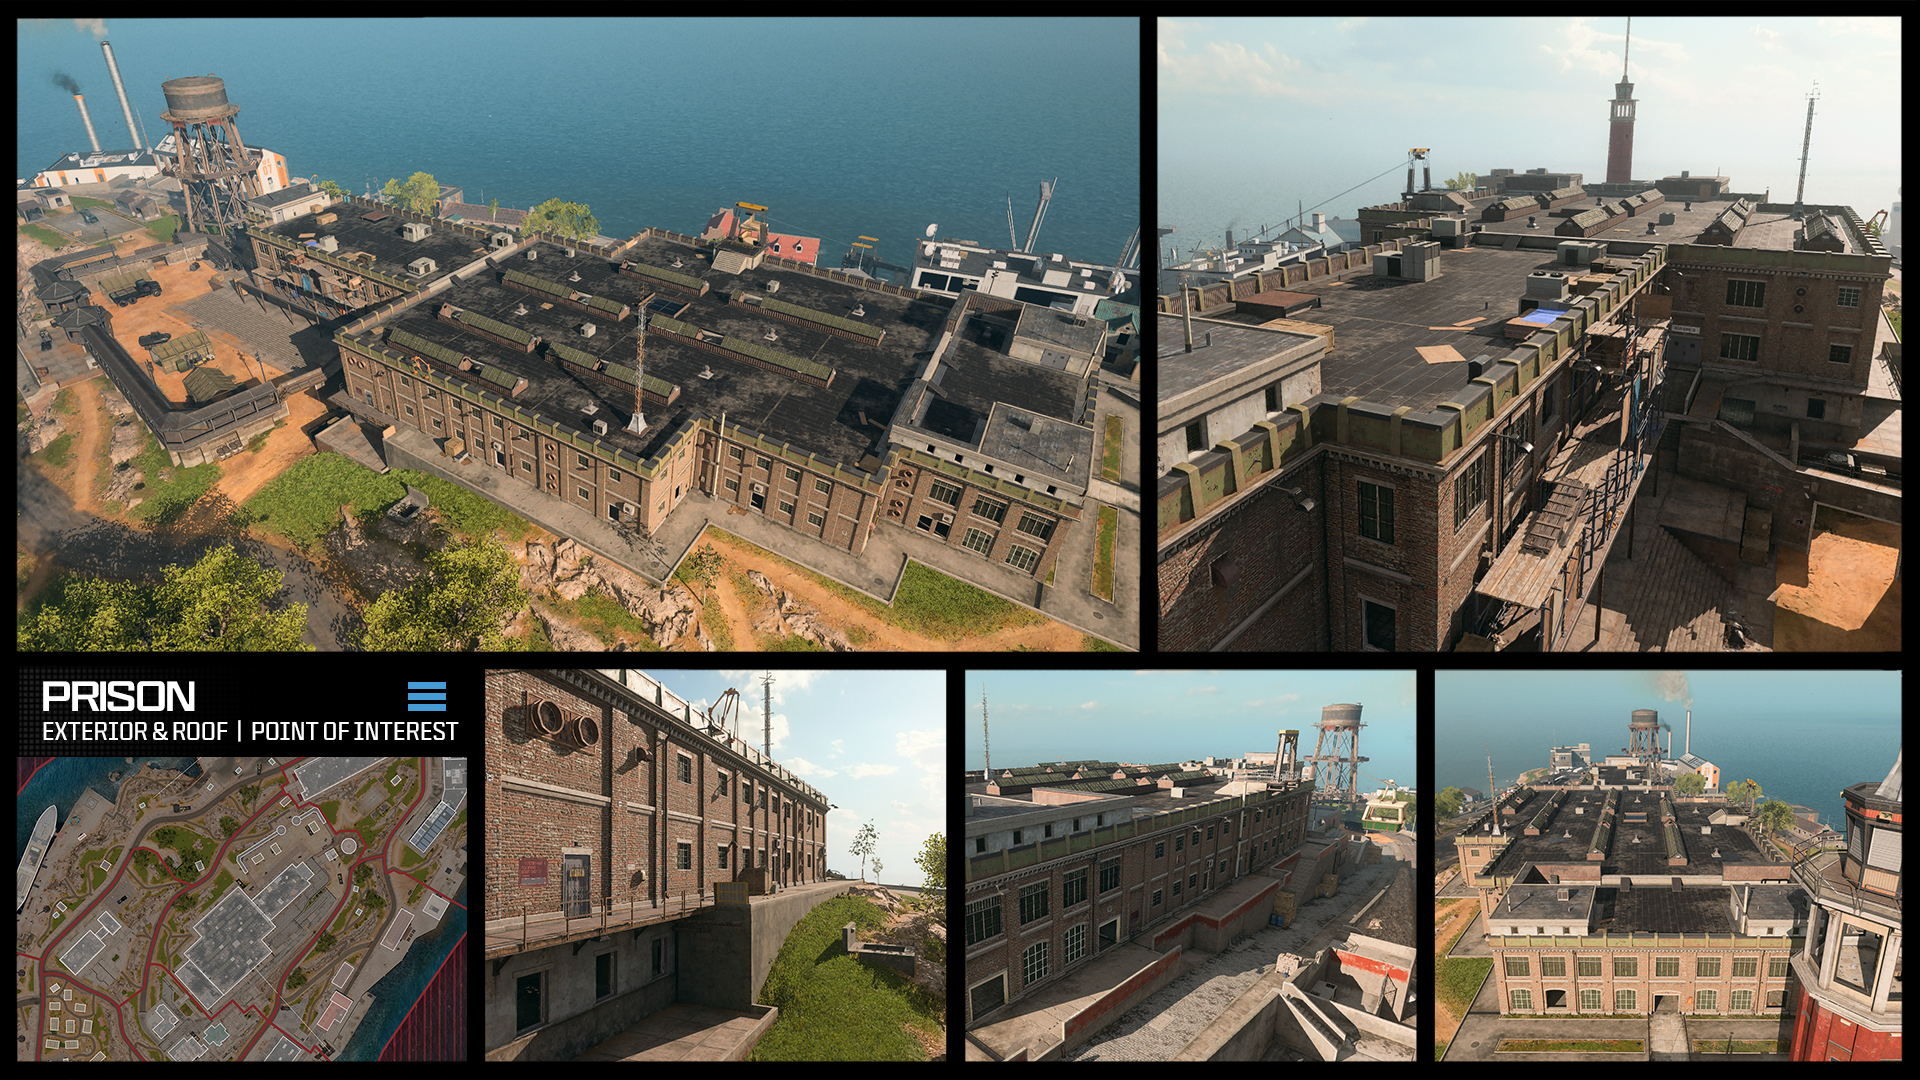
Prison Overview and Rooftop: Right in the center of the action, the Prison complex is the main draw for Operators and the largest building on the map. There are numerous points of entry: via the paved walkway, staircases, ramps, and even the tunnel on the grassy bank above the Docks. Scattered ascenders and exterior ladders provide direct access to the roof. This looks out across the island, with a 360-degree view of your surroundings, though you are vulnerable to enemy fire. The central roof has rows of pitched skylights, with several openings allowing you to drop into the Prison, as well as a tram platform that shuttles you back and forth to the Harbor.
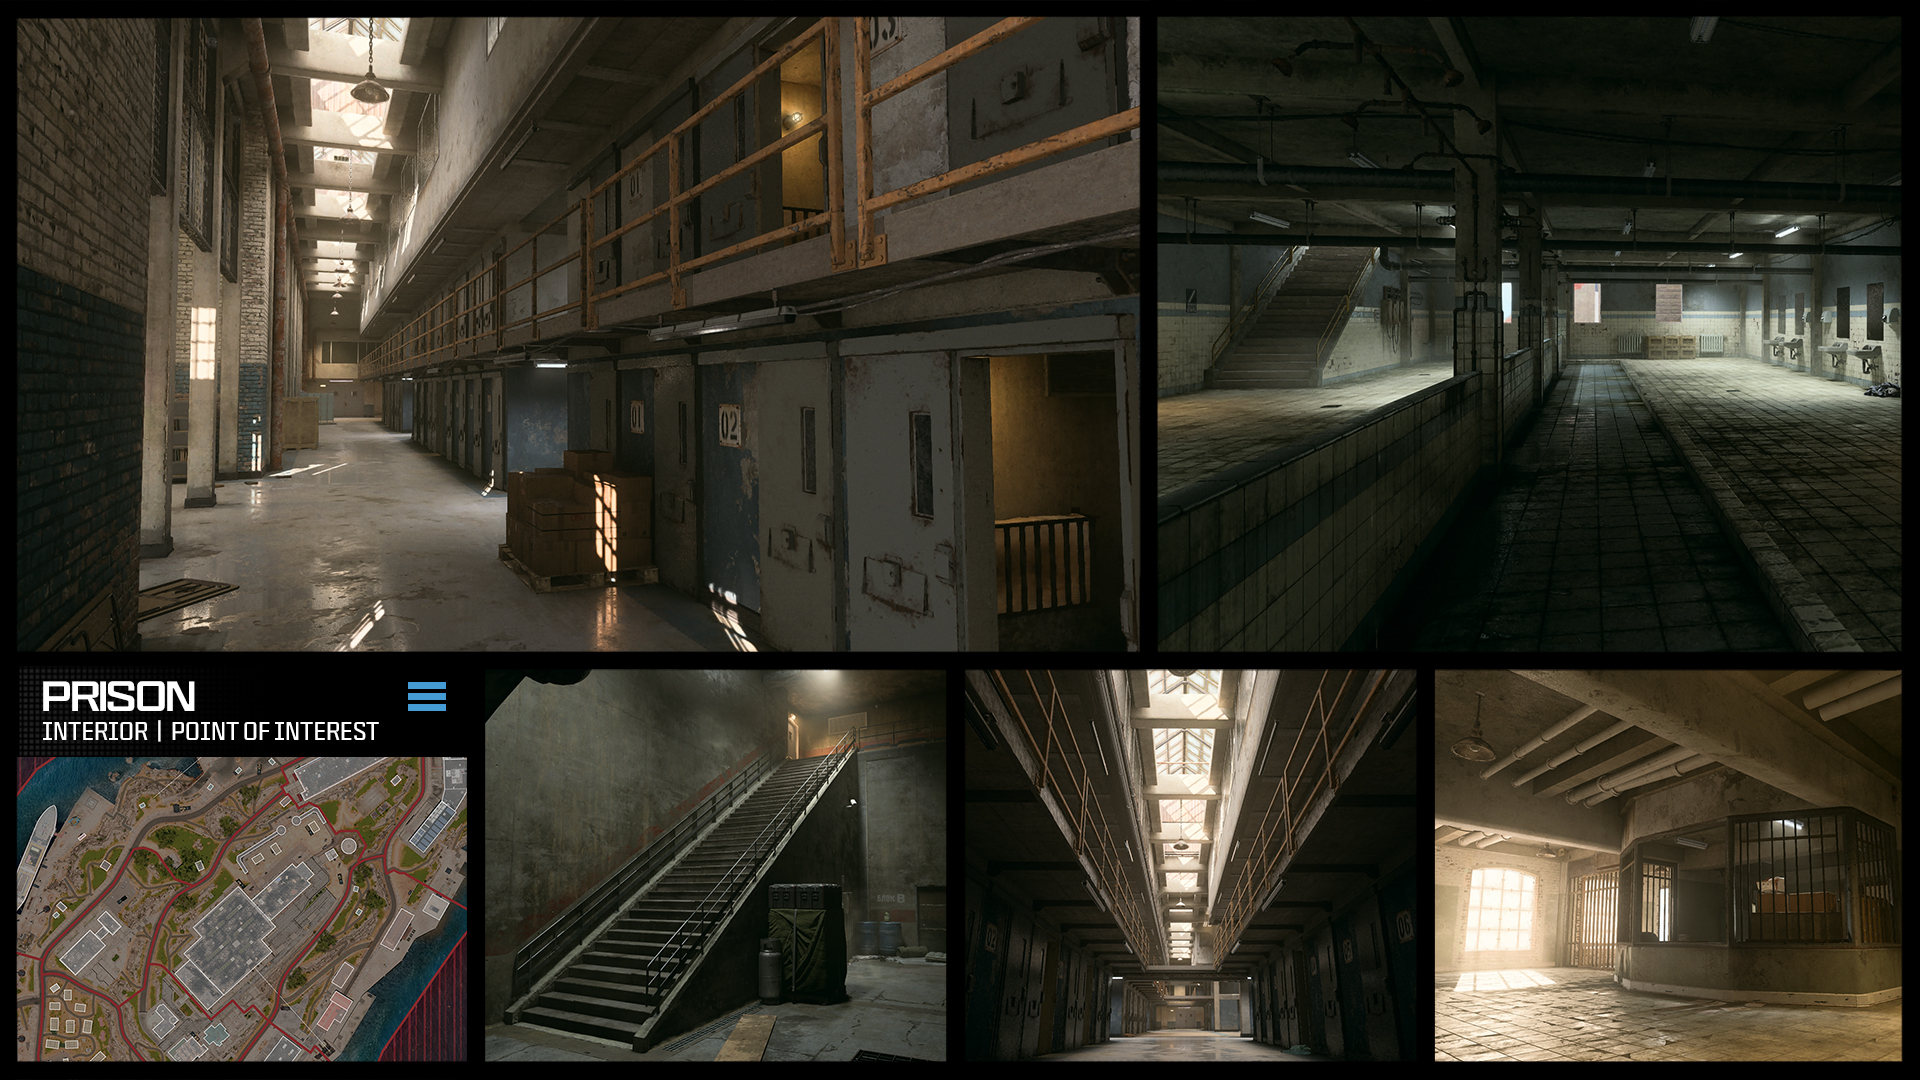
Prison Interior: The interior is split into the main cell block, which is clustered across four hallways providing excellent sightlines. The central floor offers a little more breathing room aside from threats above you. The open cells can be used as ambush points. To the northeast is the Prison cafeteria and infirmary above, which are wider rooms with pillars to dive behind. By Headquarters is the warden’s entrance with the caged lobby, suitable for close combat. The Prison basement features showers and a small electrical room; this entire structure is just as mazelike as you remember!
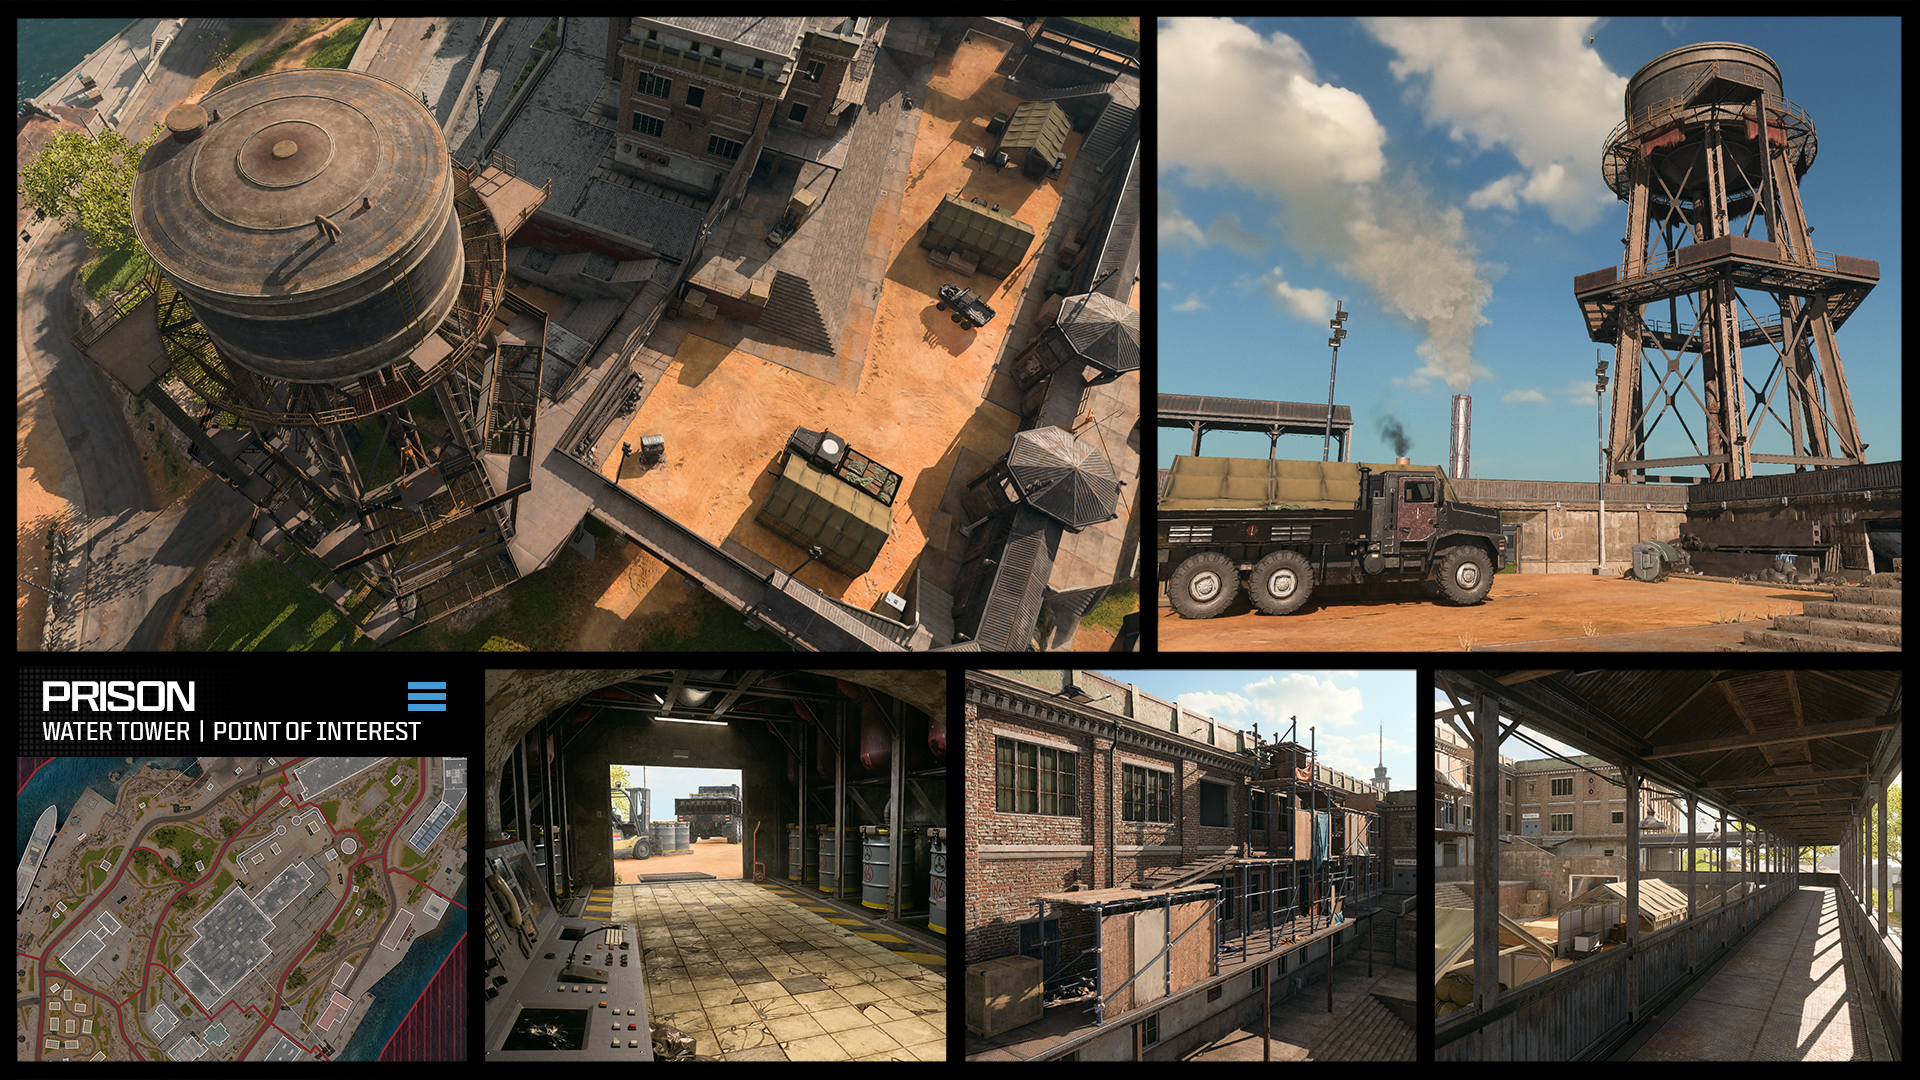
Prison Yard and Water Tower: The Water Tower next to the Prison yard serves as the island’s main landmark and is a phenomenal watchpoint. Climb the ladder or use an ascender to reach the top. The dirt yard below has tents, vehicles, and supplies, with a wall and sentry towers. This can be a preferred location to land some eliminations before ducking into cover or using the zipline to whisk you to Industry.
Harbor
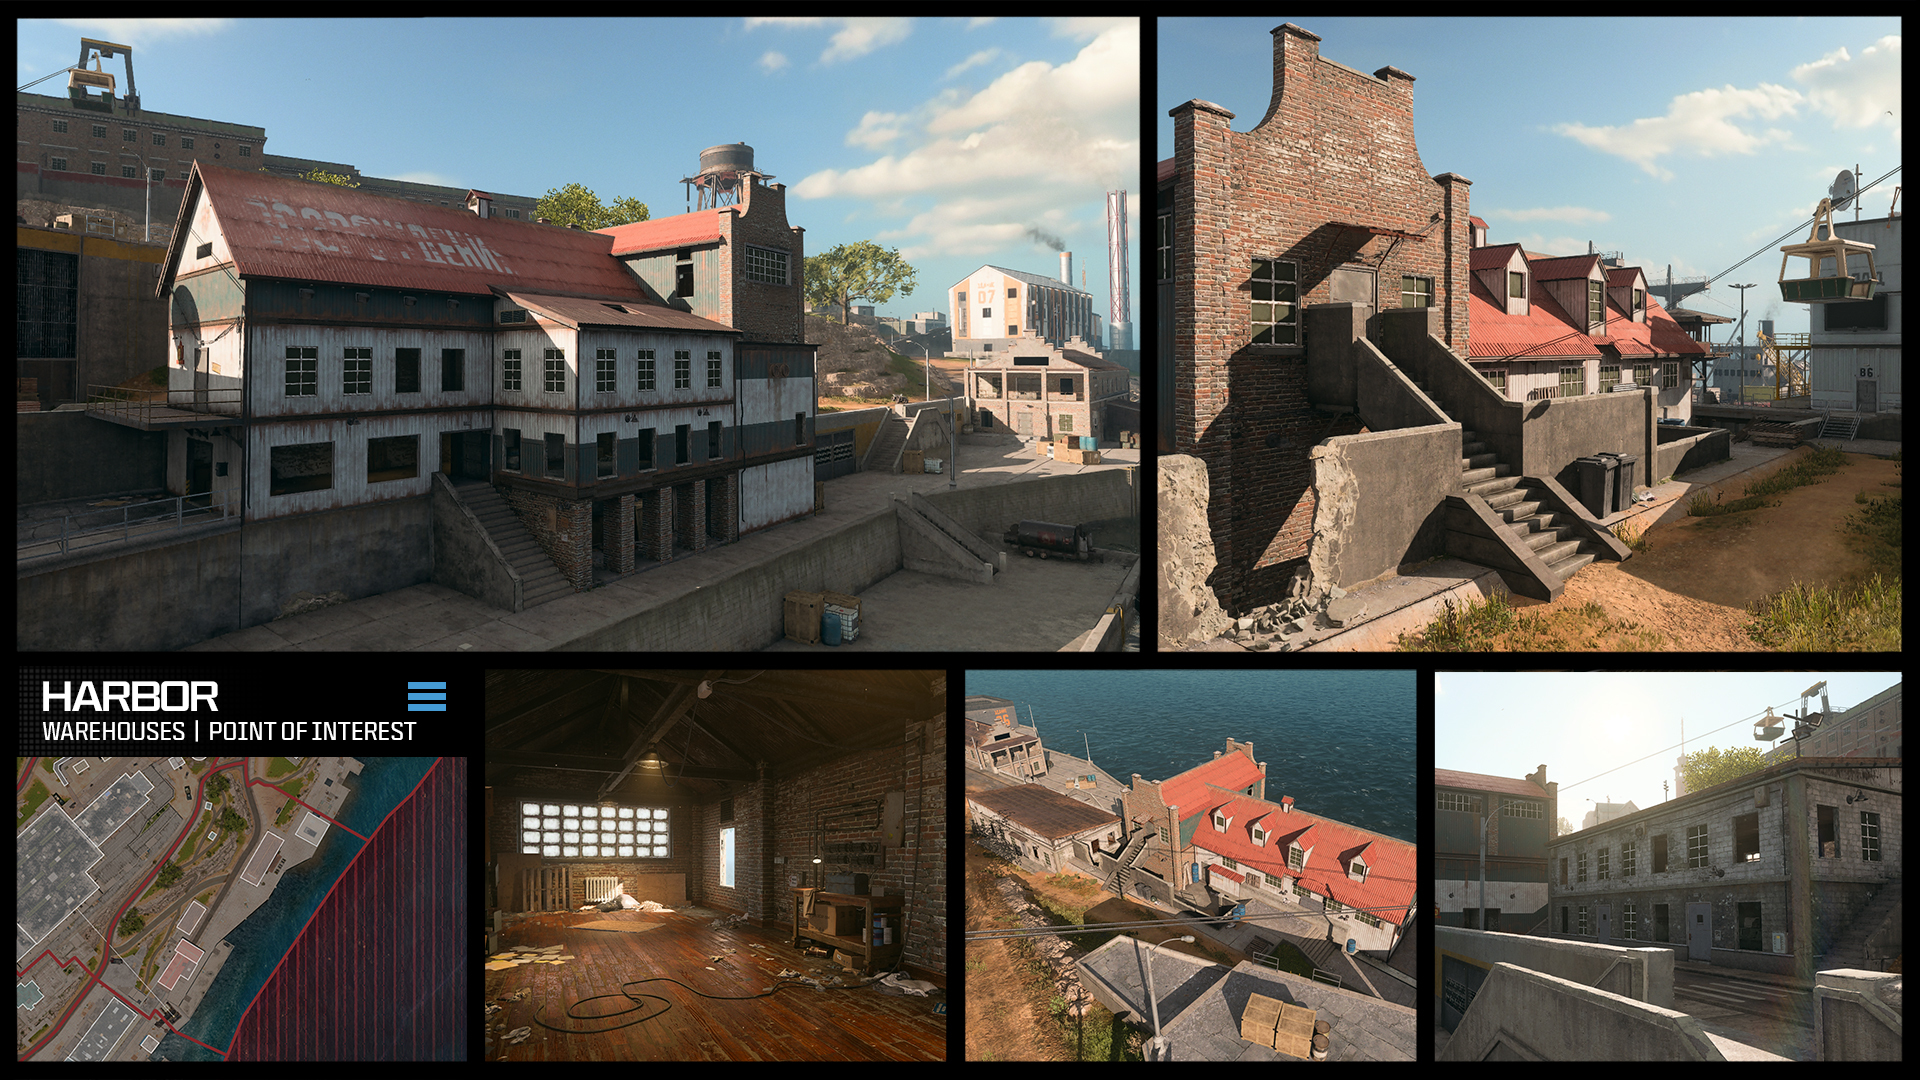
Warehouse and Old Office: The southern part of Harbor stretches between Chemical Engineering and Factory, and the concrete shoreline provides quick traversal, with several smaller buildings offering the chance to lose pursuers and find cover. The lower tram platform sits adjacent to Factory and offers a ride up to the Prison rooftop. Next to that is a red-roofed building with a tunnel-like service road under its dilapidated frame, connected to gray-and-white storage structures that Konni Group seem to have forgotten about.
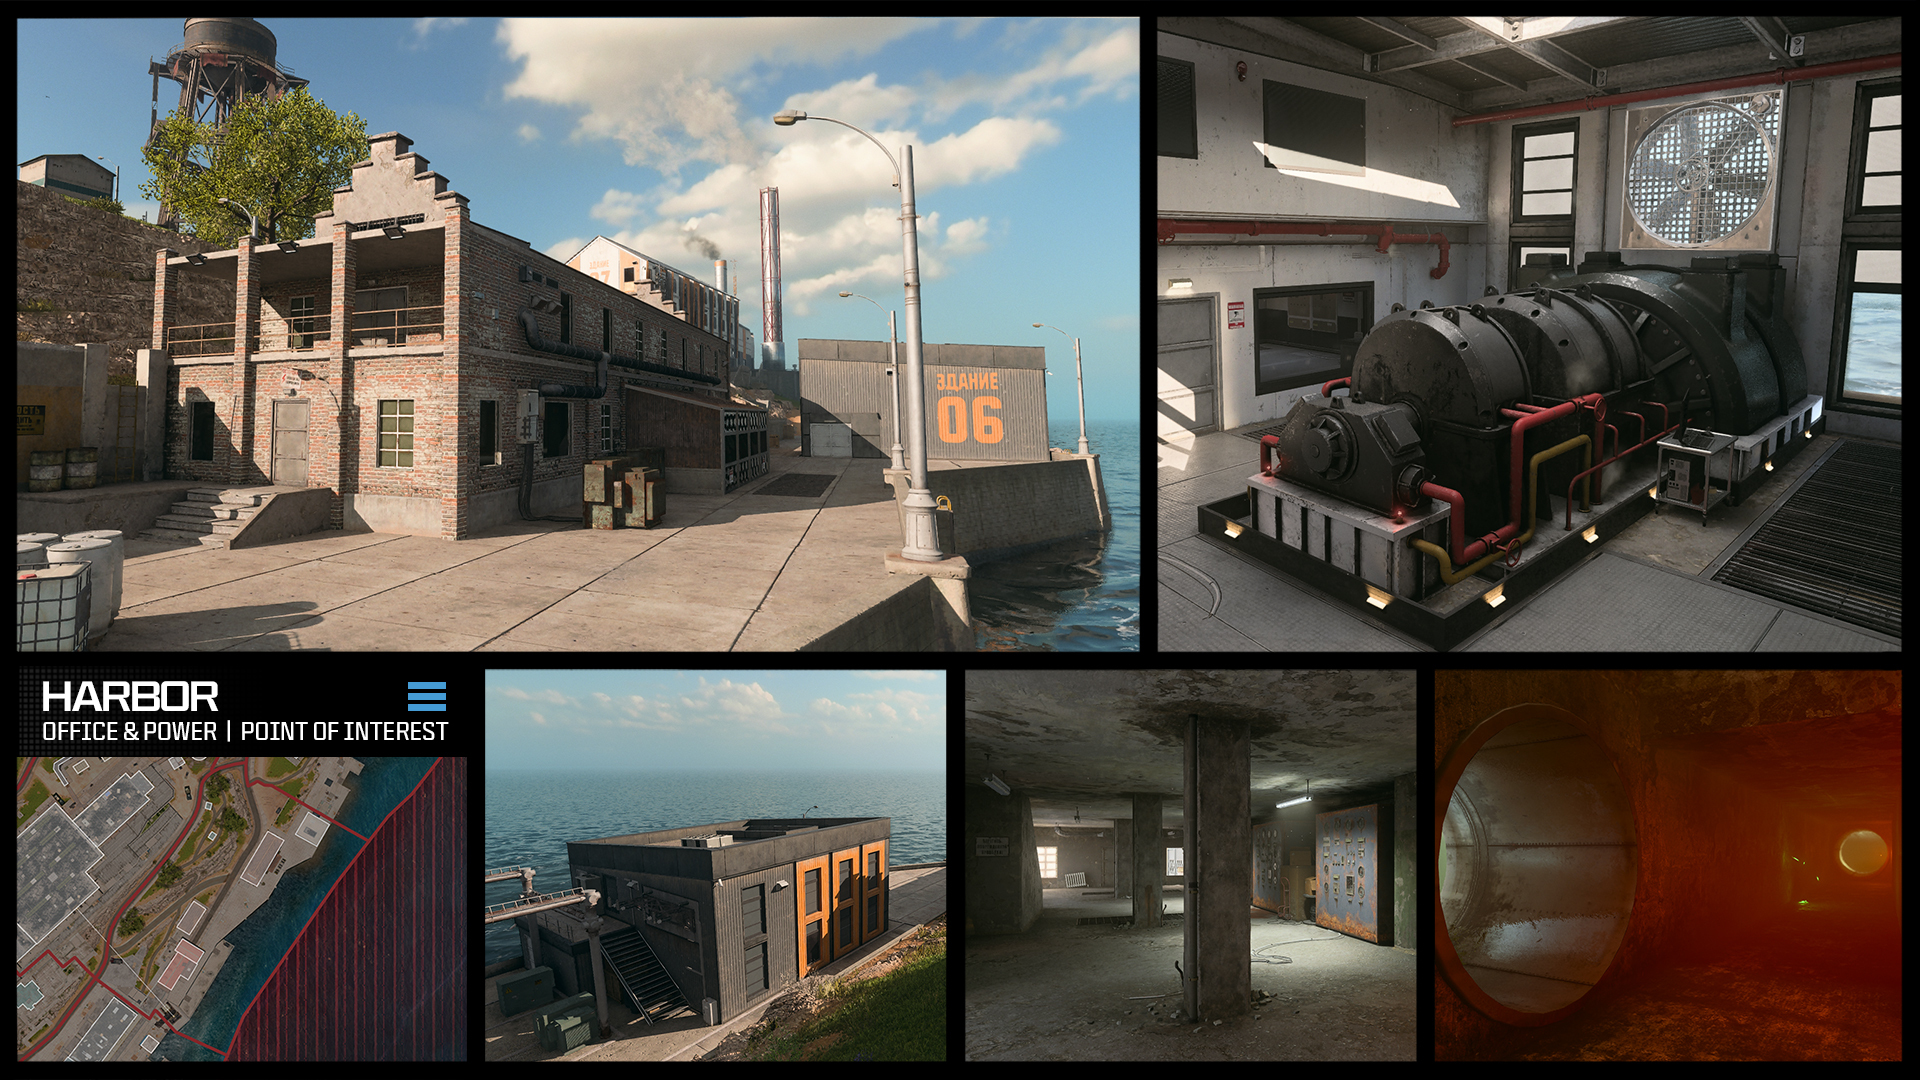
Comms Office and Power Station (Turbine): Toward Chemical Engineering is a brick warehouse and a newly constructed power station marked “06.” While the warehouse is mainly a defensive location, the power station (with black and orange exterior cladding) has smaller offices around a main turbine room, which descends into a water-filled concrete pipe you can swim through to reach multiple exit points, perfect for repositioning and flanking unsuspecting enemies.
Headquarters (and Lighthouse)
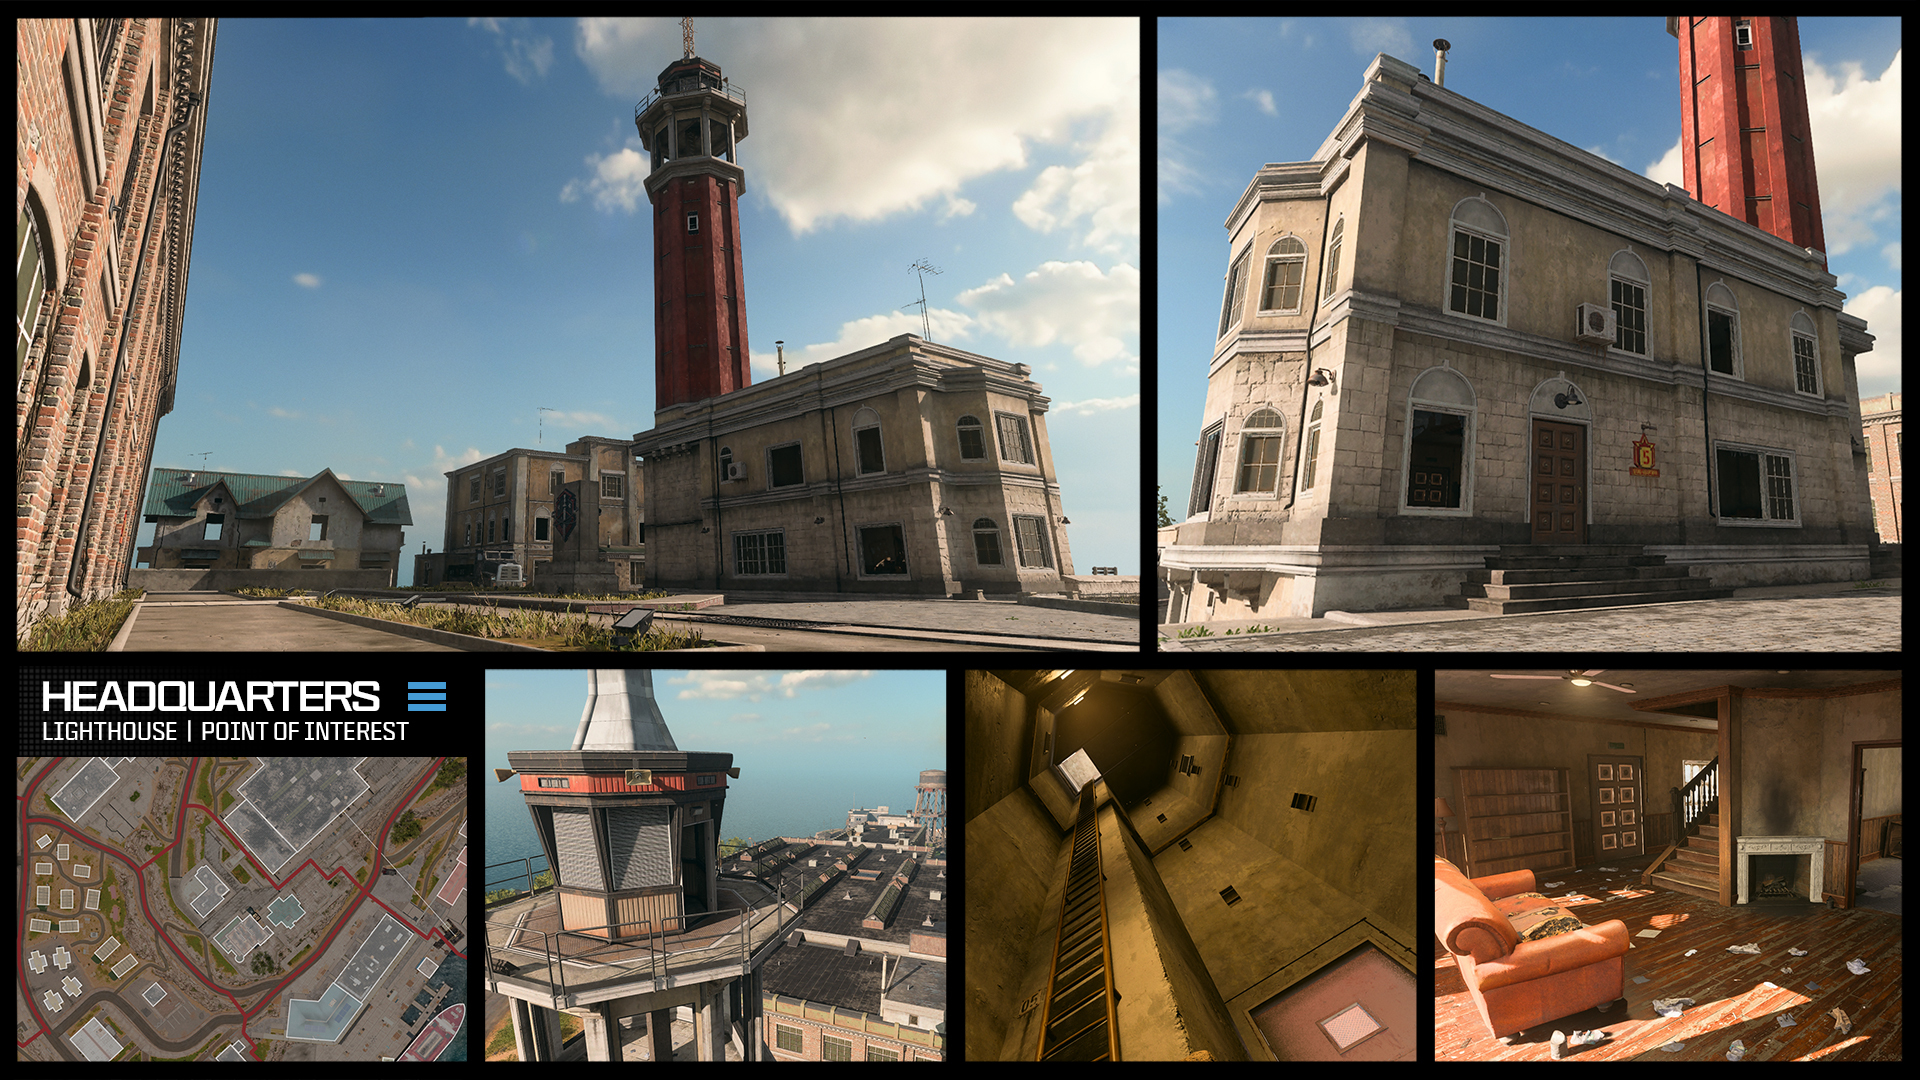
Lighthouse (Surveillance Tower): Dominating the upper forecourt of Rebirth Island between the Prison and the three main Headquarter buildings is the Lighthouse. This is used as a surveillance tower and a sniping point, as it offers one of the two highest vantage points across from the opposing Water Tower. Expect high traffic and close combat as Operators head for this structure, using parachutes or the interior ladder from the main HQ building. The HQ houses a kitchen, sitting room, study, library, and a tight cluster of offices on the upper floor.
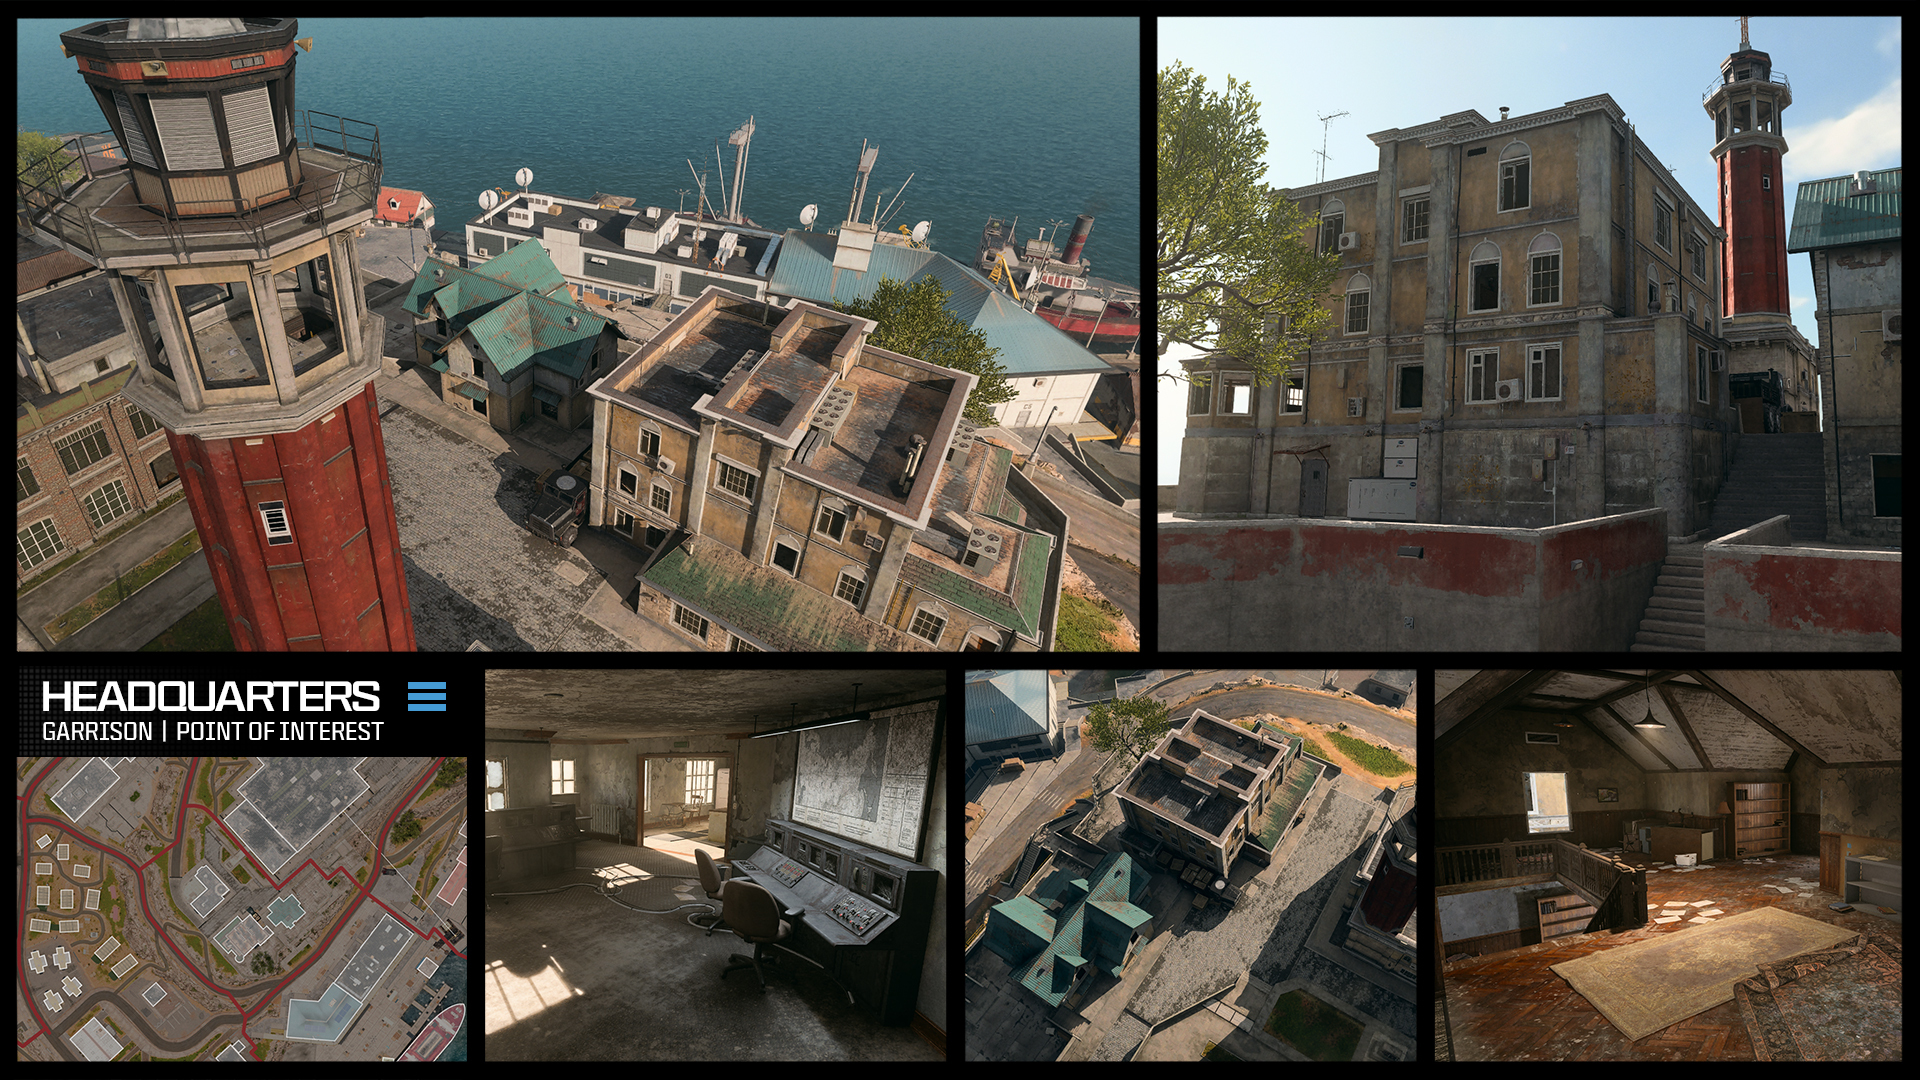
Command Center and Garrison: Not to be confused with the “Control Center” POI, the brown and stone structure with the truck parked outside offers excellent views surrounding this upper plateau. The interior allows for cover and access to the roof. Next to that is the green-roofed Garrison. It houses some interesting chambers below its main structure….
Outside is a network of exterior concrete staircases that lead down to the main road, Factory, and sloping Prison road.
Factory
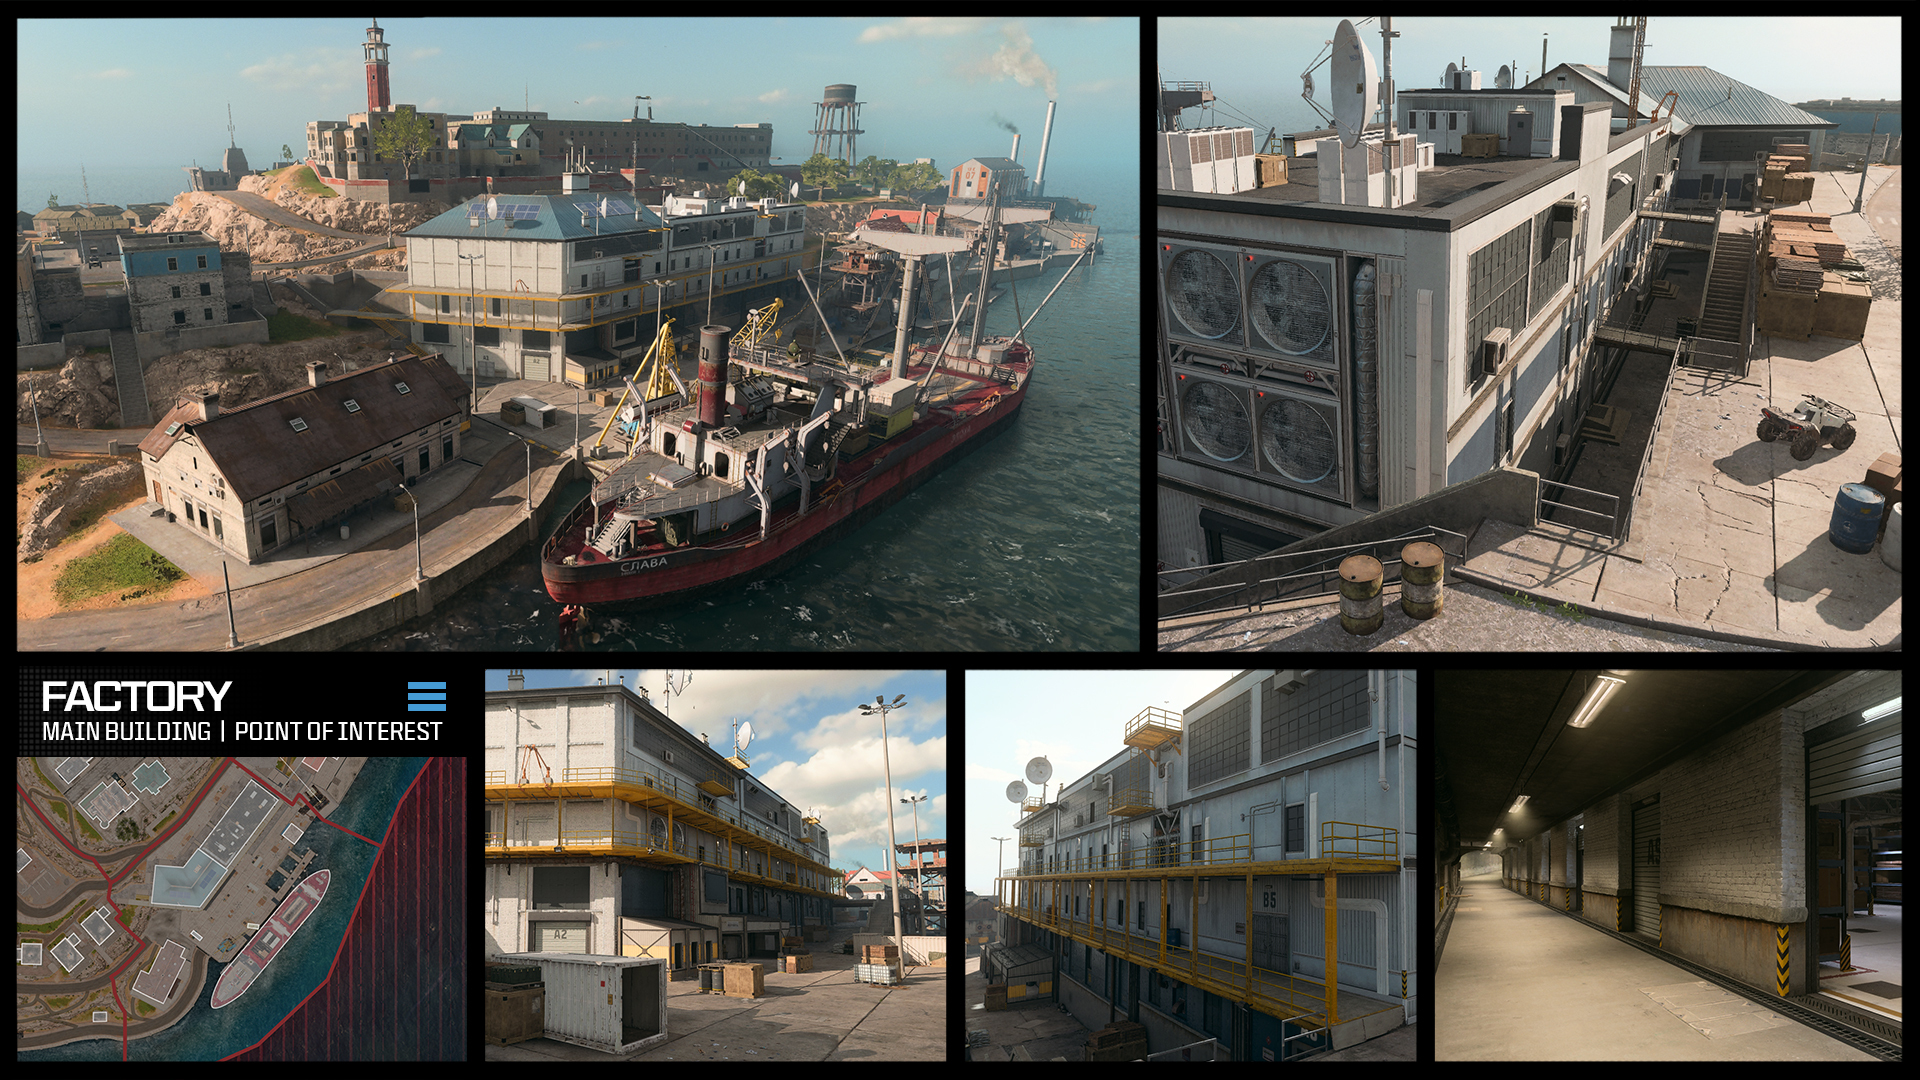
Factory and Office: Clad in muddy white corrugated metal, the Factory is the largest feature on the southwestern shoreline. This three-floor building and basement comes with an exterior gantry overlooking the dockside and Harbor, and ascenders offer rapid access to the rooftop. Inside are control rooms, with a lower floor storage room half-filled with barrels and boxes. This is where you’ll find a concrete tunnel hallway with covered access to and from the Factory. Toward Stronghold is a single-level brick office with a pitched roof and views across the docks.
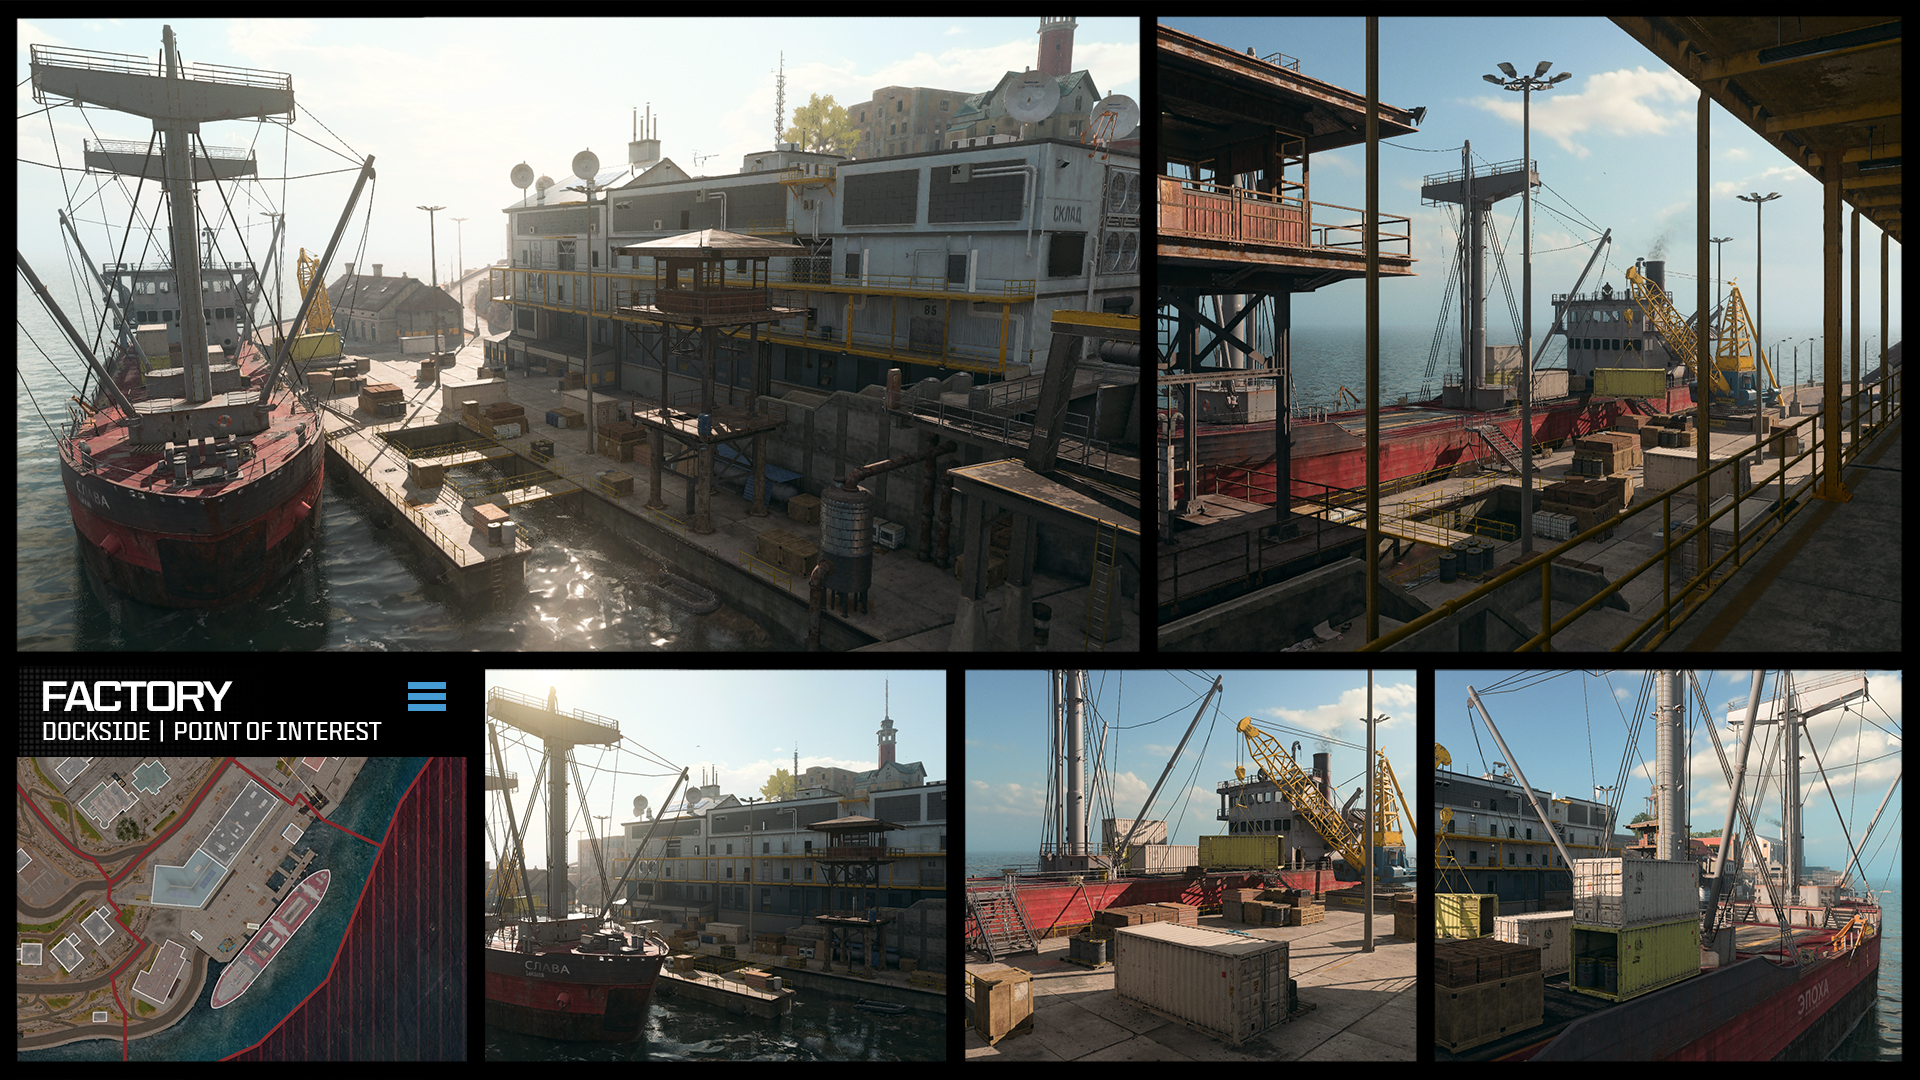
Dockside and Freighter: One of the lowest-lying areas on the map, the docks provide a straight and flat route around the Factory, with a crane, tower, tram station platform, and docked freighter to utilize for climbing or cover. The red hull of the freighter is visible to spot at distance, and the ship has a larger top deck compared to the yellow freighter moored at Dock.
Living Quarters
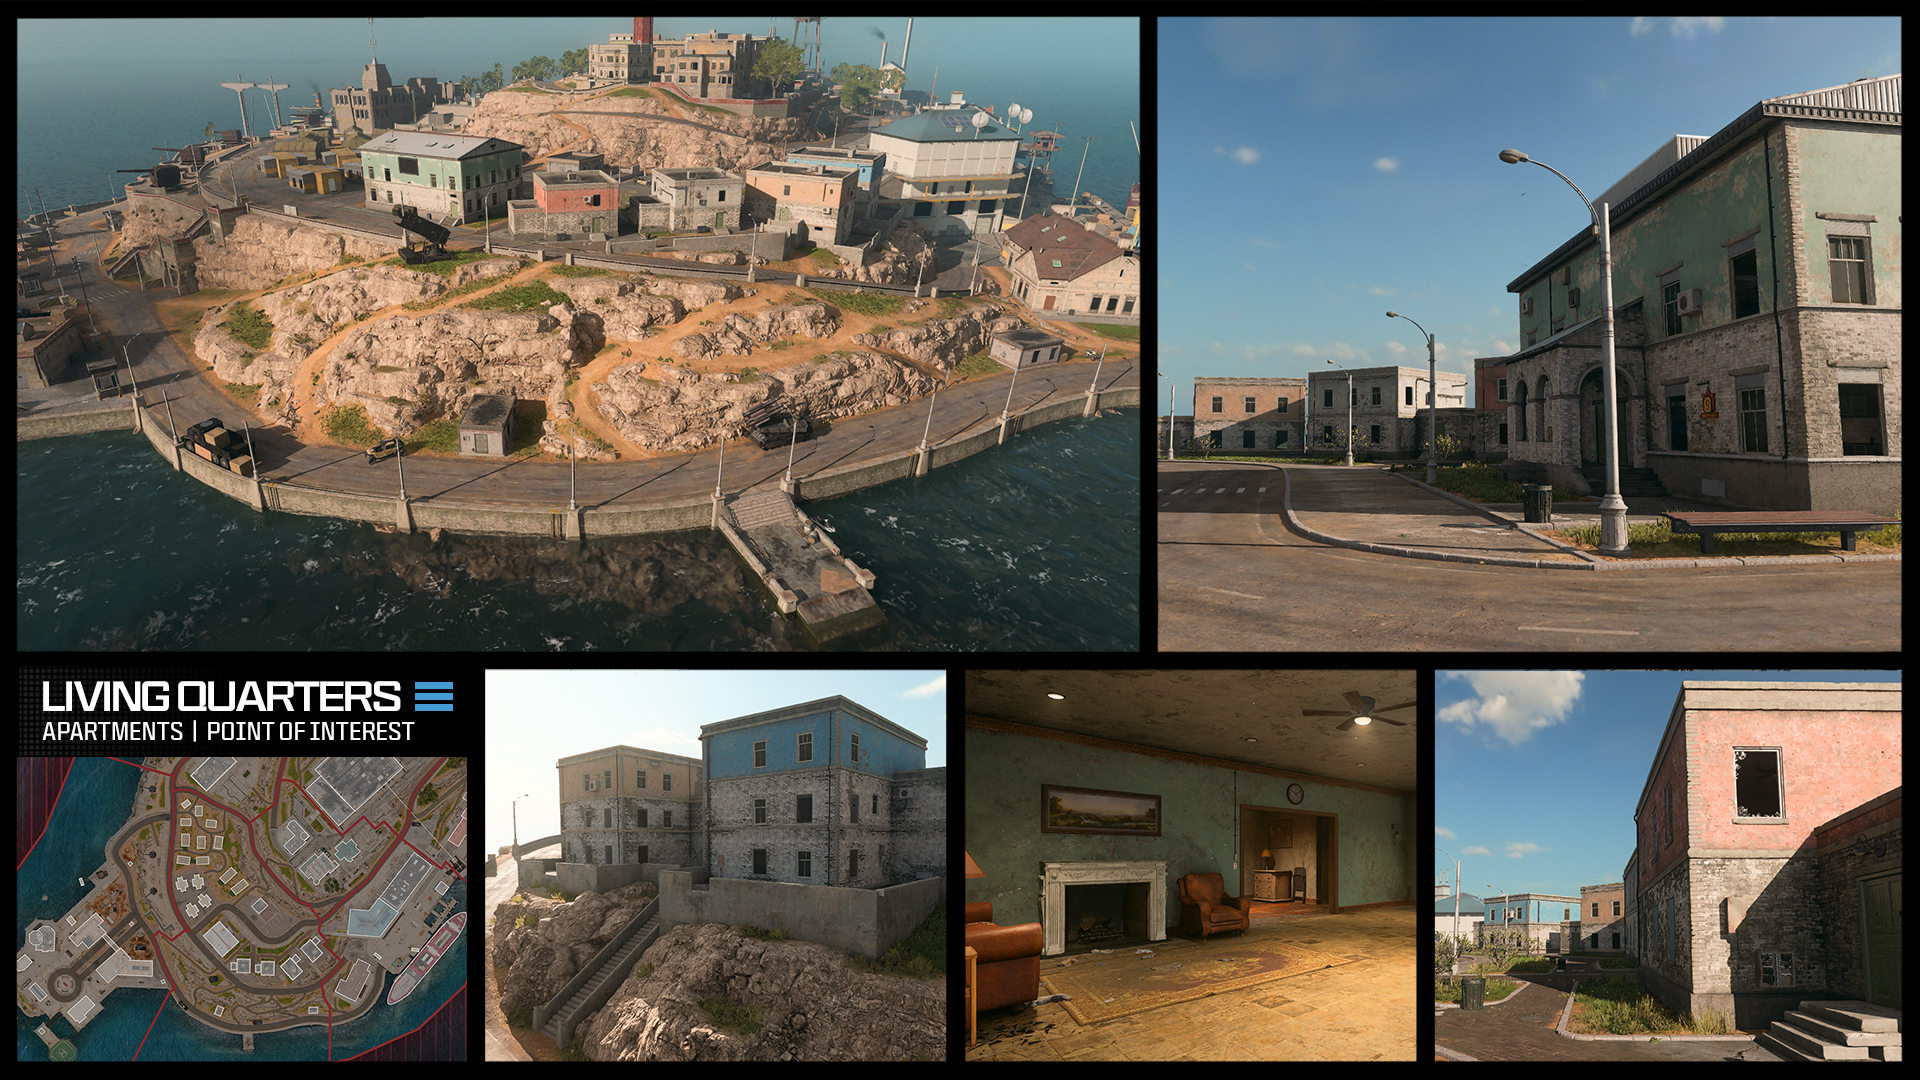
Living Quarters — Apartments and Building No. 9: A set of four apartments in faded pastel colors allows easy recognition, especially if you’re dropping in from above. The teal and orange and the gray and red buildings are pairs, with almost identical interiors, and offer tight hiding places. The green and white main living quarters (No. 9) stands alone in the center of this POI with double doors and broken windows, good interior access, and a ladder to the roof, which provides views of your surroundings.
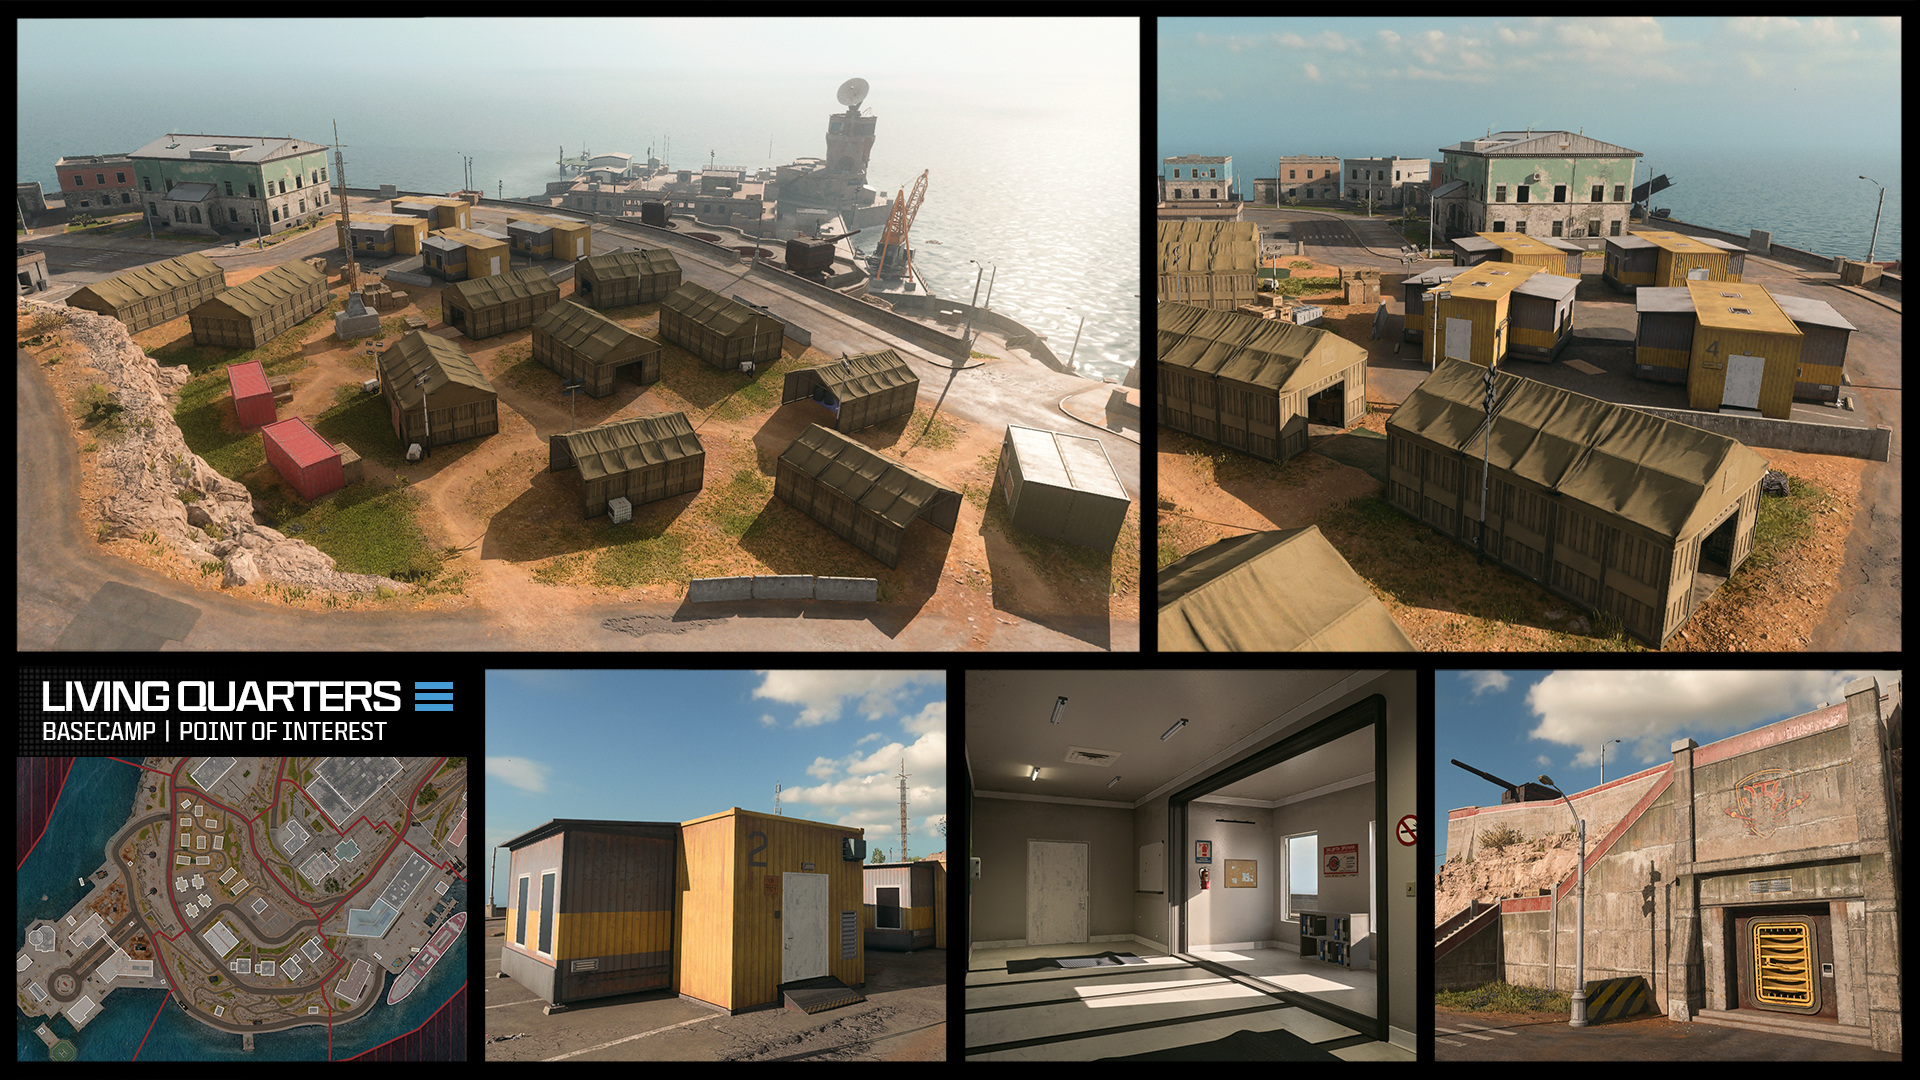
Living Quarters — Basecamp and Switchbacks: On the low plateau overlooking Stronghold is a network of military tents, medical prefabs, and a small office building. Up the rocks is Headquarters. This is a great place to get off the road and get out of sight. Also note the storage room near the pathway switchbacks and jetty accessible by the coastal road, as well as a strange and locked bunker door. How does that open?
Stronghold
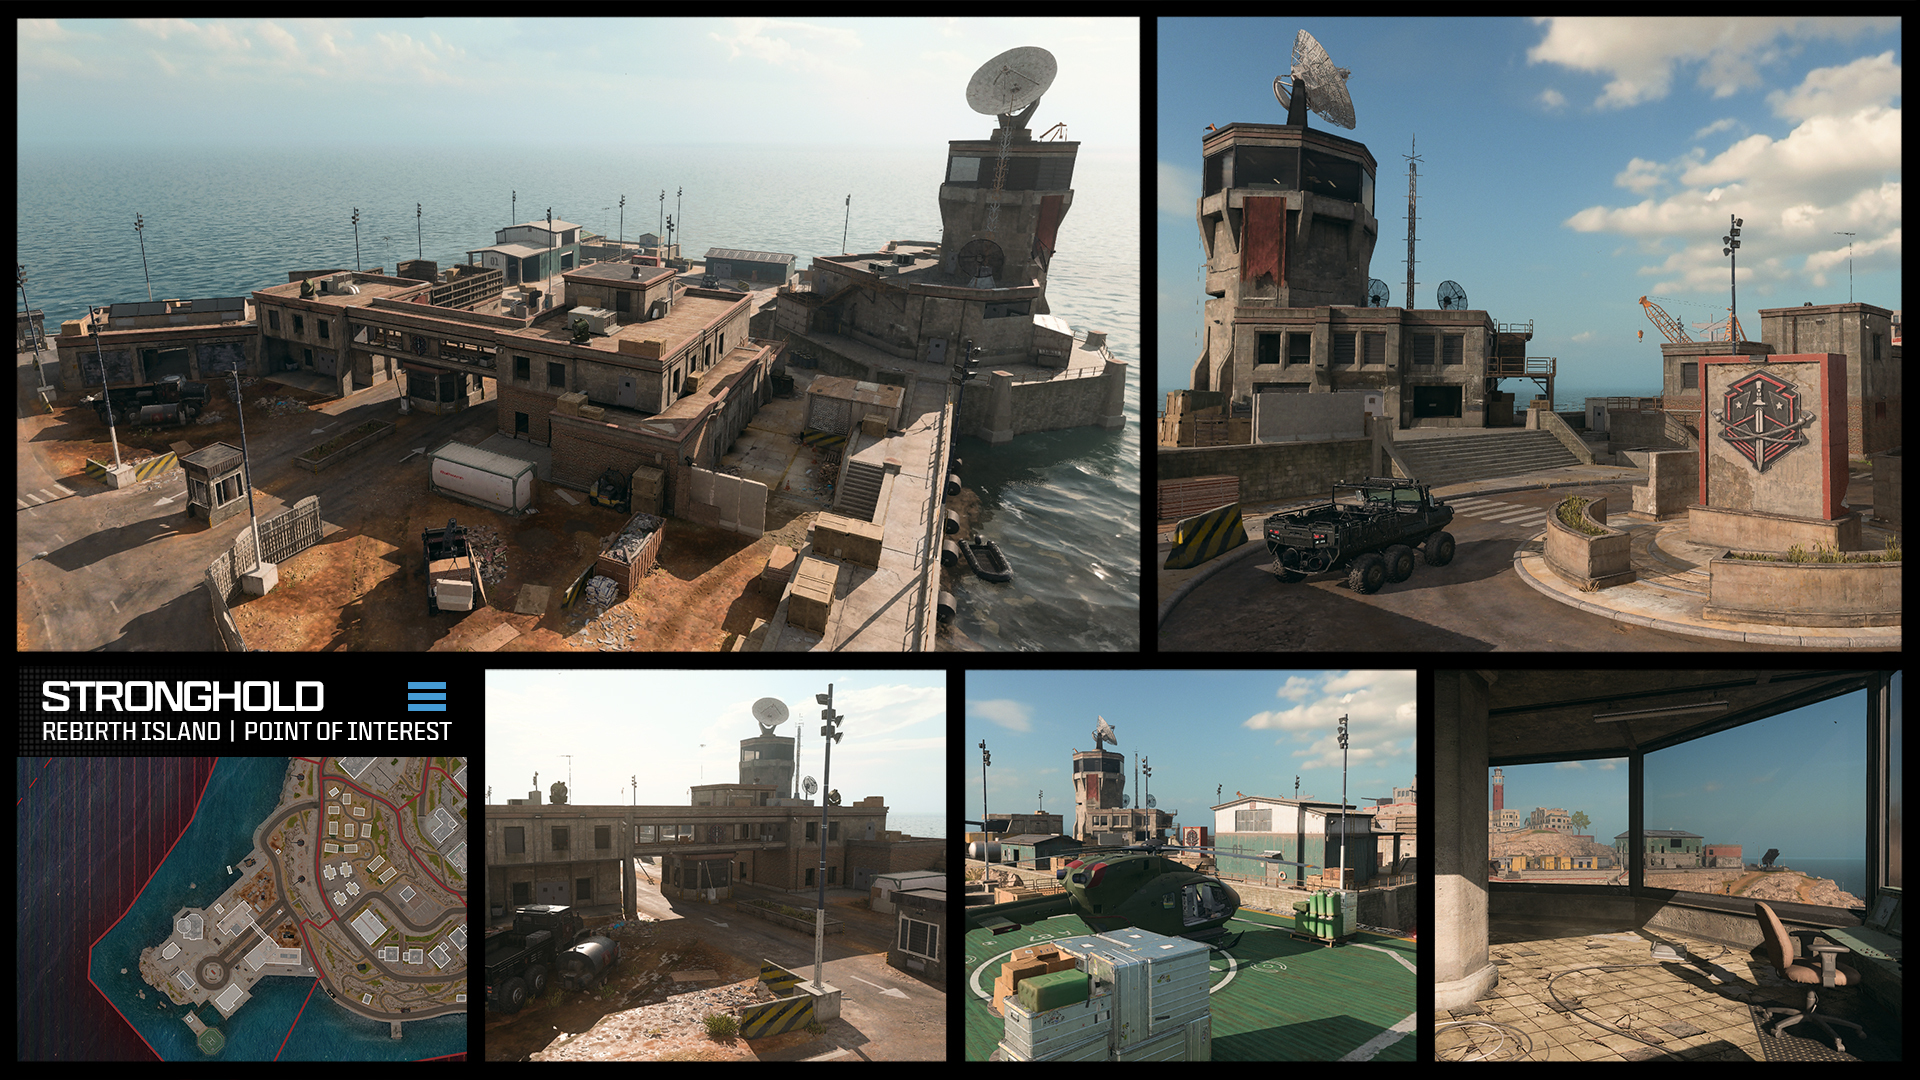
Another favorite location for Operators to drop into, the southwestern corner of Rebirth Island consists of a complex, low-lying construction site, an old checkpoint, a rear roundabout, a helipad, and the landmark satellite tower. There’s plenty of caches, vehicles, and barricades to utilize, as well as confined offices and a covered walkway across the checkpoint. Climb the tower for a commanding view from various levels. If all else fails, jump onto the shoreline rocks or swim to reposition to a more advantageous location.
Rebirth Island Tac-Atlas: Live Now!
Need an interactive overview of Rebirth Island? Our free Tac-Atlas showcasing POI boundaries and tactical intel on each map locale is now live! Click here to check it out.
New Call of Duty: Warzone Modes and Public Events
New Game Mode — Call of Duty: Warzone Bootcamp (Launch)
Available on: Urzikstan (Player Count: 44, up to 20 Players, 24 Bots).
Refine your Call of Duty: Warzone tactics in a new training mode set on a randomized slice of Urzikstan. Expanding on the Modern Warfare III “Training Course,” which launched in Season 2, the all-new Call of Duty: Warzone Bootcamp is designed to help new players build confidence for their first official drop-in.
Call of Duty: Warzone Bootcamp is a Quad-only training mode (either partied up or fill-squad) providing players a snapshot of the real-deal Call of Duty: Warzone experience, featuring up to 20 players via mode-specific matchmaking and 24 bots to test their mettle. Warzone Bootcamp is the only mode for Call of Duty: Warzone featuring bots. If this changes in the future, we’ll ensure the community is informed ahead of time.
Player, Weapon, and Battle Pass XP progression is limited in Call of Duty: Warzone Bootcamp. The new training mode will not progress Daily/Weekly Challenges, Calling Card Challenges, Weapon Challenges, or Champion’s Quest. Additionally, the new training mode will not feature public events or advanced contracts.
Drop in, learn the ropes, and get ready to take on the world.
New Game Mode: Rebirth Resurgence (Launch)
Available on: Rebirth Island (Maximum Player Count: 44).
Rebirth Island is the perfect place for the faster-paced playstyle that Resurgence brings to Battle Royale. As you know if you’ve dropped into Urzikstan, Ashika Island, Vondel, or Fortune’s Keep, your squad is here for the win, but accomplishing this requires more frequent engagements and greater risks. The Gulag is closed, and any time you’re eliminated, you redeploy after a short respawn timer, providing you have teammates who are still battling across the island!
New Game Mode: Rebirth Resurgence Loaded (Mid-Season)
Available on: Rebirth Island (Player Count: 44).
Ditch the ground loot in matches of Resurgence and bring in your preferred Loadout and custom equipment, meaning all players come fully locked and loaded right from the start of the match. If you’re taken out during a match, you redeploy using the same Resurgence rules, but with the possibility of changing to another of your custom Loadouts. If you’re out of ammo or equipment, the higher ratio of legendary and reusable loot boxes means you’re never far from a fully kitted out Operator!
New Game Mode: Rebirth Lockdown (Mid-Season)
Available on: Rebirth Island (Player Count: 28).
Lockdown comes to Rebirth Island with multiple squads tasked to capture and control zones across the map, scoring points for each zone successfully held, like a large-scale Battle Royale version of Hardpoint. Total player count is adjusted due to the smaller nature of the map, allowing for balanced but chaotic combat: Drop in with your favorite Custom Loadout — or bring a new weapon you want to quickly level up — and learn the new rotations so your team occupies as many zones as possible, accruing more points to ensure victory, rather than being the last squad standing. Respawns are active, and toward the end of a match, so are High-Value Zones that offer the chance for greater point acquisition!
New Public Event: Rebirth Infil Strikes (In-Season)
Available on: Rebirth Island.
Rebirth Island has numerous landmarks, but what if one of those locations was leveled by an airstrike, just prior to infil? Keep your wits about you and learn new tactical movement across the rubble-filled scenery, should an Infil Strike occur during a match. These explosive infil elements occur rarely and randomly adding new gameplay experiences to that match.
On certain drops, prepare to adjust your drop point and dynamic movement around a particular point of interest, as these Infil Strikes destroy one of the following:
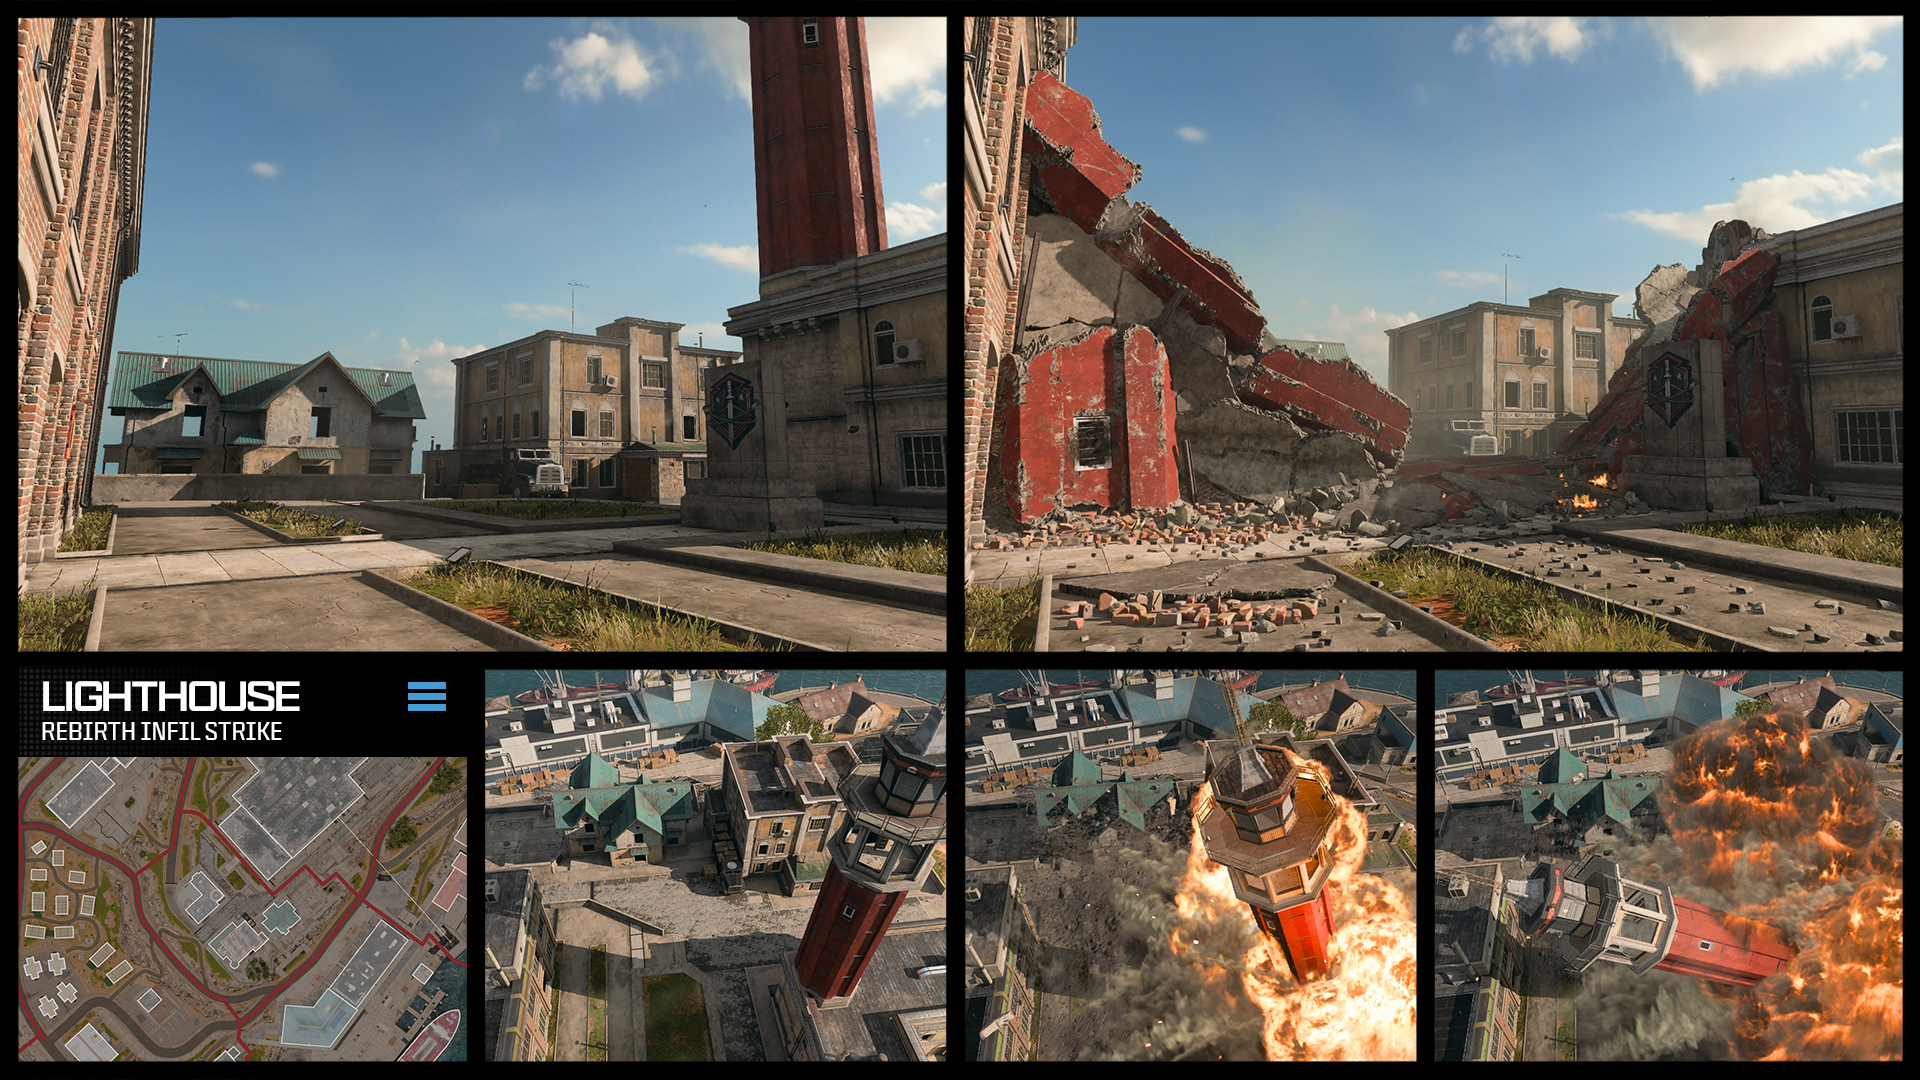
Lighthouse Disintegration: The lighthouse tower at Headquarters topples into the forecourt and the corner of Prison below, creating rubble ramps to the adjacent building and Prison.
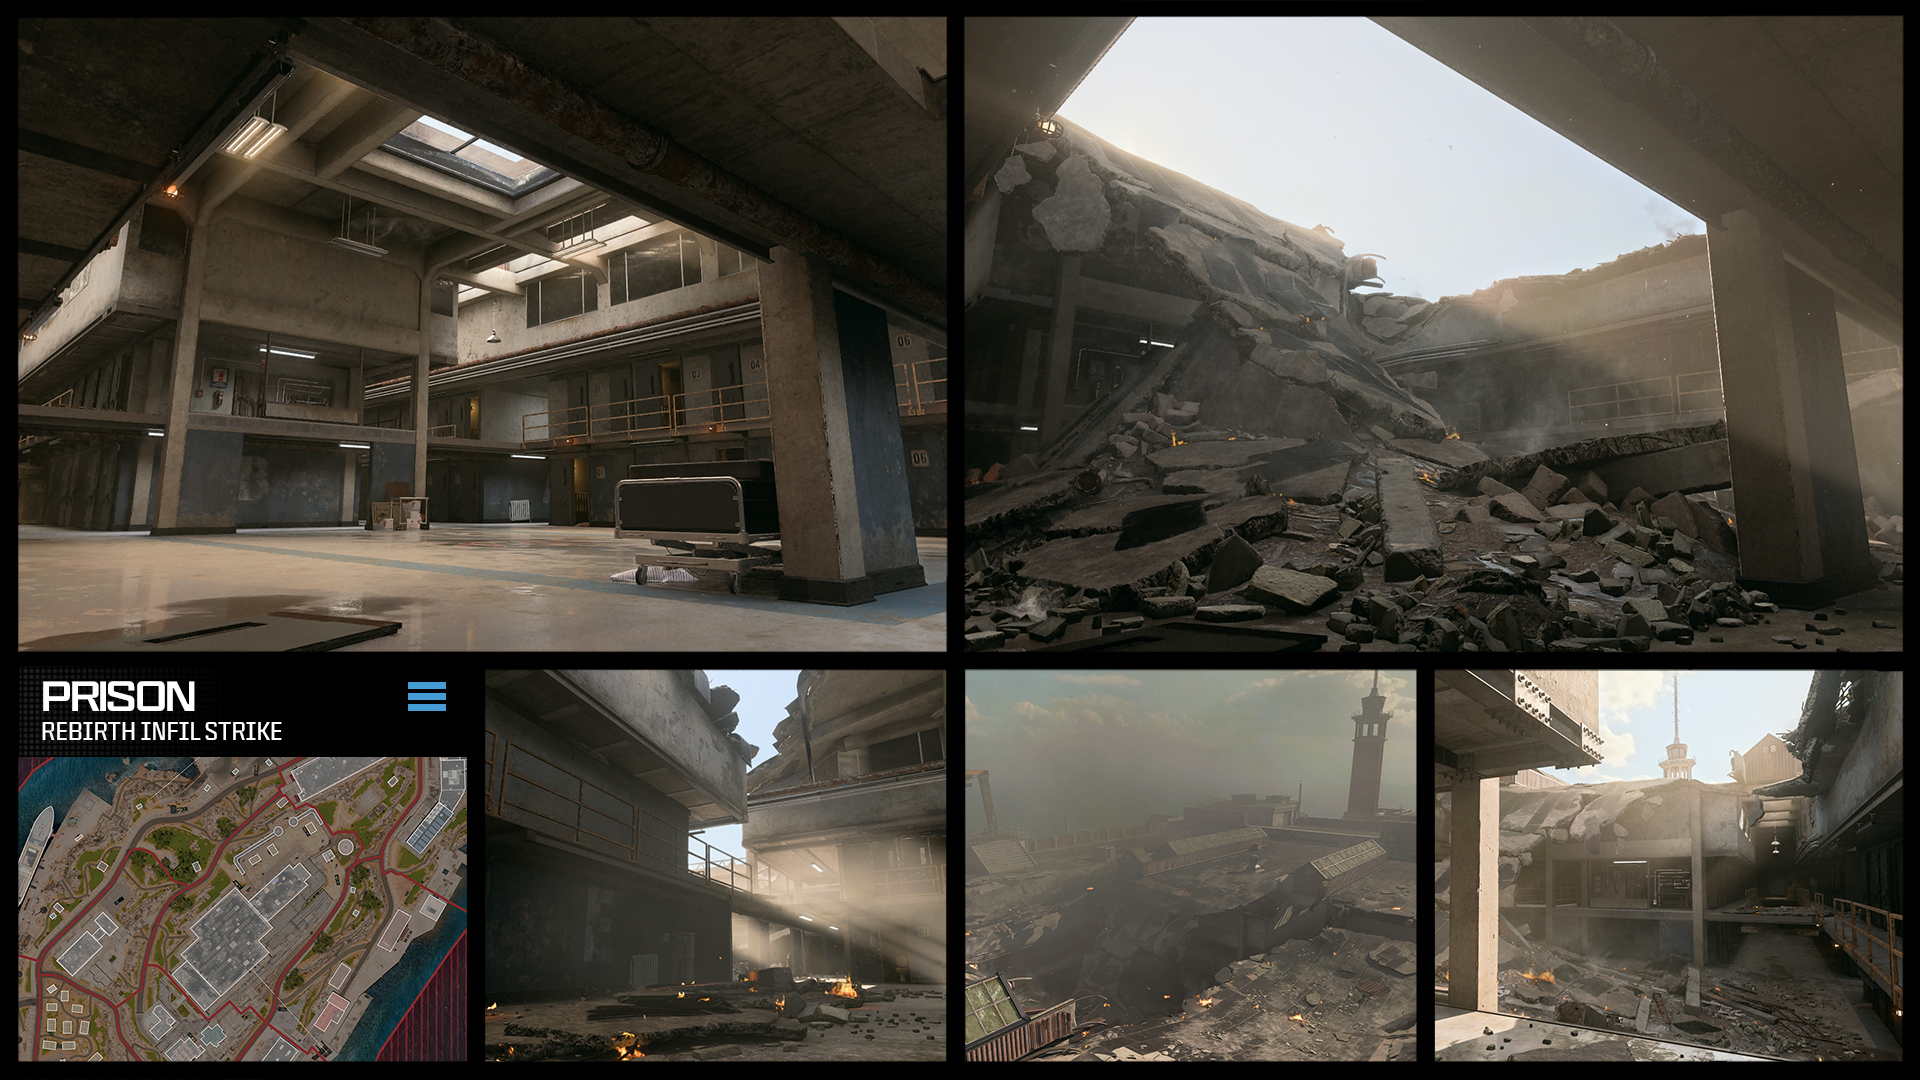
Prison Roof Collapse: An aerial bombardment creates a large plume of smoke and a massive fracture across the Prison roof, with numerous small fires and rubble piles inside the now-visible interior.
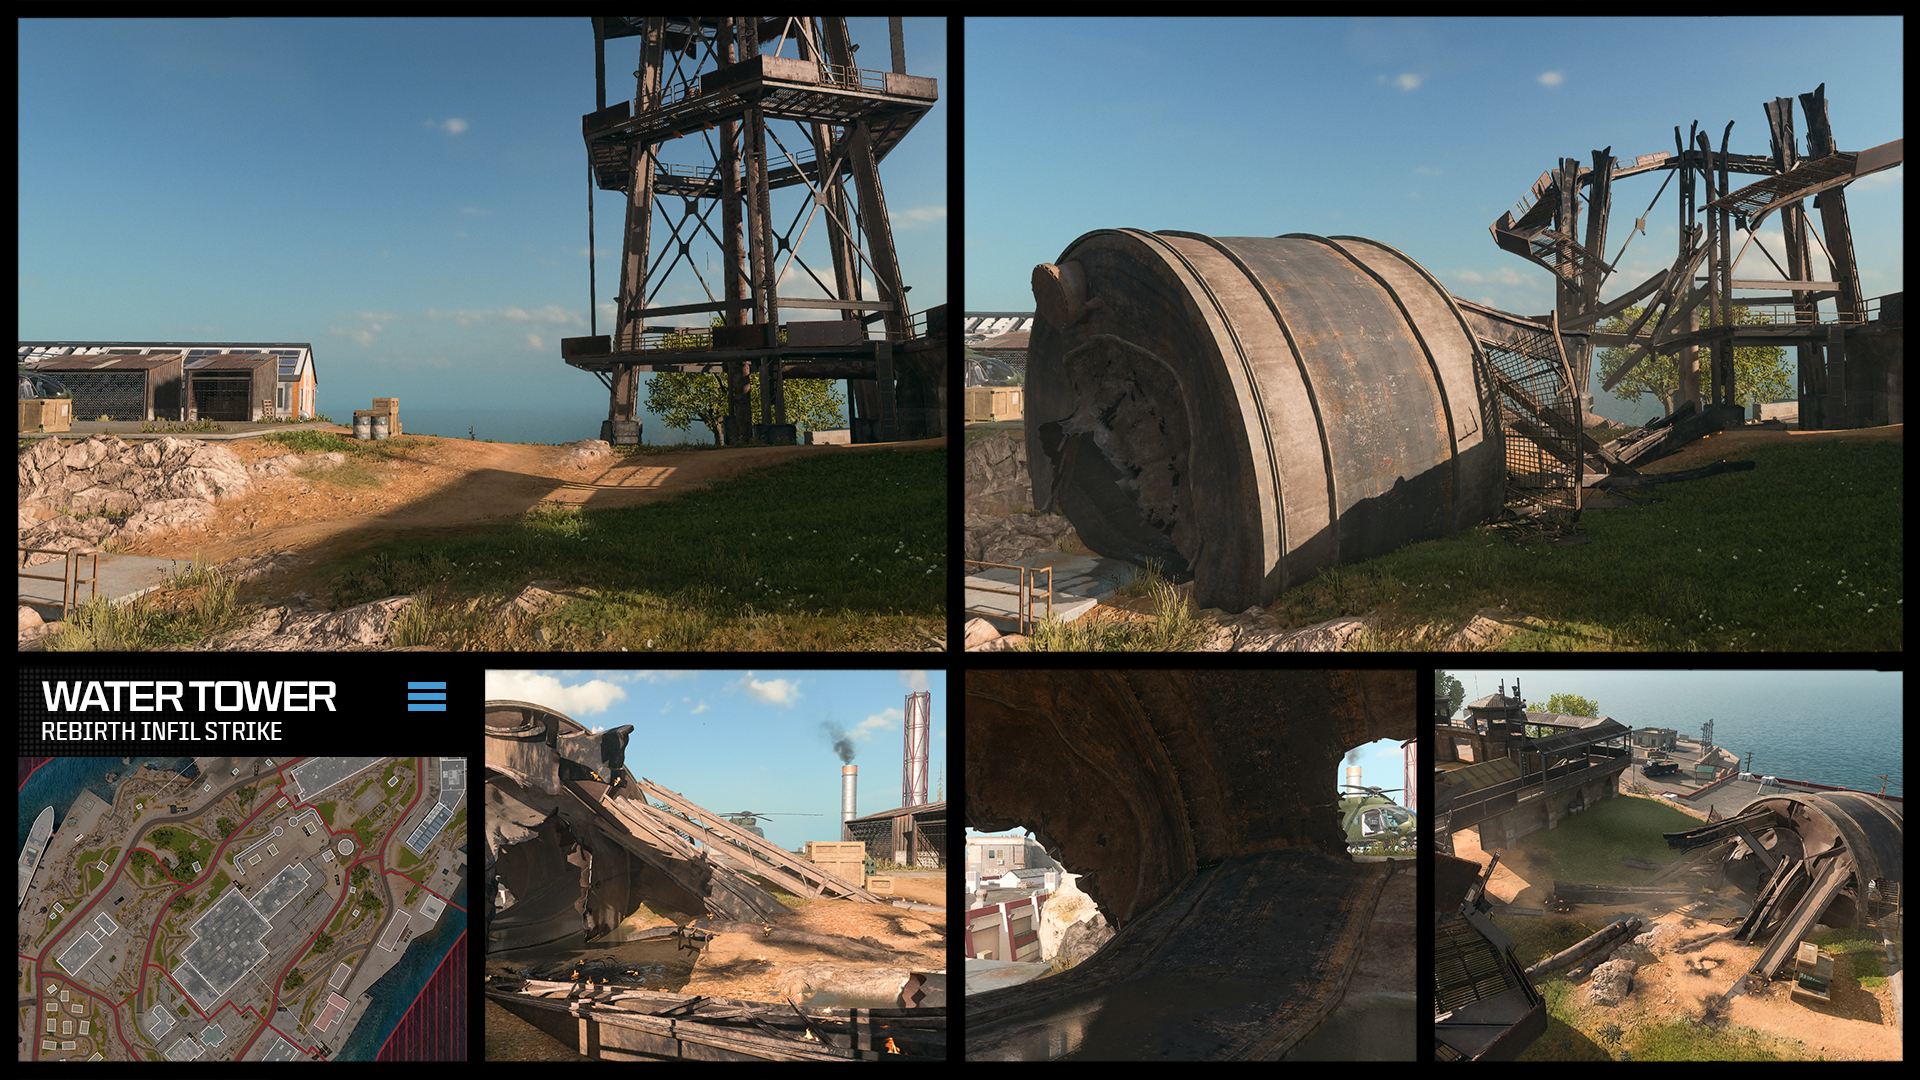
Water Tower Wreckage: Missiles strike the tower’s central platform, and it crashes down into the plateau close to the helipad. A mass of mangled steel, the tank is ripped open in several places.
New Public Event: Gulag: Climb and Punishment (Launch)
Available on: Battle Royale — Urzikstan, Vondel (Gulag, Player Count: 2).
A duel to the death isn’t the only option if you find yourself in a Gulag during a Battle Royale; if this public event is announced at the start of your Gulag confrontation, it’s worth keeping your comms on and negotiating with your opponent. Two ladders will drop from the roof, providing an easy escape route, and it’s up to you both to trust each other and ascend to redeployment. Or you can engage in combat as normal and ignore the ladders or pretend to agree to escaping and then double-cross a well-meaning rival during their climb. . . .
New Public Event: Heavy Armor (Mid-Season)
Available on: Rebirth Resurgence Modes.
Announced during infil, if this public event is activated, it allows you some added protection, enabling the equipping of an additional Armor Plate for the duration of the match. The extra plate slot is visible above your health bar where plate information is normally seen:
- This increases your Operator’s Armor Hit Points from 150 to 200.
- The extra plate slot is applied no matter the plate carrier type you have equipped (standard 3-plate, Communications Vest, Medic Vest, Stealth Vest, or Tempered Plate Carrier).
- You begin the match with an additional plate equipped.
- Except for the Tempered Plate Carrier, you have four filled plates at the start of a match. 200 Health, 50 Health per plate.
- The Tempered Plate Carrier, if equipped, has three plates, with the third one partially filled at the start of a match. A full Tempered Plate Carrier has 200 Health, 66.7 Health per plate.
Adjust your tactics accordingly, as this Public Event allows you to last longer between re-plating and lengthens the TTK and ammo expenditure when downing foes.
New Mission Contract: Spy Drones (Launch)
Available on: Rebirth Island.
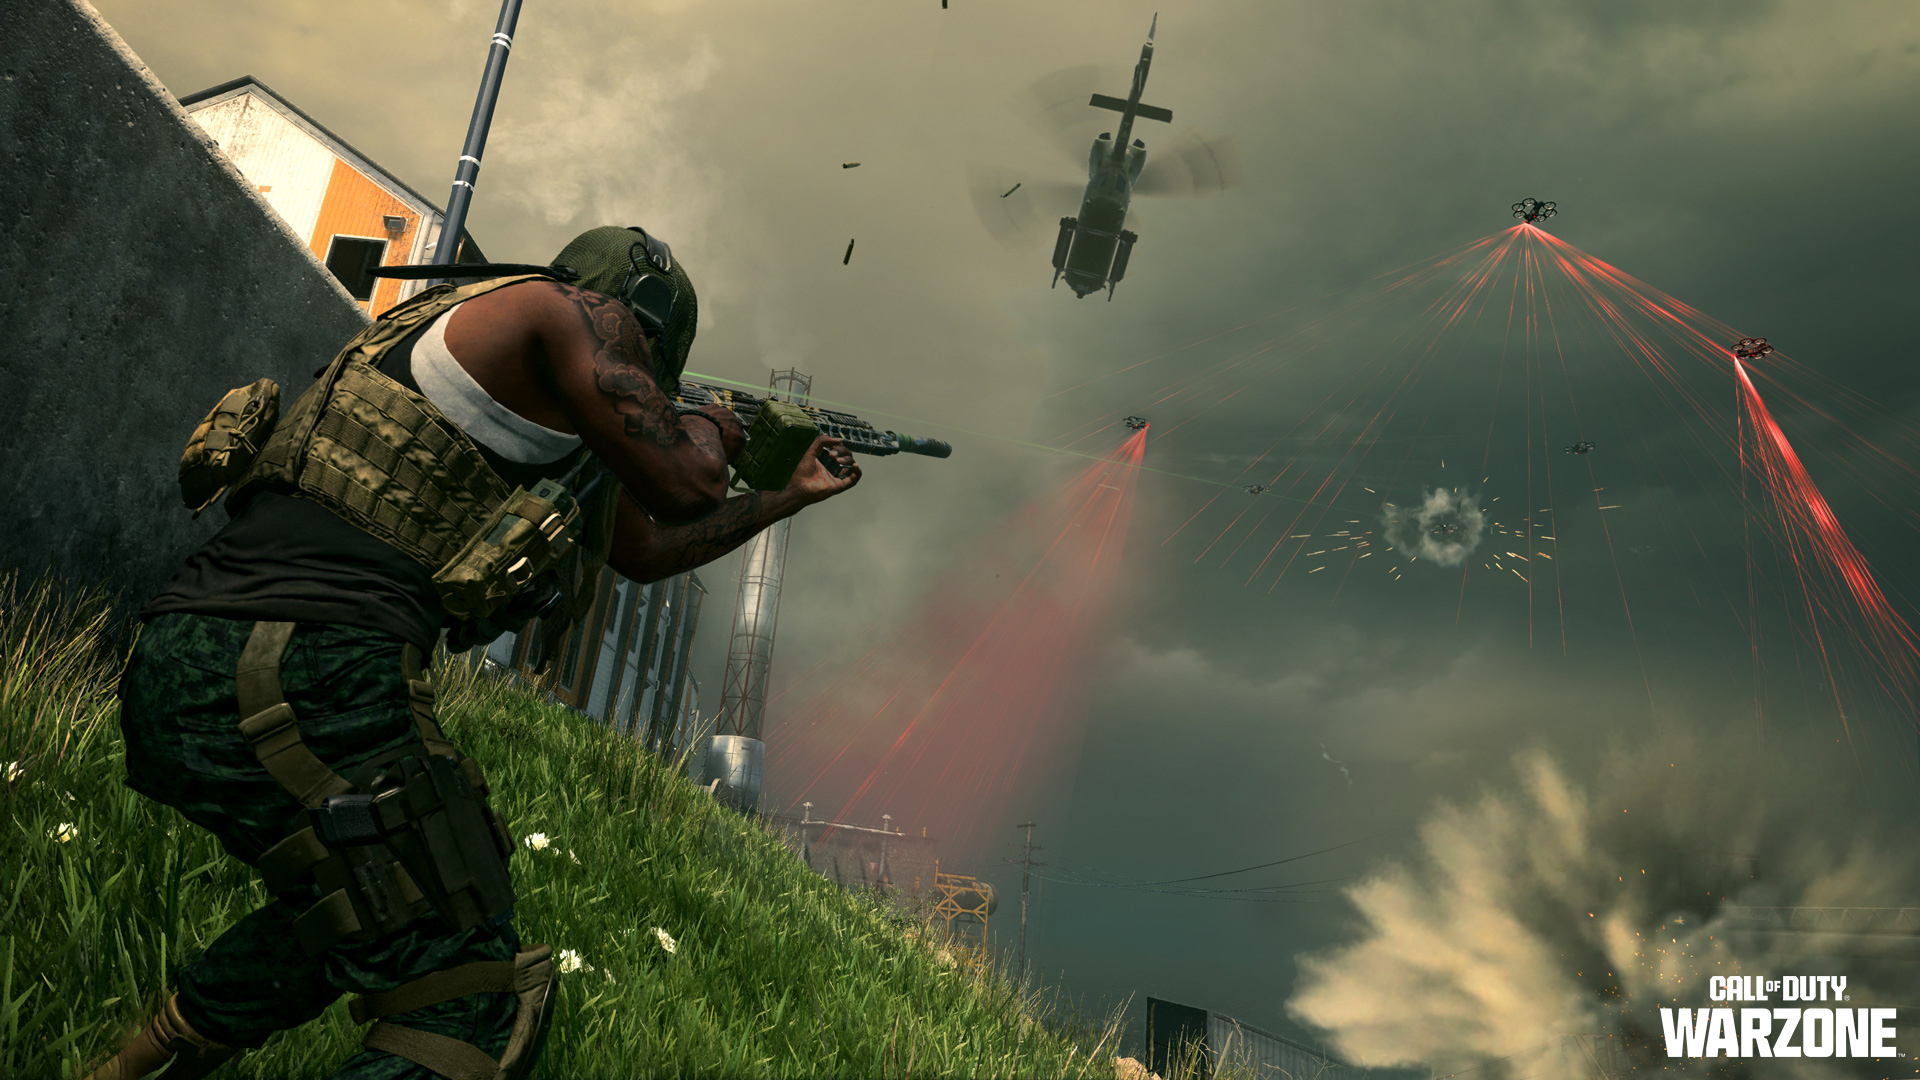
Confirmation that spy drones of unknown origin have been observed within the area of operations has resulted in a new Contract to undertake. You and your squad are to locate the drones, which appear to be gathering data at a specific destination. Head to the rendezvous point, and immediately destroy them. Expect additional rewards for neutralizing the swarm in rapid succession, and ensure you inspect the vicinity for dropped Armor Plates, Redeploy Drones, and possibly an Advanced UAV. Fair warning: Enemy Operators active in the area can steal these rewards if they reach the designated Drone zone before your team does.
New Mission Contract: Resurgence Champion’s Quest (Launch)
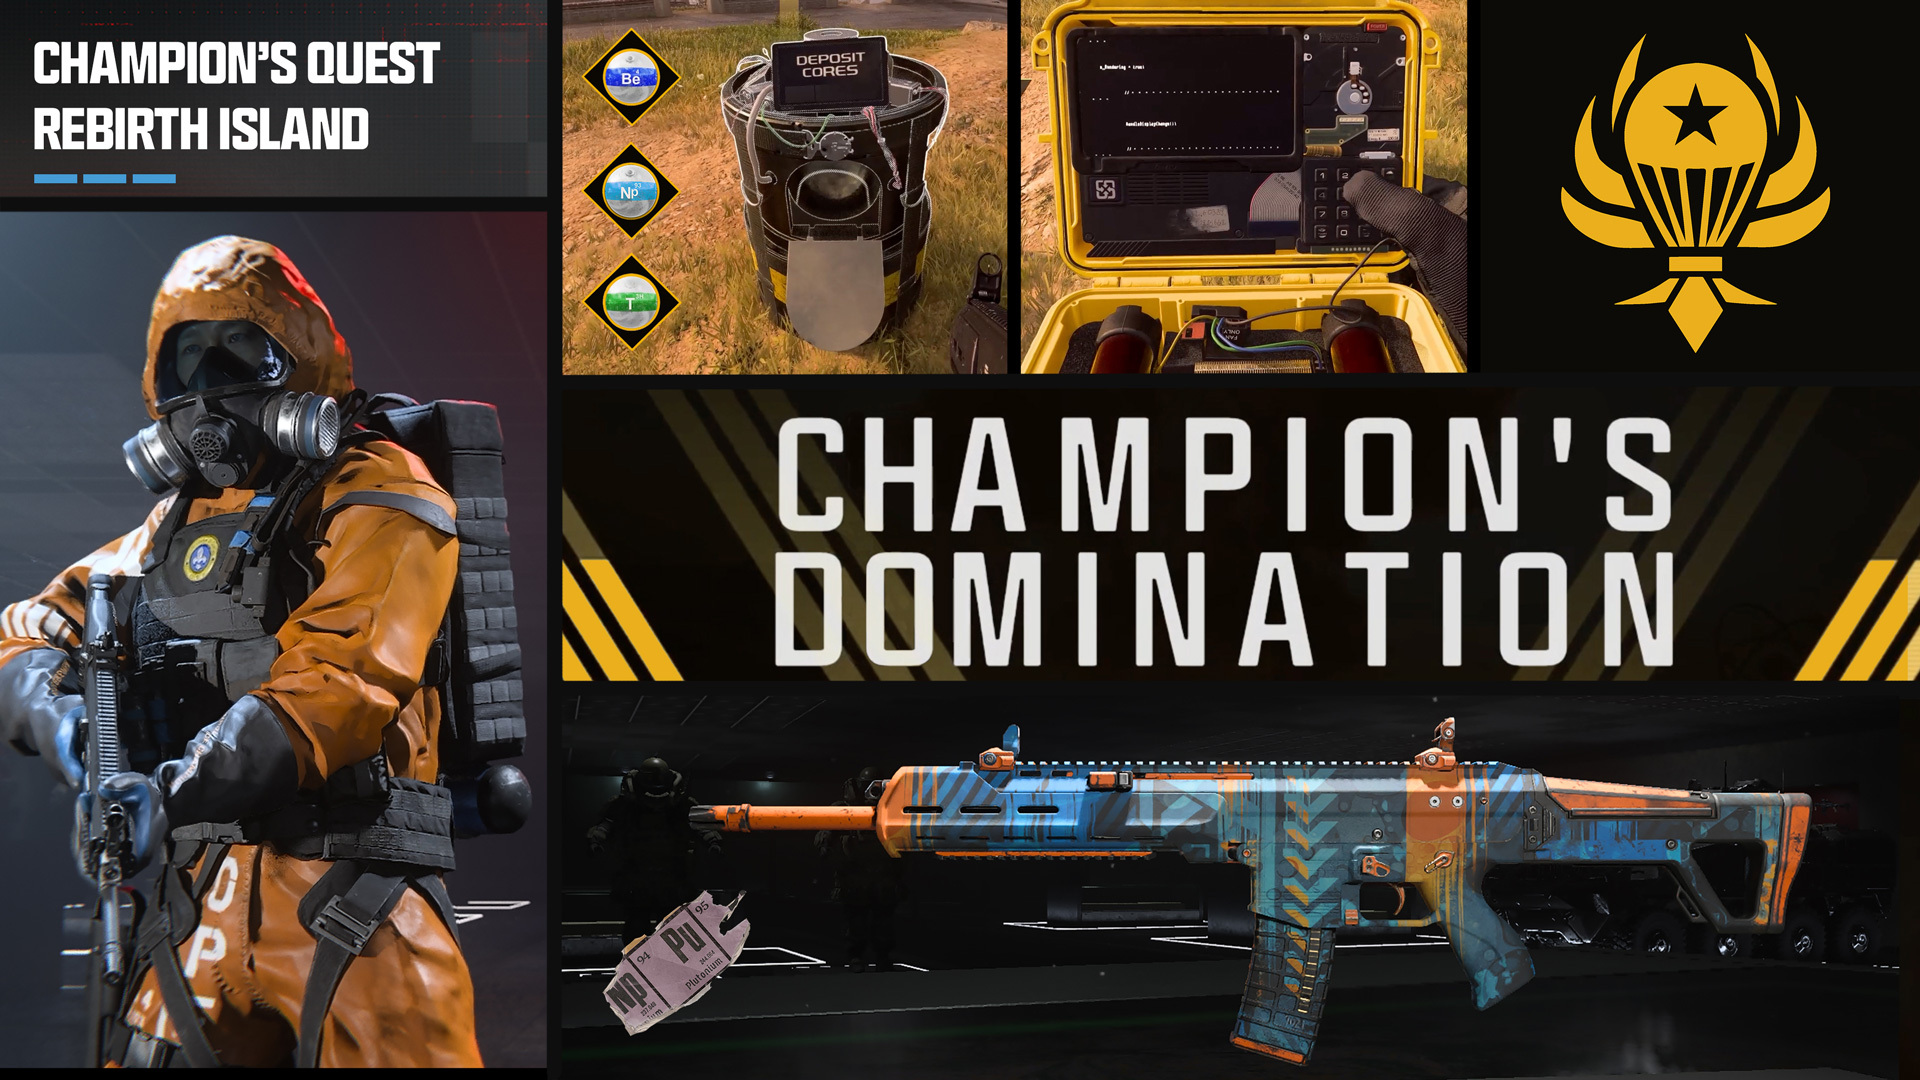
Available on: Rebirth Island.
The ultimate contract mission is confirmed to be active on Rebirth Island once a certain number of consecutive wins, or a total number of wins, are achieved. Bring a game plan and some competent cohorts with you while you wait for, locate, and then defend three elements necessary to create an impressively explosive finale, and achieve complete domination over your enemies. Expect a variety of rewards, including an Animated Calling Card, Charm, Sticker, Weapon Camo, and Operator Skin for those elite enough to complete the quest.
Call of Duty: Warzone New and Returning Features
New Equipment (Field Upgrade): Squad Rage (Launch)
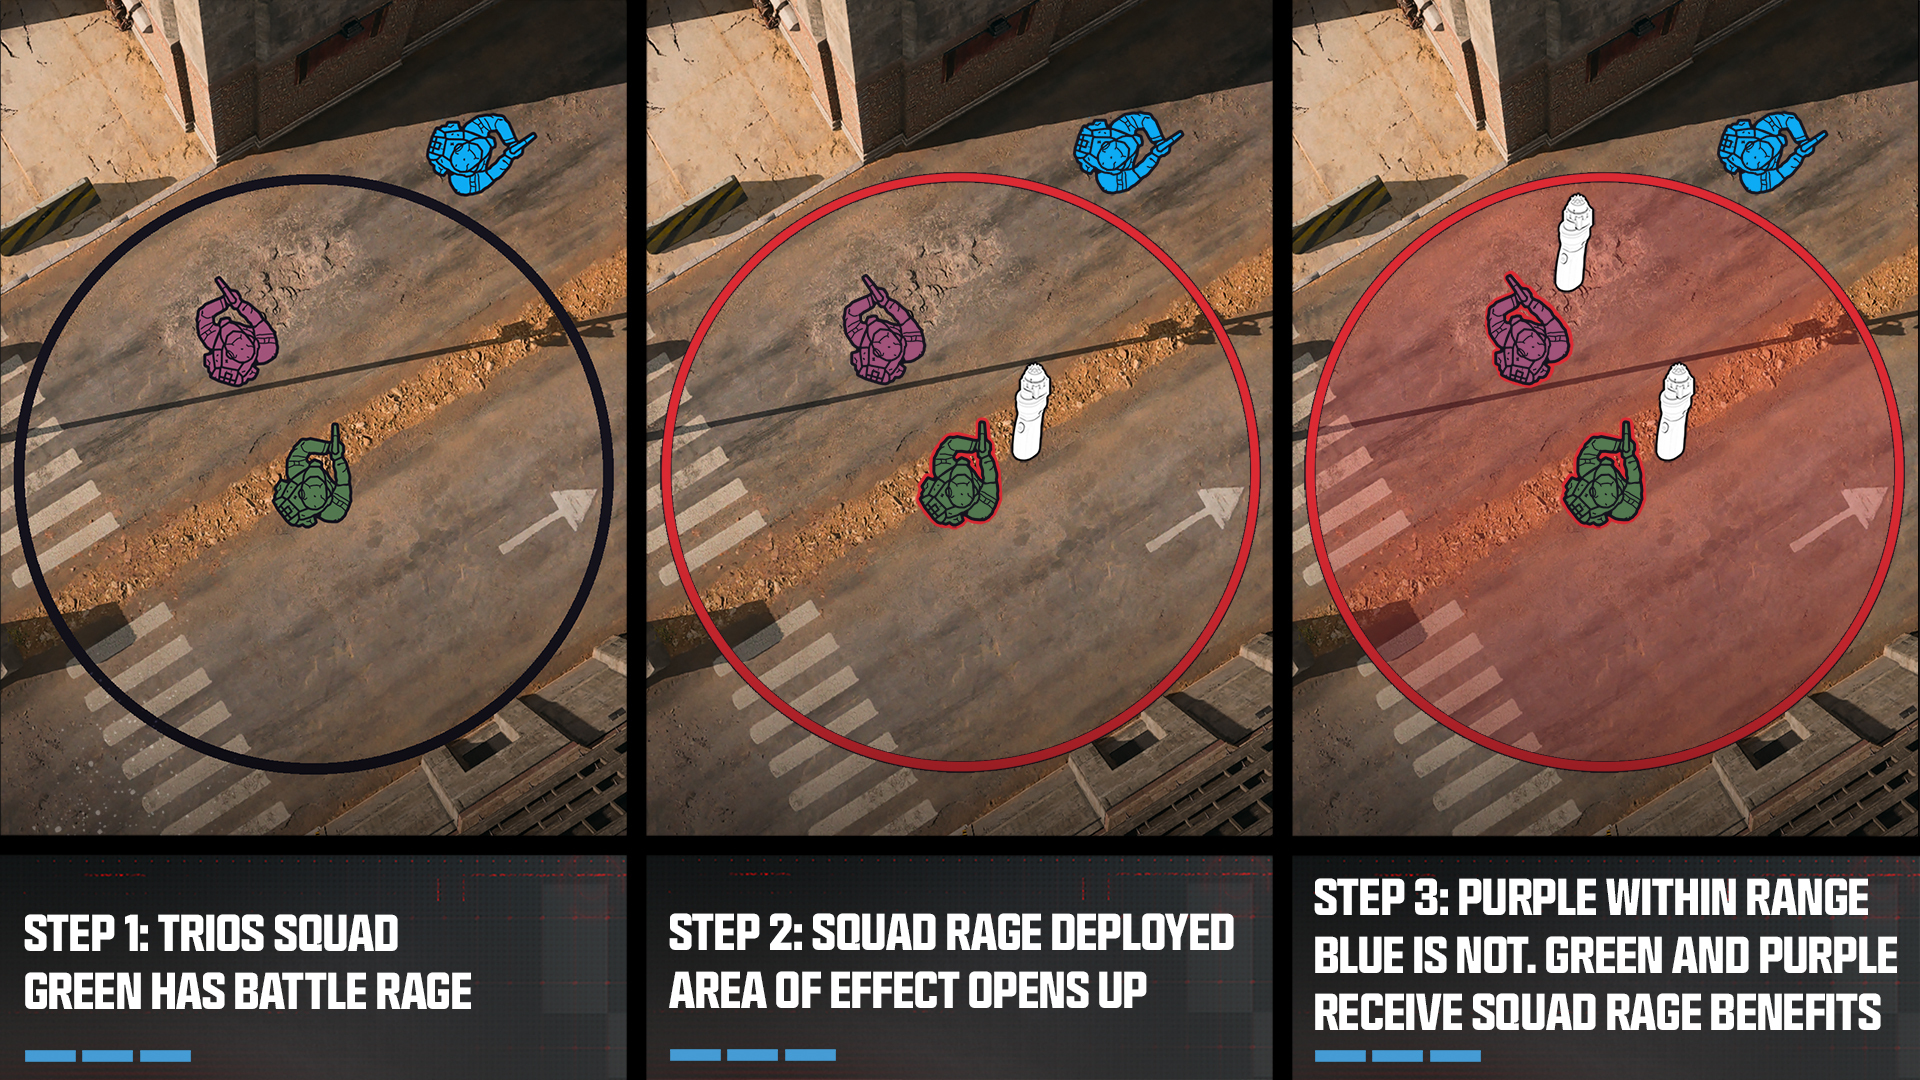
Available on: Rebirth Island.
Locate an enhanced version of the Battle Rage Field Upgrade by looting or purchasing at a Buy Station, and then huff the mask to your tactical advantage! Once active, Squad Rage vaporizes any gas within the radius of effect surrounding the user and grants Battle Rage to both you and any teammate standing within that radius. Stave off the gas, resist the effects of enemy Tacticals, and utilize the infinite Tactical Sprint, increased Health, and regeneration for the duration of the Rage. Weigh these advantages with keeping your crew close enough for everyone to gain these possibly match-winning benefits.
New Equipment (Field Upgrade): Utility Box (Mid-Season)
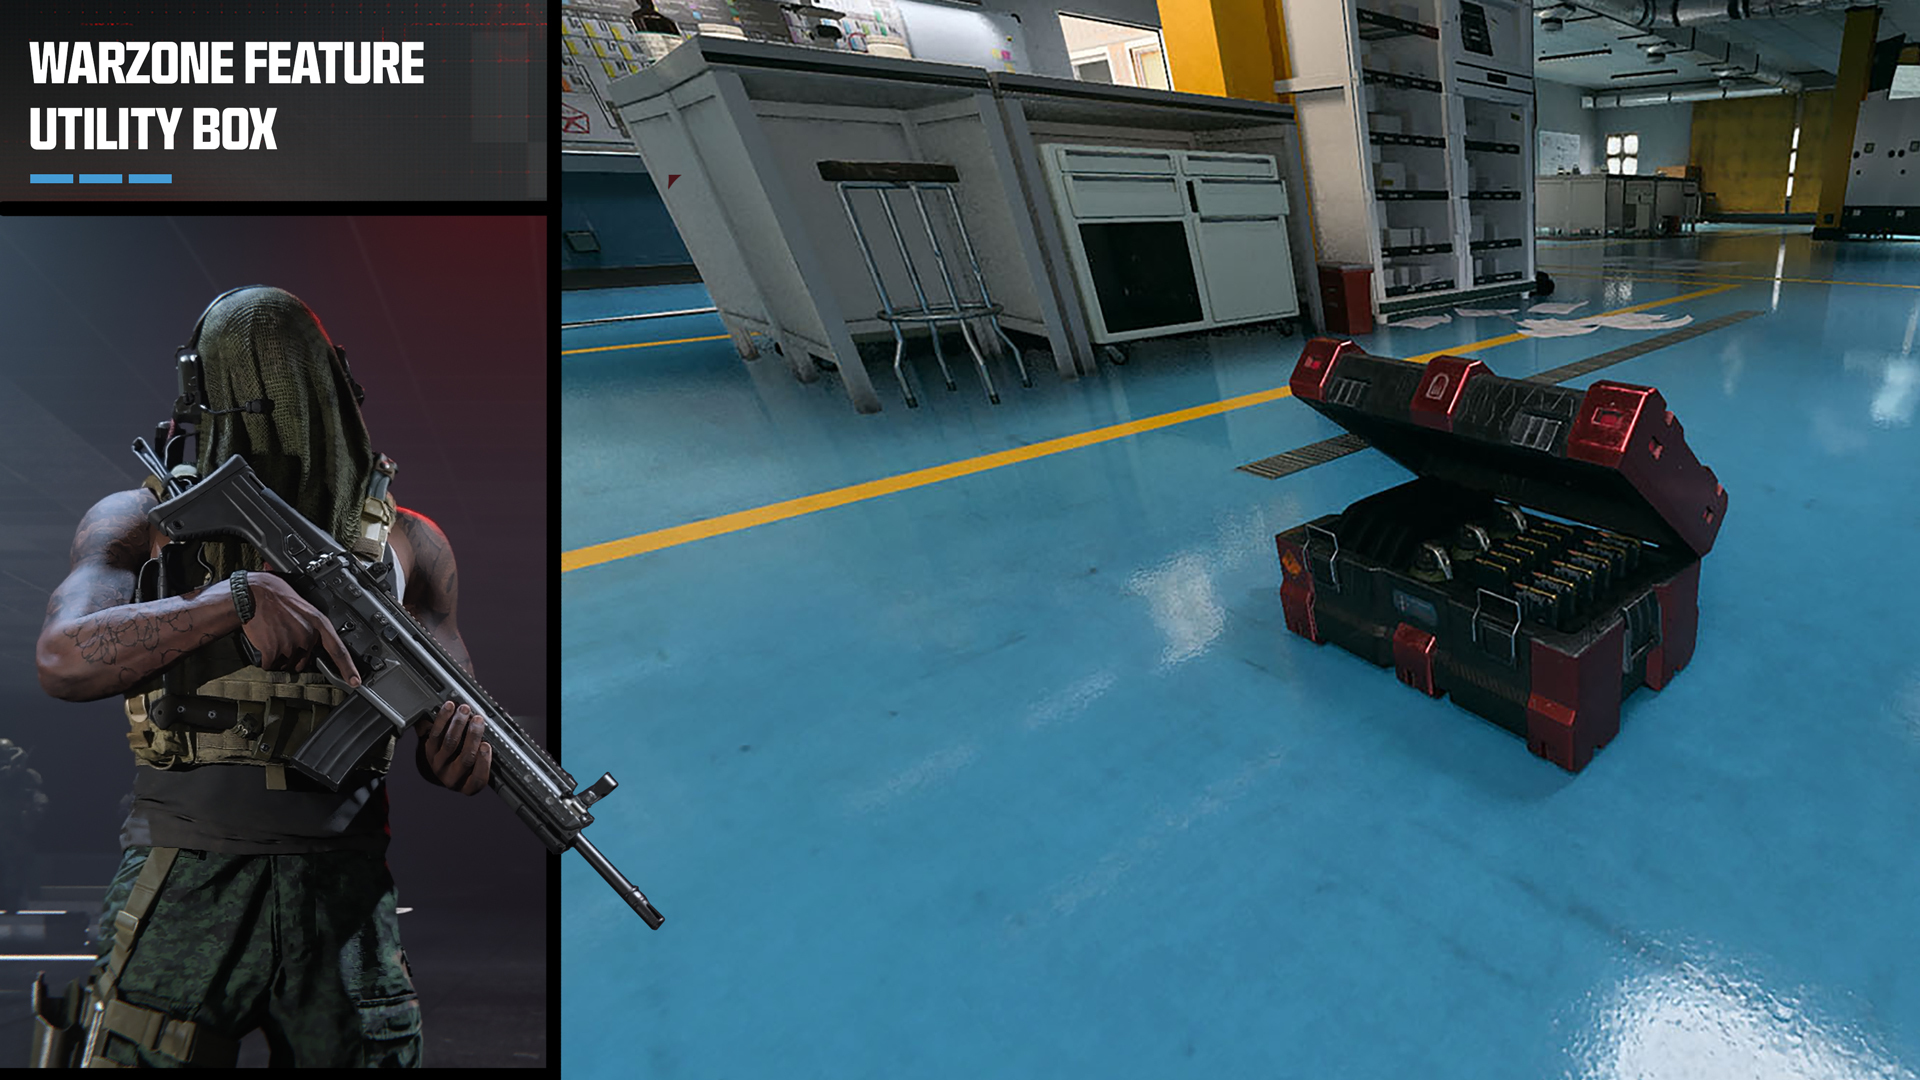
Available on: Rebirth Island.
Running low on both armor and ammunition? Only got one inventory space to carry a resupply box? Then you may want to invest in a Utility Box! Available as rare ground loot or to purchase from a Buy Station, the Utility Box combines the utility of the Armor and Munitions Boxes into one, refilling the ammo of your weapons, your Tacticals and Lethals, and your Armor Plates to maximum capacity. Any extraneous equipment will be dropped for your teammates to use, and the Utility Box functions as a resupply for your squad as well.
New Equipment (Killstreak): Foresight (In-Season)
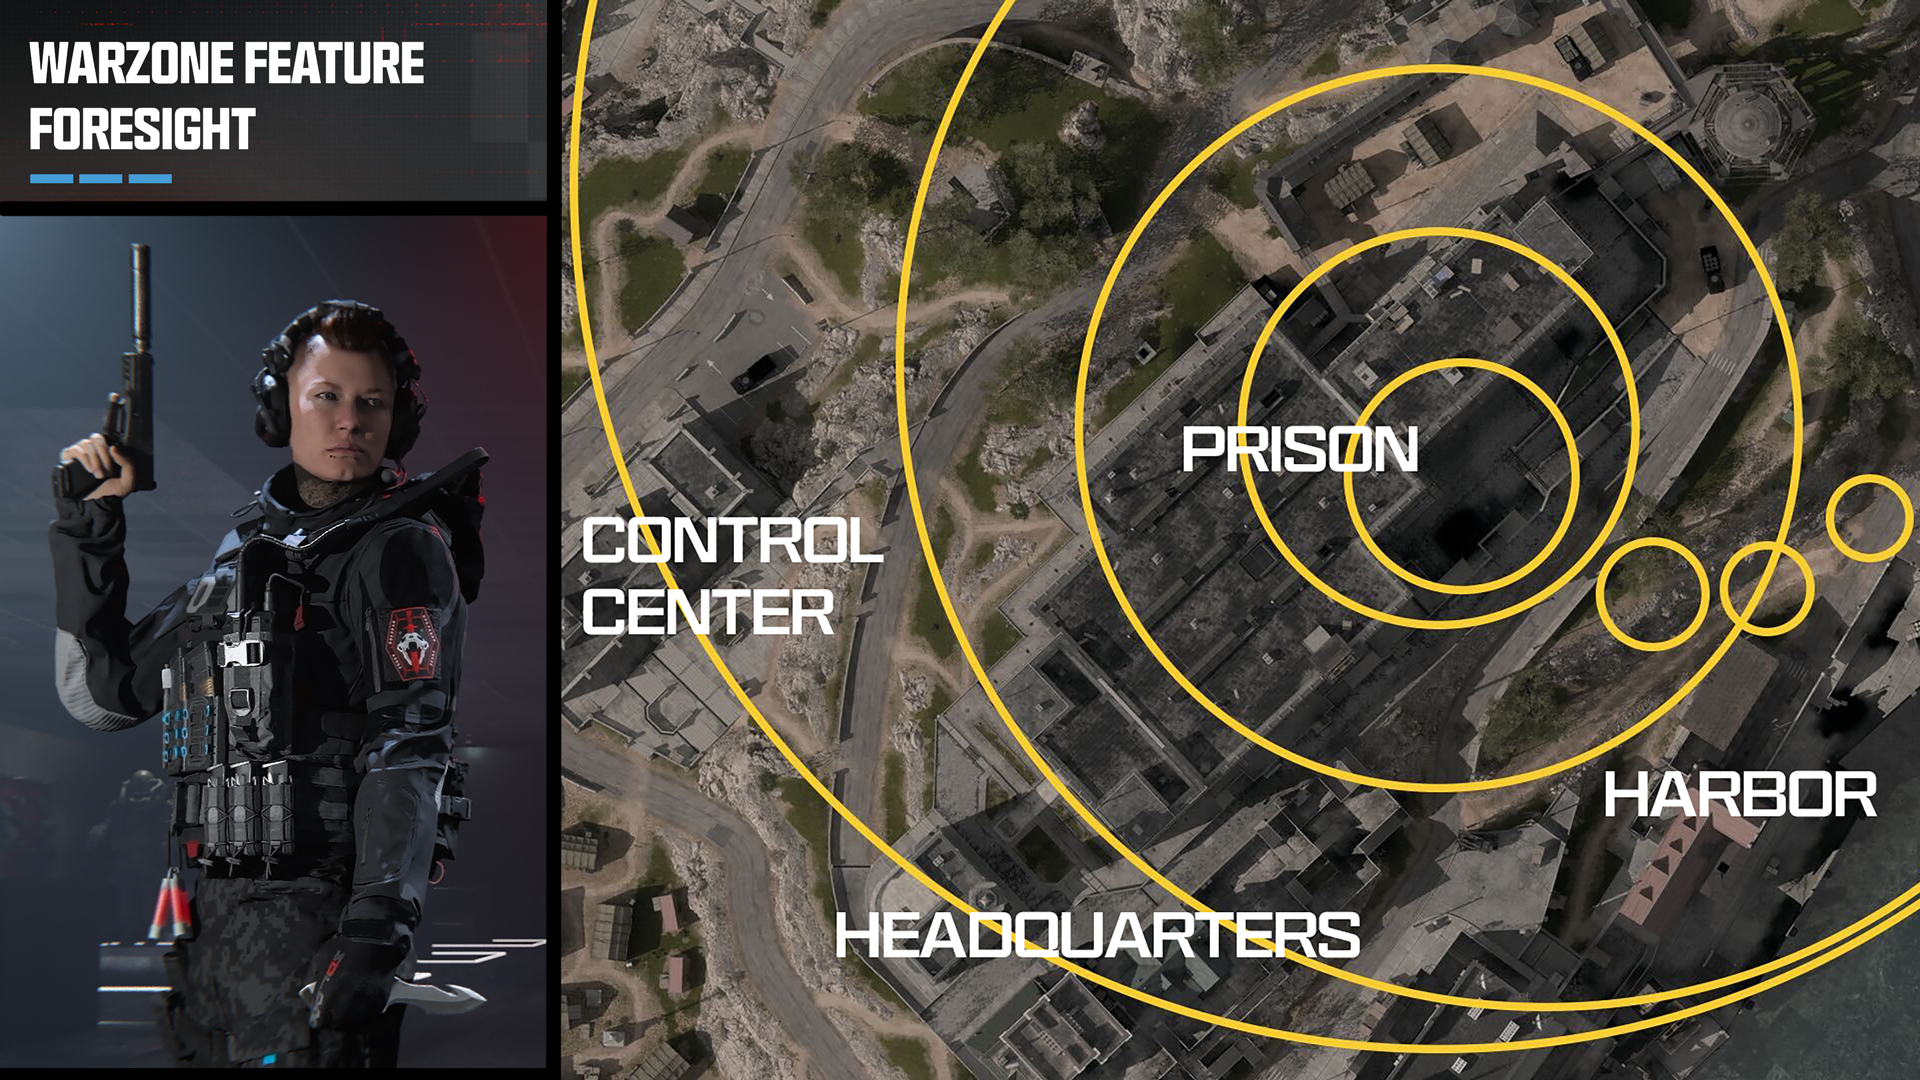
Available on: Rebirth Island.
To be forewarned is to be forearmed, and for those wanting a less bombastic Killstreak, Foresight can offer incredible insight regarding the future of your match! Returning from the original Call of Duty: Warzone, Foresight was last available at a Containment Monitor Station and in the Black Market. For Season 3, Foresight becomes a Killstreak, a piece of rare loot, purchasable at a Buy Station, or found on the corpse of a fallen foe. Foresight shows you the location of every future gas circle, so you’ll know where the game ends. Plan your tactics accordingly!
Returning Equipment (Perk Package): Specialist (In-Season)

Available on: Rebirth Island.
It’s back! The most prized Perk possession in all of Call of Duty: Warzone returns! This hexagon of omnipotence may be incredibly difficult to discover — in fact, it’s only very rarely found at a [[REDACTED]] or in specific [[REDACTED]] — but its effectiveness cannot be understated. Once found, this grants you every applicable Perk in the game and continues to function even if you subsequently access your Loadout Drop with your chosen Perks. In addition to the default Perks available to all Operators (Tac Pads, Commando Gloves, Quick-Grip Gloves, Climbing Boots, and Overkill), Specialist grants you the advantages of the following 29 additional Perks, but only for the remainder of the match:
Perk Slots 1 and 2 (all Perks active): Battle Hardened, Double Time, E.O.D., Focus, Irradiated, Mechanic, Mountaineer, Scavenger, Shrapnel, Sleight of Hand, Spotter, Strong Arm.
Perk Slot 3 (all Perks active): Cold-Blooded, Escapist, Payout, Primed, Quick Fix, Resupply, Stalker, Survivor, Tempered, Tracker.
Perk Slot 4 (all Perks active): Birdseye, Combat Scout, Flex, Ghost, High Alert, Resolute, Shrouded.
Updated Movement: Aquatic Gameplay Comes to Rebirth Island! (Launch)
Available on: Rebirth Island.
The last time Operators descended on Rebirth Island, the ocean was very much out of bounds. Not so in Season 3, as a variety of watercraft and the ability to swim are available to any player wanting to get their feet wet. There are now new ways to traverse land and sea, including waterlogged tunnels and even a flooded bunker to explore.
New Feature: Biometrics Scanner (Launch)
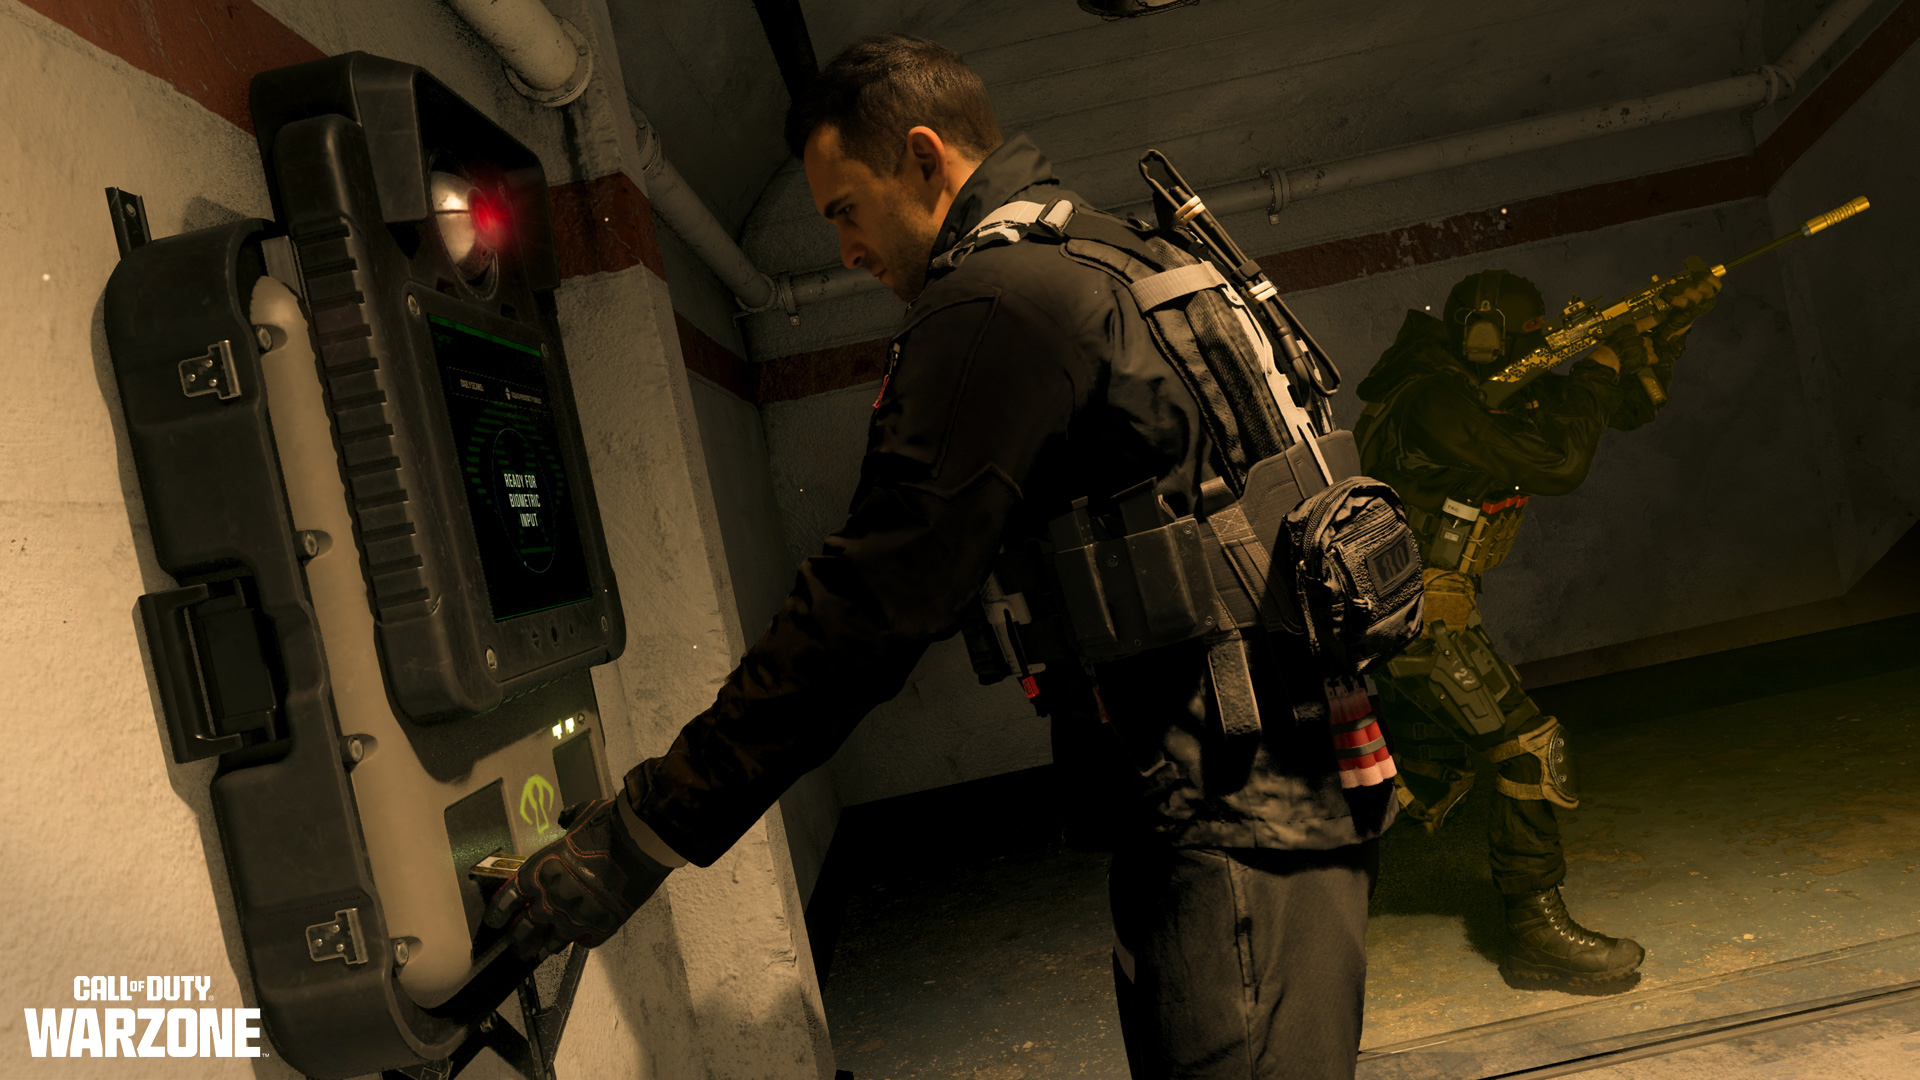
Available on: Rebirth Island.
Dotted around Rebirth Island’s communications facilities is a series of 10 Biometric Scanners, terminals that include biometric scanning capabilities. Once per match where these Scanners are active, you can approach a Biometrics Scanner and check your statistics. The Scanner produces a Keycard based on your identity (placed directly into your Backpack), along with an XP reward. Inspect the Keycard, and you’ll see it contains your Operator name, Clan Tag, and Access Level.
Keycards: These take up a slot in your Backpack, can be dropped or looted, and can unlock a special menu in any Rebirth Island Buy Station for the duration of the remaining match.
Keycard Rarity: There are six different rarities of Keycard:
Bronze (common)
Silver (relatively common)
Gold (uncommon)
Platinum (rare)
Polyatomic (very rare)
Orion (incredibly rare)
The percentage chance of receiving a specific rarity is [[REDACTED]], but your chances improve if a squadmate is close by during a scan, or if you repeat the scanning process in the next few days.
Buy Station Access and In-Match Rewards: Bring your Keycard, or one you’ve looted from the corpse of a foe to any Rebirth Island Buy Station, and a special Keycard menu will be accessible, based on the highest card you have in your possession. General examples of expected items from each Keycard menu are as follows (with any Equipment and Perks selected from your favorite Loadout):
Bronze: Random ammunition, Cash ($), Armor Plates, Lethals, and Tacticals.
Silver: Random ammunition, Cash ($$), Armor Plates, Lethals, Tacticals, Perk Package.
Gold: Random ammunition, Cash ($$$), Armor Plates, Lethals, Tacticals, Perk Package, Plate Carrier, Field Upgrade.
Platinum: Random ammunition, Cash ($$$$), Armor Plates, Lethals, Tacticals, Perk Package, Plate Carrier, Field Upgrade, Killstreak.
Polyatomic: [[REDACTED]] free equipment selects at the Buy Station, [[REDACTED]] Weapon.
Orion: [[REDACTED]] free equipment selects at the Buy Station, [[REDACTED]] Weapons, additional [[RECACTED]].
Additional and Permanent In-Game Rewards: There is growing evidence that returning to a Biometric Scanner on subsequent but nonconsecutive visits may unlock a variety of additional assets — including camouflage for your armaments — as well as communications deemed “Most Secret.” No further details have been authorized.
© 2024 Activision Publishing, Inc. ACTIVISION, CALL OF DUTY, CALL OF DUTY WARZONE, MODERN WARFARE, and CALL OF DUTY LEAGUE are trademarks of Activision Publishing, Inc. All other trademarks and trade names are the property of their respective owners.
For more information, please visit http://www.callofduty.com/ and http://www.youtube.com/callofduty, and follow @Activision and @CallofDuty on X (formerly Twitter), Instagram, and Facebook. For Call of Duty Updates, follow @CODUpdates on X (formerly Twitter).
©2024 Legendary. All Rights Reserved.
TM & ©TOHO CO., LTD.
MONSTERVERSE TM & ©Legendary